Chapter 9. Public and private software distribution
This chapter covers
- Choosing a project distribution method
- Using hosted infrastructure
- Running and using your own registry
- Understanding manual image distribution workflows
- Distributing image sources
You have your own images of software you’ve written, customized, or just pulled from the internet. But what good is an image if nobody can install it? Docker is different from other container management tools because it provides image distribution features.
There are several ways to get your images out to the world. This chapter explores those distribution paradigms and provides a framework for making or choosing one or more for your own projects.
Hosted registries offer both public and private repositories with automated build tools. By contrast, running a private registry lets you hide and customize your image distribution infrastructure. Heavier customization of a distribution workflow might require you to abandon the Docker image distribution facilities and build your own. Some systems might abandon the image as the distribution unit altogether and distribute the source files for images instead. This chapter will teach you how to select and use a method for distributing your images to the world or just at work.
9.1. Choosing a distribution method
The most difficult thing about choosing a distribution method is choosing the appropriate method for your situation. To help with this problem, each method presented in this chapter is examined on the same set of selection criteria.
The first thing to recognize about distributing software with Docker is that there’s no universal solution. Distribution requirements vary for many reasons, and several methods are available. Every method has Docker tools at its core, so it’s always possible to migrate from one to another with minimal effort. The best way to start is by examining the full spectrum of options at a high level.
9.1.1. A distribution spectrum
The image distribution spectrum offers many methods with differing levels of flexibility and complexity. The methods that provide the most flexibility can be the most complicated to use, whereas those that are the simplest to use are generally the most restrictive. Figure 9.1 shows the full spectrum.
Figure 9.1. The image distribution spectrum
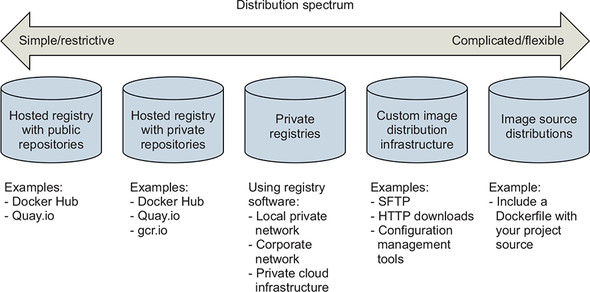
The methods included in the spectrum range from hosted registries such as Docker Hub to totally custom distribution architectures or source-distribution methods. We cover some of these subjects in more detail than others. We also place particular focus on private registries because they provide the most balance between the two concerns.
Having a spectrum of choices illustrates your range of options, but you need a consistent set of selection criteria in order to determine which you should use.
9.1.2. Selection criteria
Choosing the best distribution method for your needs may seem daunting with this many options. In situations like these, you should take the time to understand the options, identify criteria for making a selection, and avoid the urge to make a quick decision or settle.
The following identified selection criteria are based on differences across the spectrum and on common business concerns. When making a decision, consider how important each of these is in your situation:
- Cost
- Visibility
- Transport speed or bandwidth overhead
- Longevity control
- Availability control
- Access control
- Artifact integrity
- Artifact confidentiality
- Requisite expertise
How each distribution method stacks up against these criteria is covered in the relevant sections over the rest of this chapter.
Cost
Cost is the most obvious criterion, and the distribution spectrum ranges in cost from free to very expensive, and “it’s complicated.” Lower cost is generally better, but cost is typically the most flexible criterion. For example, most people will trade cost for artifact confidentiality if the situation calls for it.
Visibility
Visibility is the next most obvious criterion for a distribution method. Secret projects or internal tools should be difficult if not impossible for unauthorized people to discover. In another case, public works or open source projects should be as visible as possible to promote adoption.
Transportation
Transportation speed and bandwidth overhead are the next most flexible criteria. File sizes and image installation speed will vary between methods that leverage image layers, concurrent downloads, and prebuilt images and those that use flat image files or rely on deployment-time image builds. High transportation speeds or low installation latency is critical for systems that use just-in-time deployment to service synchronous requests. The opposite is true in development environments or asynchronous processing systems.
Longevity
Longevity control is a business concern more than a technical concern. Hosted distribution methods are subject to other people’s or companies’ business concerns. An executive faced with the option of using a hosted registry might ask, “What happens if they go out of business or pivot away from repository hosting?” The question reduces to, “Will the business needs of the third party change before ours?” If this is a concern for you, longevity control is important. Docker makes it simple to switch between methods, and other criteria such as requisite expertise or cost may trump this concern. For those reasons, longevity control is another of the more flexible criteria.
Availability
Availability control is the ability to control the resolution of availability issues with your repositories. Hosted solutions provide no availability control. Businesses typically provide a service-level agreement (SLA) on availability if you’re a paying customer, but there’s nothing you can do to directly resolve an issue. On the other end of the spectrum, private registries or custom solutions put both the control and responsibility in your hands.
Access control
Access control protects your images from modification or access by unauthorized parties. Varying degrees of access control are available. Some systems provide only access control of modifications to a specific repository, whereas others provide course control of entire registries. Still other systems may include pay walls or digital rights management controls. Projects typically have specific access-control needs dictated by the product or business. This makes access-control requirements one of the least flexible and most important to consider.
Integrity
Artifact integrity and confidentiality both fall in the less-flexible and more-technical end of the spectrum. Artifact integrity is trustworthiness and consistency of your files and images. Violations of integrity may include man-in-the-middle attacks, in which an attacker intercepts your image downloads and replaces the content with their own. They might also include malicious or hacked registries that lie about the payloads they return.
Confidentiality
Artifact confidentiality is a common requirement for companies developing trade secrets or proprietary software. For example, if you use Docker to distribute cryptographic material, confidentiality will be a major concern. Artifact integrity and confidentiality features vary across the spectrum. Overall, the out-of-the-box distribution security features won’t provide the tightest confidentiality or integrity. If that’s one of your needs, an information security professional will need to implement and review a solution.
Expertise
The last thing to consider when choosing a distribution method is the level of expertise required. Using hosted methods can be simple and requires little more than a mechanical understanding of the tools. Building custom image or image source-distribution pipelines requires expertise with a suite of related technologies. If you don’t have that expertise or don’t have access to someone who does, using more complicated solutions will be a challenge. In that case, you may be able to reconcile the gap at additional cost.
With this strong set of selection criteria, you can begin learning about and evaluating various distribution methods. The following sections evaluate these methods against the criteria by using ratings of Worst, Bad, Good, Better, and Best. The best place to start is on the far left of the spectrum with hosted registries.
9.2. Publishing with hosted registries
As a reminder, Docker registries are services that make repositories accessible to Docker pull commands. A registry hosts repositories. The simplest way to distribute your images is by using hosted registries.
A hosted registry is a Docker registry service that’s owned and operated by a third-party vendor. Docker Hub, Quay.io, and Google Container Registry are all examples of hosted registry providers. By default, Docker publishes to Docker Hub. Docker Hub and most other hosted registries provide both public and private registries, as shown in figure 9.2.
Figure 9.2. The simplest side of the distribution spectrum and the topic of this section

The example images used in this book are distributed with public repositories hosted on Docker Hub and Quay.io. By the end of this section, you’ll understand how to publish your own images by using hosted registries and how hosted registries measure up to the selection criteria.
9.2.1. Publishing with public repositories: “Hello World!” via Docker Hub
The simplest way to get started with public repositories on hosted registries is to push a repository that you own to Docker Hub. To do so, all you need is a Docker Hub account and an image to publish. If you haven’t done so already, sign up for a Docker Hub account now.
Once you have your account, you need to create an image to publish. Create a new Dockerfile named HelloWorld.df and add the following instructions:
FROM busybox:latest          1
CMD echo 'Hello World!'
- 1 From HelloWorld.df
Chapter 8 covers Dockerfile instructions. As a reminder, the FROM instruction tells the Docker image builder which existing image to start the new image from. The CMD instruction sets the default command for the new image. Containers created from this image will display Hello World! and exit. Build your new image with the following command:
docker image build \
    -t <insert Docker Hub username>/hello-dockerfile \      1
    -f HelloWorld.df \
    .
- 1 Insert your username.
Be sure to substitute your Docker Hub username in that command. Authorization to access and modify repositories is based on the username portion of the repository name on Docker Hub. If you create a repository with a username other than your own, you won’t be able to publish it.
Publishing images on Docker Hub with the docker command-line tool requires that you establish an authenticated session with that client. You can do that with the login command:
docker login
This command will prompt you for your username, email address, and password. Each of those can be passed to the command as arguments using the --username, --email, and --password flags. When you log in, the docker client maintains a map of your credentials for the different registries that you authenticate with in a file. It will specifically store your username and an authentication token, not your password.
You will be able to push your repository to the hosted registry after you’ve logged in. Use the docker push command to do so:
docker image push <insert Docker Hub username>/hello-dockerfile 1
- 1 Insert your username.
Running that command should create output like the following:
The push refers to a repository
[dockerinaction/hello-dockerfile] (len: 1)
7f6d4eb1f937: Image already exists
8c2e06607696: Image successfully pushed
6ce2e90b0bc7: Image successfully pushed
cf2616975b4a: Image successfully pushed
Digest:
  sha256:ef18de4b0ddf9ebd1cf5805fae1743181cbf3642f942cae8de7c5d4e375b1f20
The command output includes upload statuses and the resulting repository content digest. The push operation will create the repository on the remote registry, upload each of the new layers, and then create the appropriate tags.
Your public repository will be available to the world as soon as the push operation is completed. Verify that this is the case by searching for your username and your new repository. For example, use the following command to find the example owned by the dockerinaction user:
docker search dockerinaction
Replace the dockerinaction username with your own to find your new repository on Docker Hub. You can also log in to the Docker Hub website and view your repositories to find and modify your new repository.
Having distributed your first image with Docker Hub, you should consider how this method measures up to the selection criteria; see table 9.1.
Table 9.1. Performance of public hosted repositories
Public repositories on hosted registries are the best choice for owners of open source projects or people who are just getting started with Docker. People should still be skeptical of software that they download and run from the internet, so public repositories that don’t expose their sources can be difficult for some users to trust. Hosted (trusted) builds solve this problem to a certain extent.
9.2.2. Private hosted repositories
Private repositories are similar to public repositories from an operational and product perspective. Most registry providers offer both options, and any differences in provisioning through their websites will be minimal. Because the Docker registry API makes no distinction between the two types of repositories, registry providers that offer both generally require you to provision private registries through their website, app, or API.
The tools for working with private repositories are identical to those for working with public repositories, with one exception. Before you can use docker image pull or docker container run to install an image from a private repository, you need to authenticate with the registry where the repository is hosted. To do so, you use the docker login command just as you would if you were using docker image push to upload an image.
The following commands prompt you to authenticate with the registries provided by Docker Hub and Quay.io. After creating accounts and authenticating, you’ll have full access to your public and private repositories on all three registries. The login subcommand takes an optional server argument:
docker login
# Username: dockerinaction
# Password:
# Email: book@dockerinaction.com
# WARNING: login credentials saved in /Users/xxx/.dockercfg.
# Login Succeeded

docker login quay.io
# Username: dockerinaction
# Password:
# Email: book@dockerinaction.com
# WARNING: login credentials saved in /Users/xxx/.dockercfg.
# Login Succeeded
Before you decide that private hosted repositories are the distribution solution for you, consider how they might fulfill your selection criteria; see table 9.2.
Table 9.2. Performance of private hosted repositories
Individuals and small teams will find the most utility in private hosted repositories. Their low cost and basic authorization features are friendly to low-budget projects or private projects with minimal security requirements. Large companies or projects that need a higher degree of secrecy and have a suitable budget may find their needs better met by running their own private registry.
9.3. Introducing private registries
When you have a hard requirement on availability control, longevity control, or secrecy, then running a private registry may be your best option. In doing so, you gain control without sacrificing interoperability with Docker pull and push mechanisms or adding to the learning curve for your environment. People can interact with a private registry exactly as they would with a hosted registry.
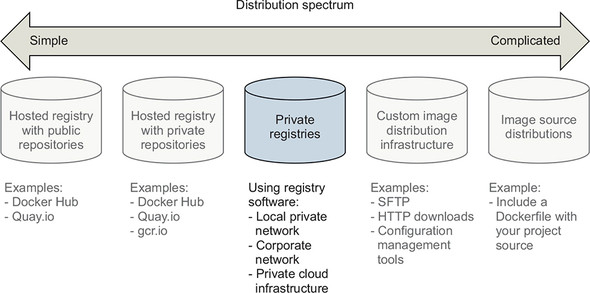
Many free and commercially supported software packages are available for running a Docker image registry. If your organization has a commercial artifact repository for operating system or application software packages, it probably supports the Docker image registry API. A simple option for running a nonproduction image registry is to use Docker’s registry software. The Docker registry, called Distribution, is open source software and distributed under the Apache 2 license. The availability of this software and permissive license keep the engineering cost of running your own registry low. Figure 9.3 illustrates that private registries fall in the middle of the distribution spectrum.
Figure 9.3. Private registries in the image distribution spectrum
Running a private registry is a great distribution method if you have special infrastructure use cases like the following:
- Regional image caches
- Team-specific image distribution for locality or visibility
- Environment or deployment stage-specific image pools
- Corporate processes for approving images
- Longevity control of external images
Before deciding that this is the best choice for you, consider the costs detailed in the selection criteria, shown in table 9.3.
Table 9.3. Performance of private registries
|
Criteria |
Rating |
Notes |
|---|---|---|
| Cost | Good | At a minimum, a private registry adds to hardware overhead (virtual or otherwise), support expense, and risk of failure. But the community has already invested the bulk of the engineering effort required to deploy a private registry by building the open source software. Cost will scale on different dimensions than hosted registries. Whereas the cost of hosted repositories scales with raw repository count, the cost of private registries scales with transaction rates and storage usage. If you build a system with high transaction rates, you’ll need to scale up the number of registry hosts so that you can handle the demand. Likewise, registries that serve a certain number of small images will have lower storage costs than those serving the same number of large images. |
| Visibility | Good | Private registries are as visible as you decide to make them. But even a registry that you own and open up to the world will be less visible than advertised popular registries such as Docker Hub. |
| Transport speed/size | Best | Latency of operations between any client and any registry will vary based on network performance between those two nodes and load on the registry. Private registries may be faster or slower than hosted registries because of these variables. Most people operating large-scale deployments or internal infrastructure will find private registries appealing. Private registries eliminate a dependency on the internet or inter-datacenter networking and will improve latency proportionate to the external network constraint. Because this solution uses a Docker registry, it shares the same parallelism gains as hosted registry solutions. |
| Longevity control | Best | You have full control over solution longevity as the registry owner. |
| Availability control | Best | You have full control over availability as the registry owner. |
| Access control | Good | The registry software doesn’t include any authentication or authorization features out of the box. But implementing those features can be achieved with a minimal engineering exercise. |
| Artifact integrity | Best | Version 2 of the registry API supports content-addressable images, and the open source software supports a pluggable storage backend. For additional integrity protections, you can force the use of TLS over the network and use backend storage with encryption at rest. |
| Confidentiality | Good | Private registries are the first solution on the spectrum appropriate for storage of trade secrets or secret material. You control the authentication and authorization mechanisms. You also control the network and in-transit security mechanisms. Most importantly, you control the at-rest storage. It’s in your power to ensure that the system is configured in such a way that your secrets stay secret. |
| Requisite experience | Good | Getting started and running a local registry requires only basic Docker experience. But running and maintaining a highly available production private registry requires experience with several technologies. The specific set depends on what features you want to take advantage of. Generally, you’ll want to be familiar with NGINX to build a proxy, LDAP or Kerberos to provide authentication, and Redis for caching. Many commercial product solutions are available for running a private Docker registry, ranging from traditional artifact repositories such as Artifactory and Nexus to software delivery systems like GitLab. |
The biggest trade-off when going from hosted registries to private registries is gaining flexibility and control while requiring greater depth and breadth of engineering experience to build and maintain the solution. Docker image registries often consume large amounts of storage, so be sure to account for that in your analysis. The remainder of this section covers what you need in order to implement all but the most complicated registry deployment designs and highlights opportunities for customization in your environment.
9.3.1. Using the registry image
Whatever your reasons for doing so, getting started with the Docker registry software is easy. The Distribution software is available on Docker Hub in a repository named registry. Starting a local registry in a container can be done with a single command:
docker run -d -p 5000:5000 \
        -v "$(pwd)"/data:/tmp/registry-dev \
        --restart=always --name local-registry registry:2
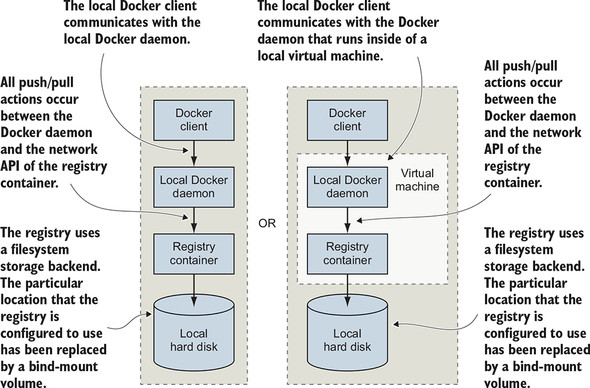
The image that’s distributed through Docker Hub is configured for insecure access from the machine running a client’s Docker daemon. When you’ve started the registry, you can use it like any other registry with docker pull, run, tag, and push commands. In this case, the registry location is localhost:5000. The architecture of your system should now match that described in figure 9.4.
Figure 9.4. Interactions between the Docker client, daemon, local registry container, and local storage
Companies that want tight version control on their external image dependencies will pull images from external sources such as Docker Hub and copy them into their own registry. You might do this to ensure that an important image does not change or disappear unexpectedly when the author updates or removes the source image. To get an idea of what it’s like working with your registry, consider a workflow for copying images from Docker Hub into your new registry:
docker image pull dockerinaction/ch9_registry_bound                  1

docker image ls -f "label=dia_excercise=ch9_registry_bound"          2

docker image tag dockerinaction/ch9_registry_bound \
    localhost:5000/dockerinaction/ch9_registry_bound

docker image push localhost:5000/dockerinaction/ch9_registry_bound   3
- 1 Pulls demo image from Docker Hub
- 2 Verifies image is discoverable with label filter
- 3 Pushes demo image into registry
In running these four commands, you copy an example repository from Docker Hub into your local repository. If you execute these commands from the same location from which you started the registry, you’ll find that the newly created data subdirectory contains new registry data.
9.3.2. Consuming images from your registry
The tight integration you get with the Docker ecosystem can make it feel like you’re working with software that’s already installed on your computer. When internet latency has been eliminated, such as when you’re working with a local registry, it can feel even less like you’re working with distributed components. For that reason, the exercise of pushing data into a local repository isn’t very exciting on its own.
The next set of commands should impress on you that you’re working with a real registry. These commands will remove the example repositories from the local cache for your Docker daemon, demonstrate that they’re gone, and then reinstall them from your personal registry:
docker image rm \
    dockerinaction/ch9_registry_bound \
    localhost:5000/dockerinaction/ch9_registry_bound                  1

docker image ls -f "label=dia_excercise=ch9_registry_bound"

docker image pull localhost:5000/dockerinaction/ch9_registry_bound    2

docker image ls -f "label=dia_excercise=ch9_registry_bound"           3

docker container rm -vf local-registry                                4
- 1 Removes tagged reference
- 2 Pulls from registry again
- 3 Demonstrates that image is back
- 4 Cleans up local registry
You can work with this registry locally as much as you want, but the insecure default configuration will prevent remote Docker clients from using your registry (unless they specifically allow insecure access). This is one of the few issues that you’ll need to address before deploying a registry in a production environment.
This is the most flexible distribution method that involves Docker registries. If you need greater control over transport, storage, and artifact management, you should consider working directly with images in a manual distribution system.
9.4. Manual image publishing and distribution
Images are files, and you can distribute them as you would any other file. It’s common to see software available for download on websites, File Transport Protocol (FTP) servers, corporate storage networks, or via peer-to-peer networks. You could use any of these distribution channels for image distribution. You can even use email or a USB drive in cases where you know your image recipients. Manual image distribution methods provide the ultimate in flexibility, enabling varied use cases such as distributing images to many people at an event simultaneously or to a secure air-gapped network.
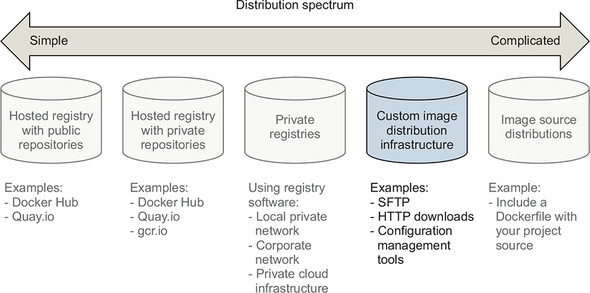
When you work with images as files, you use Docker only to manage local images and create files. All other concerns are left for you to implement. That void of functionality makes manual image publishing and distribution the second-most flexible but complicated distribution method. This section covers custom image distribution infrastructure, shown on the spectrum in figure 9.5.
Figure 9.5. Docker image distribution over custom infrastructure
We’ve already covered all the methods for working with images as files. Chapter 3 covers loading images into Docker and saving images to your hard drive. Chapter 7 covers exporting and importing full filesystems as flattened images. These techniques are the foundation for building distribution workflows like the one shown in figure 9.6.
Figure 9.6. A typical manual distribution workflow with producer, transport, and consumers
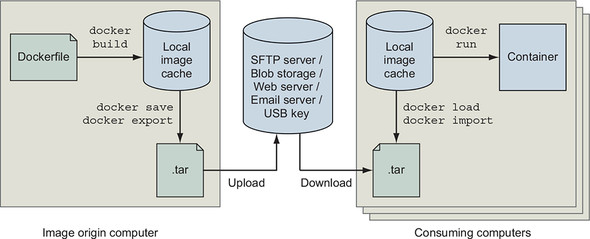
This workflow is a generalization of how you’d use Docker to create an image and prepare it for distribution. You should be familiar with using docker image build to create an image, and docker image save or docker container export to create an image file. You can perform each of these operations with a single command.
You can use any file transport after you have an image in file form. One custom component not shown in figure 9.6 is the mechanism that uploads an image to the transport. That mechanism may be a folder that is watched by a file-sharing tool such as Dropbox. It could also be a piece of custom code that runs periodically, or in response to a new file, and uses FTP or HTTP to push the file to a remote server. Whatever the mechanism, this general component will require some effort to integrate.
The figure also shows how a client would ingest the image and use it to build a container after the image has been distributed. Clients require a process or mechanism to learn where the image is located and then acquire the image from the remote source. Once clients have the image file, they can use the docker image load or import commands to complete the transfer.
Manual image distribution methods are difficult to measure against the selection criteria without knowing the specifics of the distribution problem. Using a non-Docker distribution channel gives you full control, making it possible to handle unusual requirements. It will be up to you to determine how your options measure against the selection criteria. Table 9.4 explores how manual image distribution methods rate against the selection criteria.
Table 9.4. Performance of custom image distribution infrastructure
|
Criteria |
Rating |
Notes |
|---|---|---|
| Cost | Good | Distribution costs are driven by bandwidth, storage, and hardware needs. Hosted distribution solutions such as cloud storage will bundle these costs and generally scale down price per unit as your usage increases. But hosted solutions bundle in the cost of personnel and several other benefits that you may not need, driving up the price compared to a mechanism that you own. |
| Visibility | Bad | Most manual distribution methods are special and will take more effort to advertise and use than public or private registries. Examples might include using popular websites or other well-known file distribution hubs. |
| Transport speed/size | Good | Whereas transport speed depends on the transport, file sizes are dependent on your choice of using layered images or flattened images. Remember, layered images maintain the history of the image, container-creation metadata, and old files that might have been deleted or overridden. Flattened images contain only the current set of files on the filesystem. |
| Longevity control | Bad | Using proprietary protocols, tools, or other technology that is neither open nor under your control will impact longevity control. For example, distributing image files with a hosted file-sharing service such as Dropbox will give you no longevity control. On the other hand, swapping USB drives with your friend will last as long as the two of you decide to use USB drives. |
| Availability control | Best | If availability control is an important factor for your case, you can use a transport mechanism that you own. |
| Access control | Bad | You could use a transport with the access control features you need or use file encryption. If you built a system that encrypted your image files with a specific key, you could be sure that only a person or people with the correct key could access the image. |
| Artifact integrity | Bad | Integrity validation is a more expensive feature to implement for broad distribution. At a minimum, you’d need a trusted communication channel for advertising cryptographic file signatures and creating archives that maintain image and layer signatures by using docker image save and load. |
| Confidentiality | Good | You can implement content secrecy with cheap encryption tools. If you need meta-secrecy (where the exchange itself is secret) as well as content secrecy, then you should avoid hosted tools and make sure that the transport you use provides secrecy (HTTPS, SFTP, SSH, or offline). |
| Requisite experience | Good | Hosted tools will typically be designed for ease of use and require a lesser degree of experience to integrate with your workflow. But you can as easily use simple tools that you own in most cases. |
All the same criteria apply to manual distribution, but it’s difficult to discuss them without the context of a specific transportation method.
9.4.1. A sample distribution infrastructure using FTP
Building a fully functioning example will help you understand exactly what goes into a manual distribution infrastructure. This section will help you build an infrastructure with the File Transfer Protocol.
FTP is less popular than it used to be. The protocol provides no secrecy and requires credentials to be transmitted over the wire for authentication. But the software is freely available, and clients have been written for most platforms. That makes FTP a great tool for building your own distribution infrastructure. Figure 9.7 illustrates what you’ll build.
Figure 9.7. An FTP publishing infrastructure

The example in this section uses two existing images. The first, dockerinaction/ch9 _ftpd, is a specialization of the centos:6 image; vsftpd (an FTP daemon) has been installed and configured for anonymous write access. The second image, dockerinaction/ch9_ftp_client, is a specialization of a popular minimal Alpine Linux image. An FTP client named LFTP has been installed and set as the entrypoint for the image.
To prepare for the experiment, pull a known image from Docker Hub that you want to distribute. In the example, the registry:2 image is used:
docker image pull registry:2
Once you have an image to distribute, you can begin. The first step is building your image distribution infrastructure. In this case, that means running an FTP server, which you will do on a dedicated network:
docker network create ch9_ftp
docker container run -d --name ftp-server --network=ch9_ftp -p 21:21 \
    dockerinaction/ch9_ftpd
This command starts an FTP server that accepts FTP connections on TCP port 21 (the default port). Don’t use this image in any production capacity. The server is configured to allow anonymous connections write access under the pub/incoming folder. Your distribution infrastructure will use that folder as an image distribution point.
Next, export an image to the file format. You can use the following command to do so:
docker image save -o ./registry.2.tar registry:2
Running this command exports the registry:2 image as a structured image file in your current directory. The file retains all the metadata and history associated with the image. At this point, you could inject all sorts of phases, such as checksum generation or file encryption. This infrastructure has no such requirements, and you should move along to distribution.
The dockerinaction/ch9_ftp_client image has an FTP client installed and can be used to upload your new image file to your FTP server. Remember, you started the FTP server in a container named ftp-server. The ftp-server container is attached to a user-defined bridge network (see chapter 5) named ch9_ftp, and other containers attached to the ch9_ftp network will be able to connect to ftp-server. Let’s upload the registry image archive with an FTP client:
docker container run --rm -it --network ch9_ftp \
    -v "$(pwd)":/data \
    dockerinaction/ch9_ftp_client \
    -e 'cd pub/incoming; put registry.2.tar; exit' ftp-server
This command creates a container with a volume bound to your local directory and joined to the ch9_ftp network where the FTP server container is listening. The command uses LFTP to upload a file named registry.2.tar to the server located at ftp_server. You can verify that you uploaded the image by listing the contents of the FTP server’s folder:
docker run --rm -it --network ch9_ftp \
    -v "$(pwd)":/data \
    dockerinaction/ch9_ftp_client \
    -e "cd pub/incoming; ls; exit" ftp-server
The registry image is now available for download to any FTP client that knows about the server and can access it over the network. But that file may never be overridden in the current FTP server configuration. You’d need to come up with your own versioning scheme if you were going to use a similar tool in production.
Advertising the availability of the image in this scenario requires clients to periodically poll the server by using the last command you ran to list files. Alternatively, you could build a website or send an email notifying clients about the image, but that all happens outside the standard FTP transfer workflow.
Before moving on to evaluating this distribution method against the selection criteria, consume the registry image from your FTP server to get an idea of how clients would need to integrate.
First, eliminate the registry image from your local image cache and the file from your local directory:
rm registry.2.tar
docker image rm registry:2      1
docker image ls registry        2
- 1 Need to remove any registry containers first
- 2 Confirms the registry image has been removed
Then download the image file from your FTP server by using the FTP client:
docker container run --rm -it --network ch9_ftp \
    -v "$(pwd)":/data \
    dockerinaction/ch9_ftp_client \
    -e 'cd pub/incoming; get registry.2.tar; exit' ftp-server
At this point, you should once again have the registry.2.tar file in your local directory. You can reload that image into your local cache with the docker load command:
docker image load -i registry.2.tar
You can confirm that the image has been loaded from the archive by listing images for the registry repository again with docker image ls registry.
This is a minimal example of how a manual image-publishing and distribution infrastructure might be built. With a bit of extension, you could build a production-quality, FTP-based distribution hub. In its current configuration, this example matches against the selection criteria, as shown in table 9.5.
Table 9.5. Performance of a sample FTP-based distribution infrastructure
|
Criteria |
Rating |
Notes |
|---|---|---|
| Cost | Good | This is a low-cost transport. All the related software is free. Bandwidth and storage costs should scale linearly with the number of images hosted and the number of clients. |
| Visibility | Worst | The FTP server is running in an unadvertised location with a non-standard integration workflow. The visibility of this configuration is very low. |
| Transport speed/size | Bad | In this example, all the transport happens between containers on the same computer, so all the commands finish quickly. If a client connects to your FTP service over the network, speeds are directly impacted by your upload speeds. This distribution method will download redundant artifacts and won’t download components of the image in parallel. Overall, this method isn’t bandwidth-efficient. |
| Longevity control | Best | You can use the FTP server created for this example as long as you want. |
| Availability control | Best | You have full availability control of the FTP server. If it becomes unavailable, you’re the only person who can restore service. |
| Access control | Worst | This configuration provides no access control. |
| Artifact integrity | Worst | The network transportation layer does provide file integrity between endpoints. But it’s susceptible to interception attacks, and no integrity protections exist between file creation and upload or between download and import. |
| Confidentiality | Worst | This configuration provides no secrecy. |
| Requisite experience | Good | All requisite experience for implementing this solution has been provided here. If you’re interested in extending the example for production, you need to familiarize yourself with vsftpd configuration options and SFTP. |
In short, there’s almost no real scenario where this transport configuration is appropriate. But it helps illustrate the different concerns and basic workflows that you can create when you work with image as files. Try to imagine how replacing FTP with scp or rsync tooling using the SSH protocol would improve the system’s performance for artifact integrity and secrecy. The final image distribution method we will consider distributes image sources and is both more flexible and potentially complicated.
9.5. Image source-distribution workflows
When you distribute image sources instead of images, you cut out all the Docker distribution workflow and rely solely on the Docker image builder. As with manual image publishing and distribution, source-distribution workflows should be evaluated against the selection criteria in the context of a particular implementation.
Using a hosted source control system such as Git on GitHub will have very different traits from using a file backup tool such as rsync. In a way, source-distribution workflows have a superset of the concerns of manual image publishing and distribution workflows. You’ll have to build your workflow, but without the help of the docker save, load, export, or import commands. Producers need to determine how they will package their sources, and consumers need to understand how those sources are packaged as well as how to build an image from them. That expanded interface makes source-distribution workflows the most flexible and potentially complicated distribution method. Figure 9.8 shows image source distribution on the most complicated end of the spectrum.
Figure 9.8. Using existing infrastructure to distribute image sources
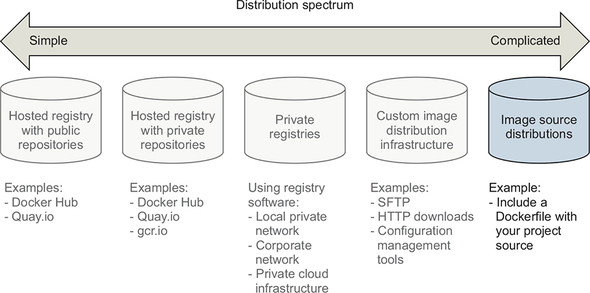
Image source distribution is one of the most common methods, despite having the most potential for complication. Popular version-control software handles many of the complications of source distribution’s expanded interface.
9.5.1. Distributing a project with Dockerfile on GitHub
When you use Dockerfile and GitHub to distribute image sources, image consumers clone your GitHub repository directly and use docker image build to build your image locally. With source distribution, publishers don’t need an account on Docker Hub or another Docker registry to publish an image.
Supposing a producer has an existing project, Dockerfile, and GitHub repository, their distribution workflow will look like this:
git init
git config --global user.email "you@example.com"
git config --global user.name "Your Name"
git add Dockerfile
# git add *whatever other files you need for the image*
git commit -m "first commit"
git remote add origin https://github.com/<your username>/<your repo>.git
git push -u origin master
Meanwhile, a consumer would use a general command set that looks like this:
git clone https://github.com/<your username>/<your repo>.git
cd <your-repo>
docker image build -t <your username>/<your repo>. .
These are all steps that a regular Git or GitHub user is familiar with, as shown in table 9.6.
Table 9.6. Performance of image source distribution via GitHub
|
Criteria |
Rating |
Notes |
|---|---|---|
| Cost | Best | There’s no cost if you’re using a public GitHub repository. |
| Visibility | Best | GitHub is a highly visible location for open source tools. It provides excellent social and search components, making project discovery simple. |
| Transport speed/size | Good | By distributing image sources, you can leverage other registries for base layers. Doing so will reduce the transportation and storage burden. GitHub also provides a content delivery network (CDN). That CDN is used to make sure clients around the world can access projects on GitHub with low network latency. |
| Longevity control | Bad | Although Git is a popular tool and should be around for a while, you forgo any longevity control by integrating with GitHub or other hosted version-control providers. |
| Availability control | Worst | Relying on GitHub or other hosted version-control providers eliminates any availability control. |
| Access control | Good | GitHub or other hosted version-control providers do provide access control-tools for private repositories. |
| Artifact integrity | Good | This solution provides no integrity for the images produced as part of the build process, or of the sources after they have been cloned to the client machine. But integrity is the whole point of version-control systems. Any integrity problems should be apparent and easily recoverable through standard Git processes. |
| Confidentiality | Worst | Public projects provide no source secrecy. |
| Requisite Experience | Good | Image producers and consumers need to be familiar with Dockerfile, the Docker builder, and the Git tooling. |
Image source distribution is divorced from all Docker distribution tools. By relying only on the image builder, you’re free to adopt any distribution toolset available. If you’re locked into a particular toolset for distribution or source control, this may be the only option that meets your criteria.
Summary
This chapter covers various software distribution mechanisms and the value contributed by Docker in each. A reader that has recently implemented a distribution channel, or is currently doing so, might take away additional insights into their solution. Others will learn more about available choices. In either case, it is important to make sure that you have gained the following insights before moving on:
- Having a spectrum of choices illustrates your range of options.
- You should use a consistent set of selection criteria in order to evaluate your distribution options and determine which method you should use.
- Hosted public repositories provide excellent project visibility, are free, and require little experience to adopt.
- Consumers will have a higher degree of trust in images generated by automated builds because a trusted third party builds them.
- Hosted private repositories are cost-effective for small teams and provide satisfactory access control.
- Running your own registry enables you to build infrastructure suitable for special use cases without abandoning the Docker distribution facilities.
- Distributing images as files can be accomplished with any file-sharing system.
- Image source distribution is flexible but only as complicated as you make it. Using popular source-distribution tools and patterns will keep things simple.