Chapter 8. Building images automatically with Dockerfiles
This chapter covers
- Automated image packaging with Dockerfiles
- Metadata and filesystem instructions
- Creating maintainable image builds with arguments and multiple stages
- Packaging for multiprocess and durable containers
- Reducing the image attack surface and building trust
A Dockerfile is a text file that contains instructions for building an image. The Docker image builder executes the Dockerfile from top to bottom, and the instructions can configure or change anything about an image. Building images from Dockerfiles makes tasks like adding files to a container from your computer simple one-line instructions. Dockerfiles are the most common way to describe how to build a Docker image.
This chapter covers the basics of working with Dockerfile builds and the best reasons to use them, a lean overview of the instructions, and how to add future build behavior. We’ll get started with a familiar example that shows how to automate the process of building images with code instead of creating them manually. Once an image’s build is defined in code, it is simple to track changes in version control, share with team members, optimize, and secure.
8.1. Packaging Git with a Dockerfile
Let’s start by revisiting the Git example image we built by hand in chapter 7. You should recognize many of the details and advantages of working with a Dockerfile as we translate the image build process from manual operations to code.
First, create a new directory, and from that directory create a new file with your favorite text editor. Name the new file Dockerfile. Write the following five lines and then save the file:
# An example Dockerfile for installing Git on Ubuntu
FROM ubuntu:latest
LABEL maintainer="dia@allingeek.com"
RUN apt-get update && apt-get install -y git
ENTRYPOINT ["git"]
Before dissecting this example, build a new image from it with the docker image build command from the same directory containing the Dockerfile and tag the image with auto:
docker image build --tag ubuntu-git:auto .
This outputs several lines about steps and output from apt-get, and will finally display a message like this:
Successfully built cc63aeb7a5a2
Successfully tagged ubuntu-git:auto
Running this command starts the build process. When it’s completed, you should have a brand-new image that you can test. View the list of all your ubuntu-git images and test the newest one with this command:
docker image ls
The new build tagged auto should now appear in the list:
REPOSITORY   TAG        IMAGE ID        CREATED             VIRTUAL SIZE
ubuntu-git   auto       cc63aeb7a5a2     2 minutes ago      219MB
ubuntu-git   latest     826c66145a59    10 minutes ago      249MB
ubuntu-git   removed    826c66145a59    10 minutes ago      249MB
ubuntu-git   1.9        3e356394c14e    41 hours ago        249MB
...
Now you can run a Git command using the new image:
docker container run --rm ubuntu-git:auto
These commands demonstrate that the image you built with the Dockerfile works and is functionally equivalent to the one you built by hand. Examine what you did to accomplish this:
First, you created a Dockerfile with four instructions:
- FROM ubuntu:latest— Tells Docker to start from the latest Ubuntu image just as you did when creating the image manually.
- LABEL maintainer— Sets the maintainer name and email for the image. Providing this information helps people know whom to contact if there’s a problem with the image. This was accomplished earlier when you invoked commit.
- RUN apt-get update && apt-get install -y git— Tells the builder to run the provided commands to install Git.
- ENTRYPOINT ["git"]— Sets the entrypoint for the image to git.
Dockerfiles, like most scripts, can include comments. Any line beginning with a # will be ignored by the builder. It’s important for Dockerfiles of any complexity to be well-documented. In addition to improving Dockerfile maintainability, comments help people audit images that they’re considering for adoption and spread best practices.
The only special rule about Dockerfiles is that the first instruction must be FROM. If you’re starting from an empty image and your software has no dependencies, or you’ll provide all the dependencies, then you can start from a special empty repository named scratch.
After you saved the Dockerfile, you started the build process by invoking the docker image build command. The command had one flag set and one argument. The --tag flag (or -t for short) specifies the full repository designation that you want to use for the resulting image. In this case, you used ubuntu-git:auto. The argument that you included at the end was a single period. That argument told the builder the location of the Dockerfile. The period told it to look for the file in the current directory.
The docker image build command has another flag, --file (or -f for short), that lets you set the name of the Dockerfile. Dockerfile is the default, but with this flag you could tell the builder to look for a file named BuildScript or release-image.df. This flag sets only the name of the file, not the location. That must always be specified in the location argument.
The builder works by automating the same tasks that you’d use to create images by hand. Each instruction triggers the creation of a new container with the specified modification. After the modification has been made, the builder commits the layer and moves on to the next instruction and container created from the fresh layer.
The builder validated that the image specified by the FROM instruction was installed as the first step of the build. If it were not, Docker would have automatically tried to pull the image. Take a look at the output from the build command that you ran:
Sending build context to Docker daemon  2.048kB
Step 1/4 : FROM ubuntu:latest
 ---> 452a96d81c30
You can see that in this case the base image specified by the FROM instruction is ubuntu:latest, which should have already been installed on your machine. The abbreviated image ID of the base image is included in the output.
The next instruction sets the maintainer information on the image. This creates a new container and then commits the resulting layer. You can see the result of this operation in the output for step 1:
Step 2/4 : LABEL maintainer="dia@allingeek.com"
 ---> Running in 11140b391074
Removing intermediate container 11140b391074
The output includes the ID of the container that was created and the ID of the committed layer. That layer will be used as the top of the image for the next instruction, RUN. The RUN instruction executes the program with the arguments you specify on top of a new image layer. Then Docker commits the filesystem changes to the layer so they are available for the next Dockerfile instruction. In this case, the output for the RUN instruction was clouded with all the output for the command apt-get update && apt-get install -y git. Installing software packages is one of the most common use cases for the RUN instruction. You should explicitly install each software package needed by your container to ensure that it is available when needed.
If you’re not interested in reams of build process output, you can invoke the docker image build command with the --quiet or -q flag. Running in quiet mode will suppress all output from the build process and management of intermediate containers. The only output of the build process in quiet mode is the resulting image ID, which looks like this:
sha256:e397ecfd576c83a1e49875477dcac50071e1c71f76f1d0c8d371ac74d97bbc90
Although this third step to install Git usually takes much longer to complete, you can see the instruction and input as well as the ID of the container where the command was run and the ID of the resulting layer. Finally, the ENTRYPOINT instruction performs all the same steps, and the output is similarly unsurprising:
Step 4/4 : ENTRYPOINT ["git"]
 ---> Running in 6151803c388a
Removing intermediate container 6151803c388a
 ---> e397ecfd576c
Successfully built e397ecfd576c
Successfully tagged ubuntu-git:auto
A new layer is being added to the resulting image after each step in the build. Although this means you could potentially branch on any of these steps, the more important implication is that the builder can aggressively cache the results of each step. If a problem with the build script occurs after several other steps, the builder can restart from the same position after the problem has been fixed. You can see this in action by breaking your Dockerfile.
Add this line to the end of your Dockerfile:
RUN This will not work
Then run the build again:
docker image build --tag ubuntu-git:auto .
The output will show which steps the builder was able to skip in favor of cached results:
Sending build context to Docker daemon  2.048kB
Step 1/5 : FROM ubuntu:latest
 ---> 452a96d81c30
Step 2/5 : LABEL maintainer="dia@allingeek.com"
 ---> Using cache                                        1
 ---> 83da14c85b5a
Step 3/5 : RUN apt-get update && apt-get install -y git
 ---> Using cache                                        1
 ---> 795a6e5d560d
Step 4/5 : ENTRYPOINT ["git"]
 ---> Using cache                                        1
 ---> 89da8ffa57c7
Step 5/5 : RUN This will not work
 ---> Running in 2104ec7bc170
/bin/sh: 1: This: not found
The command '/bin/sh -c This will not work' returned a non-zero code: 127
- 1 Note use of cache.
Steps 1 through 4 were skipped because they were already built during your last build. Step 5 failed because there’s no program with the name This in the container. The container output was valuable in this case because the error message informs you about the specific problem with the Dockerfile. If you fix the problem, the same steps will be skipped again, and the build will succeed, resulting in output like Successfully built d7a8ee0cebd4.
The use of caching during the build can save time if the build includes downloading material, compiling programs, or anything else that is time-intensive. If you need a full rebuild, you can use the --no-cache flag on docker image build to disable the use of the cache. Make sure you’re disabling the cache only when required because it will place much more strain on upstream source systems and image-building systems.
This short example uses 4 of the 18 Dockerfile instructions. The example is limited in that all the files added to the image were downloaded from the network; the example modifies the environment in a limited way and provides a general tool. The next example, which has a more specific purpose and local code, provides a more complete Dockerfile primer.
8.2. A Dockerfile primer
Dockerfiles are expressive and easy to understand because of their terse syntax that allows for comments. You can keep track of changes to Dockerfiles with any version-control system. Maintaining multiple versions of an image is as simple as maintaining multiple Dockerfiles. The Dockerfile build process itself uses extensive caching to aid rapid development and iteration. The builds are traceable and reproducible. They integrate easily with existing build systems and many continuous integration tools. With all these reasons to prefer Dockerfile builds to handmade images, it’s important to learn how to write them.
The examples in this section cover the core Dockerfile instructions used in most images. The following sections show how to create downstream behavior and more maintainable Dockerfiles. Every instruction is covered here at an introductory level. For deep coverage of each instruction, the best reference will always be the Docker documentation online at https://docs.docker.com/engine/reference/builder/. The Docker builder reference also provides examples of good Dockerfiles and a best practices guide.
8.2.1. Metadata instructions
The first example builds a base image and two other images with distinct versions of the mailer program you used in chapter 2. The purpose of the program is to listen for messages on a TCP port and then send those messages to their intended recipients. The first version of the mailer will listen for messages but only log those messages. The second will send the message as an HTTP POST to the defined URL.
One of the best reasons to use Dockerfile builds is that they simplify copying files from your computer into an image. But it’s not always appropriate for certain files to be copied to images. The first thing to do when starting a new project is to define which files should never be copied into any images. You can do this in a file called .dockerignore. In this example, you’ll create three Dockerfiles, and none needs to be copied into the resulting images.
Use your favorite text editor to create a new file named .dockerignore and copy in the following lines:
.dockerignore
mailer-base.df
mailer-logging.df
mailer-live.df
Save and close the file when you’re finished. This will prevent the .dockerignore file, or files named mailer-base.df, mailer-logging.df, or mailer-live.df, from ever being copied into an image during a build. With that bit of accounting finished, you can begin working on the base image.
Building a base image helps create common layers. Each version of the mailer will be built on top of an image called mailer-base. When you create a Dockerfile, you need to keep in mind that each Dockerfile instruction will result in a new layer being created. Instructions should be combined whenever possible because the builder won’t perform any optimization. Putting this in practice, create a new file named mailer-base.df and add the following lines:
FROM debian:buster-20190910
LABEL maintainer="dia@allingeek.com"
RUN groupadd -r -g 2200 example && \
    useradd -rM -g example -u 2200 example
ENV APPROOT="/app" \
    APP="mailer.sh" \
    VERSION="0.6"
LABEL base.name="Mailer Archetype" \
      base.version="${VERSION}"
WORKDIR $APPROOT
ADD . $APPROOT
ENTRYPOINT ["/app/mailer.sh"]      1
EXPOSE 33333
# Do not set the default user in the base otherwise
# implementations will not be able to update the image
# USER example:example
Put it all together by running the docker image build command from the directory where the mailer-base file is located. The -f flag tells the builder which filename to use as input:
docker image build -t dockerinaction/mailer-base:0.6 -f mailer-base.df .
The default and most common name for a Dockerfile is Dockerfile. However, Dockerfiles can be named anything because they are simple text files and the build command accepts any filename you tell it. Some people name their Dockerfiles with an extension such as .df so that they can easily define builds for multiple images in a single project directory (for example, app-build.df, app-runtime.df, and app-debug-tools.df). A file extension also makes it easy to activate Dockerfile support in editors.
Five new instructions are introduced in this Dockerfile. The first new instruction is ENV. ENV sets environment variables for an image, similar to the --env flag on docker container run or docker container create. In this case, a single ENV instruction is used to set three distinct environment variables. That could have been accomplished with three subsequent ENV instructions, though doing so would result in the creation of three layers. You can keep instructions easy to read by using a backslash to escape the newline character (just as in shell scripting):
Step 4/9 : ENV APPROOT="/app"     APP="mailer.sh"     VERSION="0.6"
 ---> Running in c525f774240f
Removing intermediate container c525f774240f
Environment variables declared in the Dockerfile are made available to the resulting image but can be used in other Dockerfile instructions as substitutions. In this Dockerfile, the environment variable VERSION was used as a substitution in the next new instruction, LABEL:
Step 5/9 : LABEL base.name="Mailer Archetype"       base.version="${VERSION}"
 ---> Running in 33d8f4d45042
Removing intermediate container 33d8f4d45042
 ---> 20441d0f588e
The LABEL instruction is used to define key/value pairs that are recorded as additional metadata for an image or container. This mirrors the --label flag on docker run and docker create. Like the ENV instruction before it, multiple labels can and should be set with a single instruction. In this case, the value of the VERSION environment variable was substituted for the value of the base.version label. By using an environment variable in this way, the value of VERSION will be available to processes running inside a container as well as recorded to an appropriate label. This increases maintainability of the Dockerfile because it’s more difficult to make inconsistent changes when the valueis set in a single location.
Docker Inc. recommends recording metadata with labels to help organize images, networks, containers, and other objects. Each label key should be prefixed with the reverse DNS notation of a domain that is controlled or collaborating with the author, such as com.<your company>.some-label. Labels are flexible, extensible, and lightweight, but the lack of structure makes leveraging the information difficult.
The Label Schema project (http://label-schema.org/) is a community effort to standardize label names and promote compatible tooling. The schema covers many important attributes of an image such as build date, name, and description. For example, when using the label schema namespace, the key for the build date is named org.label-schema.build-date and should have a value in RFC 3339 format such as 2018-07-12T16:20:50.52Z.
The next two instructions are WORKDIR and EXPOSE. These are similar in operation to their corresponding flags on the docker run and docker create commands. An environment variable was substituted for the argument to the WORKDIR command:
Step 6/9 : WORKDIR $APPROOT
Removing intermediate container c2cb1fc7bf4f
 ---> cb7953a10e42
The result of the WORKDIR instruction will be an image with the default working directory set to /app. Setting WORKDIR to a location that doesn’t exist will create that location just as it would with the command-line option. Last, the EXPOSE command creates a layer that opens TCP port 33333:
Step 9/9 : EXPOSE 33333
 ---> Running in cfb2afea5ada

Removing intermediate container cfb2afea5ada
 ---> 38a4767b8df4
The parts of this Dockerfile that you should recognize are the FROM, LABEL, and ENTRYPOINT instructions. In brief, the FROM instruction sets the layer stack to start from the debian:buster-20190910 image. Any new layers built will be placed on top of that image. The LABEL instruction adds key/value pairs to the image’s metadata. The ENTRYPOINT instruction sets the executable to run at container startup. Here, it’s setting the instruction to exec ./mailer.sh and using the shell form of the instruction.
The ENTRYPOINT instruction has two forms: the shell form and an exec form. The shell form looks like a shell command with whitespace-delimited arguments. The exec form is a string array in which the first value is the command to execute and the remaining values are arguments. A command specified using the shell form would be executed as an argument to the default shell. Specifically, the command used in this Dockerfile will be executed as /bin/sh –c 'exec ./mailer.sh' at runtime. Most importantly, if the shell form is used for ENTRYPOINT, all other arguments provided by the CMD instruction or at runtime as extra arguments to docker container run will be ignored. This makes the shell form of ENTRYPOINT less flexible.
You can see from the build output that the ENV and LABEL instructions each resulted in a single step and layer. But the output doesn’t show that the environment variable values were substituted correctly. To verify that, you’ll need to inspect the image:
docker inspect dockerinaction/mailer-base:0.6
Tip
Remember, the docker inspect command can be used to view the metadata of either a container or an image. In this case, you used it to inspect an image.
The relevant lines are these:
"Env": [
    "PATH=/usr/local/sbin:/usr/local/bin:/usr/sbin:/usr/bin:/sbin:/bin",
    "APPROOT=/app",
    "APP=mailer.sh",
    "VERSION=0.6"
],
...
"Labels": {
    "base.name": "Mailer Archetype",
    "base.version": "0.6",
    "maintainer": "dia@allingeek.com"
},
...
"WorkingDir": "/app"
The metadata makes it clear that the environment variable substitution works. You can use this form of substitution in the ENV, ADD, COPY, LABEL, WORKDIR, VOLUME, EXPOSE, and USER instructions.
The last commented line is a metadata instruction, USER. It sets the user and group for all further build steps and containers created from the image. In this case, setting it in a base image would prevent any downstream Dockerfiles from installing software. That would mean that those Dockerfiles would need to flip the default back and forth for permission. Doing so would create at least two additional layers. The better approach would be to set up the user and group accounts in the base image and let the implementations set the default user when they’ve finished building.
The most curious thing about this Dockerfile is that the ENTRYPOINT is set to a file that doesn’t exist. The entrypoint will fail when you try to run a container from this base image. But now that the entrypoint is set in the base image, that’s one less layer that will need to be duplicated for specific implementations of the mailer. The next two Dockerfiles build different mailer.sh implementations.
8.2.2. Filesystem instructions
Images that include custom functionality will need to modify the filesystem. A Dockerfile defines three instructions that modify the filesystem: COPY, VOLUME, and ADD. The Dockerfile for the first implementation should be placed in a file named mailer-logging.df:
FROM dockerinaction/mailer-base:0.6
RUN apt-get update && \
    apt-get install -y netcat
COPY ["./log-impl", "${APPROOT}"]
RUN chmod a+x ${APPROOT}/${APP} && \
    chown example:example /var/log
USER example:example
VOLUME ["/var/log"]
CMD ["/var/log/mailer.log"]
In this Dockerfile, you use the image generated from mailer-base as the starting point. The three new instructions are COPY, VOLUME, and CMD. The COPY instruction will copy files from the filesystem where the image is being built, into the build container. The COPY instruction takes at least two arguments. The last argument is the destination, and all other arguments are source files. This instruction has only one unexpected feature: any files copied will be copied with file ownership set to root. This is the case regardless of how the default user is set before the COPY instruction. It’s better to delay any RUN instructions to change file ownership until all the files that you need to update have been copied into the image.
The COPY instruction, just like ENTRYPOINT and other instructions, will honor both shell style and exec style arguments. But if any of the arguments contains whitespace, you need to use the exec form.
Tip
Using the exec (or string array) form wherever possible is the best practice. At a minimum, a Dockerfile should be consistent and avoid mixing styles. This will make your Dockerfiles more readable and ensure that instructions behave as you’d expect without detailed understanding of their nuances.
The second new instruction is VOLUME. This behaves exactly as you’d expect if you understand what the --volume flag does on a call to docker run or docker create. Each value in the string array argument will be created as a new volume definition in the resulting layer. Defining volumes at image build time is more limiting than at runtime. You have no way to specify a bind-mount volume or read-only volume at image build time. The VOLUME instruction will do only two things: create the defined location in the image filesystem and then add a volume definition to the image metadata.
The last instruction in this Dockerfile is CMD. CMD is closely related to the ENTRYPOINT instruction, as shown in figure 8.1 They both take either shell or exec forms and are both used to start a process within a container. But a few important differences exist.
Figure 8.1. Relationship between ENTRYPOINT and CMD
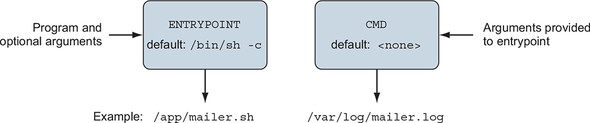
The CMD command represents an argument list for the entrypoint. The default entrypoint for a container is /bin/sh. If no entrypoint is set for a container, the values are passed, because the command will be wrapped by the default entrypoint. But if the entrypoint is set and is declared using the exec form, you use CMD to set default arguments. The base for this Dockerfile defines the ENTRYPOINT as the mailer command. This Dockerfile injects an implementation of mailer.sh and defines a default argument. The argument used is the location that should be used for the log file.
Before building the image, you need to create the logging version of the mailer program. Create a directory at ./log-impl. Inside that directory, create a file named mailer.sh and copy the following script into the file:
#!/bin/sh
printf "Logging Mailer has started.\n"
while true
do
    MESSAGE=$(nc -l -p 33333)
    printf "[Message]: %s\n" "$MESSAGE" > $1
    sleep 1
done
The structural specifics of this script are unimportant. All you need to know is that this script will start a mailer daemon on port 33333 and write each message that it receives to the file specified in the first argument to the program. Use the following command to build the mailer-logging image from the directory containing mailer-logging.df:
docker image build -t dockerinaction/mailer-logging -f mailer-logging.df .
The results of this image build should be anticlimactic. Go ahead and start up a named container from this new image:
docker run -d --name logging-mailer dockerinaction/mailer-logging
The logging mailer should now be built and running. Containers that link to this implementation will have their messages logged to /var/log/mailer.log. That’s not very interesting or useful in a real-world situation, but it might be handy for testing. An implementation that sends email would be better for operational monitoring.
The next implementation example uses the Simple Email Service provided by Amazon Web Services to send email. Get started with another Dockerfile. Name this file mailer-live.df:
FROM dockerinaction/mailer-base:0.6
ADD ["./live-impl", "${APPROOT}"]
RUN apt-get update && \
    apt-get install -y curl netcat python && \
    curl "https://bootstrap.pypa.io/get-pip.py" -o "get-pip.py" && \
    python get-pip.py && \
    pip install awscli && \
    rm get-pip.py && \
    chmod a+x "${APPROOT}/${APP}"
USER example:example
CMD ["mailer@dockerinaction.com", "pager@dockerinaction.com"]
This Dockerfile includes one new instruction, ADD. The ADD instruction operates similarly to the COPY instruction with two important differences. The ADD instruction will
- Fetch remote source files if a URL is specified
- Extract the files of any source determined to be an archive file
The auto-extraction of archive files is the more useful of the two. Using the remote fetch feature of the ADD instruction isn’t good practice; although the feature is convenient, it provides no mechanism for cleaning up unused files and results in additional layers. Instead, you should use a chained RUN instruction, like the third instruction of mailer-live.df.
The other instruction to note in this Dockerfile is CMD, where two arguments are passed. Here you’re specifying the From and To fields on any emails that are sent. This differs from mailer-logging.df, which specifies only one argument.
Next, create a new subdirectory named live-impl under the location containing mailer-live.df. Add the following script to a file in that directory named mailer.sh:
#!/bin/sh
printf "Live Mailer has started.\n"
while true
do
  MESSAGE=$(nc -l -p 33333)
  aws ses send-email --from $1 \
    --destination {\"ToAddresses\":[\"$2\"]} \

    --message "{\"Subject\":{\"Data\":\"Mailer Alert\"},\
                \"Body\":{\"Text\":{\"Data\":\"${MESSAGE}\"}}}"
  sleep 1
done
The key takeaway from this script is that, like the other mailer implementation, it will wait for connections on port 33333, take action on any received messages, and then sleep for a moment before waiting for another message. This time, though, the script will send an email using the Simple Email Service command-line tool. Build and start a container with these two commands:
docker image build -t dockerinaction/mailer-live -f mailer-live.df .
docker run -d --name live-mailer dockerinaction/mailer-live
If you link a watcher to these, you’ll find that the logging mailer works as advertised. But the live mailer seems to be having difficulty connecting to the Simple Email Service to send the message. With a bit of investigation, you’ll eventually realize that the container is misconfigured. The aws program requires certain environment variables to be set.
You need to set AWS_ACCESS_KEY_ID, AWS_SECRET_ACCESS_KEY, and AWS_DEFAULT _REGION in order to get this example working. These environment variables define the AWS cloud credentials and location to use for this example. Discovering execution preconditions one by one as programs need them can be frustrating for users. Section 8.5.1 details an image design pattern that reduces this friction and helps adopters.
Before you get to design patterns, you need to learn about the final Dockerfile instruction. Remember, not all images contain applications. Some are built as platforms for downstream images. Those cases specifically benefit from the ability to inject downstream build-time behavior.
8.3. Injecting downstream build-time behavior
A Dockerfile instruction that is important for authors of base images is ONBUILD. The ONBUILD instruction defines other instructions to execute if the resulting image is used as a base for another build. For example, you could use ONBUILD instructions to compile a program that’s provided by a downstream layer. The upstream Dockerfile copies the contents of the build directory into a known location and then compiles the code at that location. The upstream Dockerfile would use a set of instructions like this:
ONBUILD COPY [".", "/var/myapp"]
ONBUILD RUN go build /var/myapp
The instructions following ONBUILD aren’t executed when their containing Dockerfile is built. Instead, those instructions are recorded in the resulting image’s metadata under ContainerConfig.OnBuild. The previous instructions would result in the following metadata inclusions:
...
"ContainerConfig": {
...
    "OnBuild": [

        "COPY [\".\", \"/var/myapp\"]",
        "RUN go build /var/myapp"
    ],
    ...
This metadata is carried forward until the resulting image is used as the base for another Dockerfile build. When a downstream Dockerfile uses the upstream image (the one with the ONBUILD instructions) in a FROM instruction, those ONBUILD instructions are executed after the FROM instruction and before the next instruction in a Dockerfile.
Consider the following example to see exactly when ONBUILD steps are injected into a build. You need to create two Dockerfiles and execute two build commands to get the full experience. First, create an upstream Dockerfile that defines the ONBUILD instructions. Name the file base.df and add the following instructions:
FROM busybox:latest
WORKDIR /app
RUN touch /app/base-evidence
ONBUILD RUN ls -al /app
You can see that the image resulting from building base.df will add an empty file named base-evidence to the /app directory. The ONBUILD instruction will list the contents of the /app directory at build time, so it’s important that you not run the build in quiet mode if you want to see exactly when changes are made to the filesystem.
Next, create the downstream Dockerfile. When this is built, you will be able to see exactly when the changes are made to the resulting image. Name the file downstream.df and include the following contents:
FROM dockerinaction/ch8_onbuild
RUN touch downstream-evidence
RUN ls -al .
This Dockerfile will use an image named dockerinaction/ch8_onbuild as a base, so that’s the repository name you’ll want to use when you build the base. Then you can see that the downstream build will create a second file and then list the contents of /app again.
With these two files in place, you’re ready to start building. Run the following to create the upstream image:
docker image build -t dockerinaction/ch8_onbuild -f base.df .
The output of the build should look like this:
Sending build context to Docker daemon  3.072kB
Step 1/4 : FROM busybox:latest
 ---> 6ad733544a63
Step 2/4 : WORKDIR /app
Removing intermediate container dfc7a2022b01
 ---> 9bc8aeafdec1

Step 3/4 : RUN touch /app/base-evidence
 ---> Running in d20474e07e45
Removing intermediate container d20474e07e45
 ---> 5d4ca3516e28
Step 4/4 : ONBUILD RUN ls -al /app
 ---> Running in fce3732daa59
Removing intermediate container fce3732daa59
 ---> 6ff141f94502
Successfully built 6ff141f94502
Successfully tagged dockerinaction/ch8_onbuild:latest
Then build the downstream image with this command:
docker image build -t dockerinaction/ch8_onbuild_down -f downstream.df .
The results clearly show when the ONBUILD instruction (from the base image) is executed:
Sending build context to Docker daemon  3.072kB
Step 1/3 : FROM dockerinaction/ch8_onbuild
# Executing 1 build trigger
 ---> Running in 591f13f7a0e7
total 8
drwxr-xr-x    1 root     root          4096 Jun 18 03:12 .
drwxr-xr-x    1 root     root          4096 Jun 18 03:13 ..
-rw-r--r--    1 root     root             0 Jun 18 03:12 base-evidence
Removing intermediate container 591f13f7a0e7
 ---> 5b434b4be9d8
Step 2/3 : RUN touch downstream-evidence
 ---> Running in a42c0044d14d
Removing intermediate container a42c0044d14d
 ---> e48a5ea7b66f
Step 3/3 : RUN ls -al .
 ---> Running in 7fc9c2d3b3a2
total 8
drwxr-xr-x    1 root     root          4096 Jun 18 03:13 .
drwxr-xr-x    1 root     root          4096 Jun 18 03:13 ..
-rw-r--r--    1 root     root             0 Jun 18 03:12 base-evidence
-rw-r--r--    1 root     root             0 Jun 18 03:13 downstream-evidence
Removing intermediate container 7fc9c2d3b3a2
 ---> 46955a546cd3
Successfully built 46955a546cd3
Successfully tagged dockerinaction/ch8_onbuild_down:latest
You can see the builder registering the ONBUILD instruction with the container metadata in step 4 of the base build. Later, the output of the downstream image build shows which triggers (ONBUILD instructions) it has inherited from the base image. The builder discovers and processes the trigger immediately after step 0, the FROM instruction. The output then includes the result of the RUN instruction specified by the trigger. The output shows that only evidence of the base build is present. Later, when the builder moves on to instructions from the downstream Dockerfile, it lists the contents of the /app directory again. The evidence of both changes is listed.
That example is more illustrative than it is useful. You should consider browsing Docker Hub and looking for images tagged with onbuild suffixes to get an idea about how this is used in the wild. Here are a couple of our favorites:
8.4. Creating maintainable Dockerfiles
Dockerfile has features that make maintaining closely related images easier. These features help authors share metadata and data between images at build time. Let’s work through a couple of Dockerfile implementations and use these features to make them more concise and maintainable.
As you were writing the mailer application’s Dockerfiles, you may have noticed a few repeated bits that need to change for every update. The VERSION variable is the best example of repetition. The version metadata goes into the image tag, environment variable, and label metadata. There’s another issue, too. Build systems often derive version metadata from the application’s version-control system. We would prefer not to hardcode it in our Dockerfiles or scripts.
The Dockerfile’s ARG instruction provides a solution to these problems. ARG defines a variable that users can provide to Docker when building an image. Docker interpolates the argument value into the Dockerfile, allowing creation of parametrized Dockerfiles. You provide build arguments to the docker image build command by using one or more --build-arg <varname>=<value> options.
Let’s introduce the ARG VERSION instruction into mailer-base.df on line 2:
FROM debian:buster-20190910
ARG VERSION=unknown                       1
LABEL maintainer="dia@allingeek.com"
RUN groupadd -r -g 2200 example && \
    useradd -rM -g example -u 2200 example
ENV APPROOT="/app" \
    APP="mailer.sh" \
    VERSION="${VERSION}"
LABEL base.name="Mailer Archetype" \
      base.version="${VERSION}"
WORKDIR $APPROOT
ADD . $APPROOT
ENTRYPOINT ["/app/mailer.sh"]
EXPOSE 33333
- 1 Defines the VERSION build arg with default value “unknown”
Now the version can be defined once as a shell variable and passed on the command line as both the image tag and a build argument for use within the image:
version=0.6; docker image build -t dockerinaction/mailer-base:${version} \
    -f mailer-base.df \
    --build-arg VERSION=${version} \
    .
Let’s use docker image inspect to verify that the VERSION was substituted all the way down to the base.version label:
docker image inspect --format '{{ json .Config.Labels }}' \
    dockerinaction/mailer-base:0.6
The inspect command should produce JSON output that looks like this:
{
  "base.name": "Mailer Archetype",
  "base.version": "0.6",
  "maintainer": "dia@allingeek.com"
}
If you had not specified VERSION as a build argument, the default value of unknown would be used and a warning printed during the build process.
Let’s turn our attention to multistage builds, which can help manage important concerns by distinguishing between phases of an image build. Multistage builds can help solve a few common problems. The primary uses are reusing parts of another image, separating the build of an application from the build of an application runtime image, and enhancing an application’s runtime image with specialized test or debug tools. The example that follows demonstrates reusing parts of another image as well as separating an application’s build and runtime concerns. First, let’s learn about Dockerfile’s multistage feature.
A multistage Dockerfile is a Dockerfile that has multiple FROM instructions. Each FROM instruction marks a new build stage whose final layer may be referenced in a downstream stage. The build stage is named by appending AS <name> to the FROM instruction, where name is an identifier you specify, such as builder. The name can be used in subsequent FROM and COPY --from=<name|index> instructions, providing a convenient way to identify the source layer for files brought into the image build. When you build a Dockerfile with multiple stages, the build process still produces a single Docker image. The image is produced from the final stage executed in the Dockerfile.
Let’s demonstrate the use of multistage builds with an example that uses two stages and a bit of composition; see figure 8.2. An easy way to follow along with this example is to clone the Git repository at git@github.com:dockerinaction/ch8_multi_stage_build.git.
Figure 8.2. Multistage Docker builds
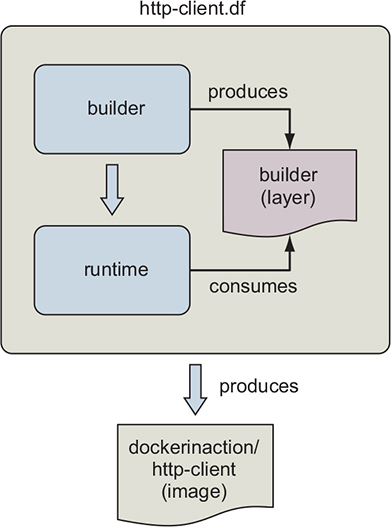
This Dockerfile defines two stages: builder and runtime. The builder stage gathers dependencies and builds the example program. The runtime stage copies the certificate authority (CA) and program files into the runtime image for execution. The source of the http-client.df Dockerfile is as follows:
#################################################
# Define a Builder stage and build app inside it
FROM golang:1-alpine as builder

# Install CA Certificates
RUN apk update && apk add ca-certificates

# Copy source into Builder
ENV HTTP_CLIENT_SRC=$GOPATH/src/dia/http-client/
COPY . $HTTP_CLIENT_SRC
WORKDIR $HTTP_CLIENT_SRC

# Build HTTP Client
RUN CGO_ENABLED=0 GOOS=linux GOARCH=amd64 \
    go build -v -o /go/bin/http-client

#################################################
# Define a stage to build a runtime image.
FROM scratch as runtime
ENV PATH="/bin"
# Copy CA certificates and application binary from builder stage
COPY --from=builder \
    /etc/ssl/certs/ca-certificates.crt /etc/ssl/certs/ca-certificates.crt
COPY --from=builder /go/bin/http-client /http-client
ENTRYPOINT ["/http-client"]
Let’s examine the image build in detail. The FROM golang:1-alpine as builder instruction declares that the first stage will be based on Golang’s alpine image variation and aliased to builder for easy referencing by later stages. First, builder installs certificate authority files used to establish Transport Layer Security (TLS) connections supporting HTTPS. These CA files aren’t used in this stage, but will be stored for composition by the runtime image. Next, the builder stage copies the http-client source code into the container and builds the http-client Golang program into a static binary. The http-client program is stored in the builder container at /go/bin/http-client.
The http-client program is simple. It makes an HTTP request to retrieve its own source code from GitHub:
package main

import (
    "net/http"
)
import "io/ioutil"
import "fmt"

func main() {
    url := "https://raw.githubusercontent.com/" +

       "dockerinaction/ch8_multi_stage_build/master/http-client.go"
    resp, err := http.Get(url)

    if err != nil {
            panic(err)
    }
    defer resp.Body.Close()
    body, err := ioutil.ReadAll(resp.Body)
    fmt.Println("response:\n", string(body))
}
The runtime stage is based on scratch. When you build an image FROM scratch, the filesystem begins empty and the image will contain only what is COPY’d there. Notice that the http.Get statement retrieves the file by using the HTTPS protocol. This means the program will need a set of valid TLS certificate authorities. CA authorities are available from the builder stage because you installed them previously. The runtime stage copies both the ca-certificates.crt and http-client files from the builder stage into the runtime stage with the following:
COPY --from=builder \
    /etc/ssl/certs/ca-certificates.crt /etc/ssl/certs/ca-certificates.crt
COPY --from=builder /go/bin/http-client /http-client
The runtime stage finishes by setting the ENTRYPOINT of the image to /http-client, which will be invoked when the container starts. The final image will contain just two files. You can build the image with a command like this:
docker build -t dockerinaction/http-client -f http-client.df .
The image can be executed as follows:
docker container run --rm -it dockerinaction/http-client:latest
When the http-client image runs successfully, it will output the http-client.go source code listed previously. To recap, the http-client.df Dockerfile uses a builder stage to retrieve runtime dependencies and build the http-client program. The runtime stage then copies http-client and its dependencies from the builder stage onto the minimal scratch base and configures it for execution. The resulting image contains only what is needed to run the program and is just over 6 MB in size. In the next section, we’ll work through a different style of application delivery using defensive startup scripts.
8.5. Using startup scripts and multiprocess containers
Whatever tooling you choose to use, you’ll always need to consider a few image design aspects. You’ll need to ask yourself whether the software running in your container requires any startup assistance, supervision, monitoring, or coordination with other in-container processes. If so, you’ll need to include a startup script or initialization program with the image and install it as the entrypoint.
8.5.1. Environmental preconditions validation
Failure modes are difficult to communicate and can catch someone off guard if they occur at arbitrary times. If container configuration problems always cause failures at startup time for an image, users can be confident that a started container will keep running.
In software design, failing fast and precondition validation are best practices. It makes sense that the same should hold true for image design. The preconditions that should be evaluated are assumptions about the context.
Docker containers have no control over the environment where they’re created. They do, however, have control of their own execution. An image author can solidify the user experience of their image by introducing environment and dependency validation prior to execution of the main task. A container user will be better informed about the requirements of an image if containers built from that image fail fast and display descriptive error messages.
For example, WordPress requires certain environment variables to be set or container links to be defined. Without that context, WordPress would be unable to connect to the database where the blog data is stored. It would make no sense to start WordPress in a container without access to the data it’s supposed to serve. WordPress images use a script as the container entrypoint. That script validates that the container context is set in a way that’s compatible with the contained version of WordPress. If any required condition is unmet (a link is undefined or a variable is unset), the script will exit before starting WordPress, and the container will stop unexpectedly.
Validating the preconditions for a program startup is generally use-case specific. If you’re packaging software into an image, you’ll usually need to write a script or carefully configure the tool used to start the program yourself. The startup process should validate as much of the assumed context as possible. This should include the following:
- Presumed links (and aliases)
- Environment variables
- Secrets
- Network access
- Network port availability
- Root filesystem mount parameters (read-write or read-only)
- Volumes
- Current user
You can use whichever scripting or programming language you want to accomplish this task. In the spirit of building minimal images, it’s a good idea to use a language or scripting tool that’s already included with the image. Most base images ship with a shell such as /bin/sh or /bin/bash. Shell scripts are the most common because shell programs are commonly available and they easily adapt to program and environment-specific requirements. When building an image from scratch for a single binary such as the http-client example from section 8.4, the program is responsible for validating its own preconditions, as no other programs will exist in the container.
Consider the following shell script that might accompany a program that depends on a web server. At container startup, this script enforces that either another container has been linked to the web alias and has exposed port 80, or the WEB_HOST environment variable has been defined:
#!/bin/bash
set -e

if [ -n "$WEB_PORT_80_TCP" ]; then
  if [ -z "$WEB_HOST" ]; then
    WEB_HOST='web'
  else
    echo >&2 '[WARN]: Linked container, "web" overridden by $WEB_HOST.'
    echo >&2 "===> Connecting to WEB_HOST ($WEB_HOST)"
  fi
fi

if [ -z "$WEB_HOST" ]; then
  echo >&2 '[ERROR]: specify container to link; "web" or WEB_HOST env var'
  exit 1
fi
exec "$@" # run the default command
If you’re unfamiliar with shell scripting, this is an appropriate time to learn it. The topic is approachable, and several excellent resources are available for self-directed learning. This specific script uses a pattern in which both an environment variable and a container link are tested. If the environment variable is set, the container link will be ignored. Finally, the default command is executed.
Images that use a startup script to validate configuration should fail fast if someone uses them incorrectly, but those same containers may fail later for other reasons. You can combine startup scripts with container restart policies to make reliable containers. But container restart policies are not perfect solutions. Containers that have failed and are waiting to be restarted aren’t running. This means that an operator won’t be able to execute another process within a container that’s in the middle of a backoff window. The solution to this problem involves making sure the container never stops.
8.5.2. Initialization processes
UNIX-based computers usually start an initialization (init) process first. That init process is responsible for starting all the other system services, keeping them running, and shutting them down. It’s often appropriate to use an init-style system to launch, manage, restart, and shut down container processes with a similar tool.
Init processes typically use a file or set of files to describe the ideal state of the initialized system. These files describe what programs to start, when to start them, and what actions to take when they stop. Using an init process is the best way to launch multiple programs, clean up orphaned processes, monitor processes, and automatically restart any failed processes.
If you decide to adopt this pattern, you should use the init process as the entrypoint of your application-oriented Docker container. Depending on the init program you use, you may need to prepare the environment beforehand with a startup script.
For example, the runit program doesn’t pass environment variables to the programs it launches. If your service uses a startup script to validate the environment, it won’t have access to the environment variables it needs. The best way to fix that problem might be to use a startup script for the runit program. That script might write the environment variables to a file so the startup script for your application can access them.
Several open source init programs exist. Full-featured Linux distributions ship with heavyweight and full-featured init systems such as SysV, Upstart, and systemd. Linux Docker images such as Ubuntu, Debian, and CentOS typically have their init programs installed but nonfunctioning out of the box. These can be complex to configure and may have hard dependencies on resources that require root access. For that reason, the community has tended toward the use of lighter-weight init programs.
Popular options include runit, tini, BusyBox init, Supervisord, and DAEMON Tools. These all attempt to solve similar problems, but each has its benefits and costs. Using an init process is a best practice for application containers, but there’s no perfect init program for every use case. When evaluating any init program for use in a container, consider these factors:
- Additional dependencies the program brings into the image
- File sizes
- How the program passes signals to its child processes (or if it does at all)
- Required user access
- Monitoring and restart functionality (backoff-on-restart features are a bonus)
- Zombie process cleanup features
Init processes are so important that Docker provides an --init option to run an init process inside the container to manage the program being executed. The --init option can be used to add an init process to an existing image. For example, you can run Netcat using the alpine:3.6 image and manage it with an init process:
docker container run -it --init alpine:3.6 nc -l -p 3000
If you inspect the host’s processes with ps -ef, you will see Docker ran /dev/init -- nc -l -p 3000 inside the container instead of just nc. Docker uses the tini program as an init process by default, though you may specify another init process instead.
Whichever init program you decide on, make sure your image uses it to boost adopter confidence in containers created from your image. If the container needs to fail fast to communicate a configuration problem, make sure the init program won’t hide that failure. Now that you have a solid foundation for running and signaling processes inside containers, let’s see how to communicate the health of containerized processes to collaborators.
8.5.3. The purpose and use of health checks
Health checks are used to determine whether the application running inside the container is ready and able to perform its function. Engineers define application-specific health checks for containers to detect conditions when the application is running, but is stuck or has broken dependencies.
Docker runs a single command inside the container to determine whether the application is healthy. There are two ways to specify the health check command:
- Use a HEALTHCHECK instruction when defining the image
- On the command-line when running a container
This Dockerfile defines a health check for the NGINX web server:
FROM nginx:1.13-alpine

HEALTHCHECK --interval=5s --retries=2 \
  CMD nc -vz -w 2 localhost 80 || exit 1
The health check command should be reliable, lightweight, and not interfere with the operation of the main application because it will be executed frequently. The command’s exit status will be used to determine the container’s health. Docker has defined the following exit statuses:
- 0: success— The container is healthy and ready for use.
- 1: unhealthy— The container is not working correctly.
- 2: reserved— Do not use this exit code.
Most programs in the UNIX world exit with a 0 status when things went as expected, and a nonzero status otherwise. The || exit 1 is a bit of shell trickery that means or exit 1. This means whenever nc exits with any nonzero status, nc’s status will be converted to 1 so that Docker knows the container is unhealthy. Conversion of nonzero exit statuses to 1 is a common pattern because Docker does not define the behavior of all nonzero health check statuses, only 1 and 2. As of this writing, use of an exit code whose behavior is not defined will result in an unhealthy status.
Let’s build and run the NGINX example:
docker image build -t dockerinaction/healthcheck .
docker container run --name healthcheck_ex -d dockerinaction/healthcheck
Now that a container with a health check is running, you can inspect the container’s health status with docker ps. When a health check is defined, the docker ps command reports the container’s current health status in the STATUS column. Docker ps output can be a bit unwieldy, so you will use a custom format that prints the container name, image name, and status in a table:
docker ps --format 'table {{.Names}}\t{{.Image}}\t{{.Status}}'
NAMES               IMAGE                        STATUS
healthcheck_ex      dockerinaction/healthcheck   Up 3 minutes (healthy)
By default, the health check command will be run every 30 seconds, and three failed checks are required before transitioning the container’s health_status to unhealthy. The health check interval and number of consecutive failures before reporting a container as unhealthy can be adjusted in the HEALTHCHECK instruction or when running the container.
The health check facility also supports options for the following:
- Time-out— A time-out for the health check command to run and exit.
- Start period— A grace period at the start of a container to not count health check failures toward the health status; once the health check command returns healthy, the container is considered started, and subsequent failures count toward the health status.
Image authors should define a useful health check in images where possible. Usually this means exercising the application in some way or checking an internal application health status indicator such as a /health endpoint on a web server. However, sometimes it is impractical to define a HEALTHCHECK instruction because not enough is known about how the image will run ahead of time. To address this problem, Docker provides the --health-cmd to define a health check when running a container.
Let’s take the previous HEALTHCHECK example and specify the health check when running the container instead:
docker container run --name=healthcheck_ex -d \
  --health-cmd='nc -vz -w 2 localhost 80 || exit 1' \
  nginx:1.13-alpine
Defining a health check at runtime overrides the health check defined in the image if one exists. This is useful for integrating a third-party image because you can account for requirements specific to your environment.
These are the tools at your disposal to build images that result in durable containers. Durability is not security, and although adopters of your durable images might trust that they will keep running as long as they can, they shouldn’t trust your images until they’ve been hardened.
8.6. Building hardened application images
As an image author, it’s difficult to anticipate all the scenarios where your work will be used. For that reason, harden the images you produce whenever possible. Hardening an image is the process of shaping it in a way that will reduce the attack surface inside any Docker containers based on it.
A general strategy for hardening an application image is to minimize the software included with it. Naturally, including fewer components reduces the number of potential vulnerabilities. Further, building minimal images keeps image download times short and helps adopters deploy and build containers more rapidly.
You can do three things to harden an image beyond that general strategy. First, you can enforce that your images are built from a specific image. Second, you can make sure that regardless of how containers are built from your image, they will have a sensible default user. Last, you should eliminate a common path for root user escalation from programs with setuid or setgid attributes set.
8.6.1. Content-addressable image identifiers
The image identifiers discussed so far in this book are all designed to allow an author to update images in a transparent way to adopters. An image author chooses what image their work will be built on top of, but that layer of transparency makes it difficult to trust that the base hasn’t changed since it was vetted for security problems. Since Docker 1.6, the image identifier has included an optional digest component.
An image ID that includes the digest component is called a content-addressable image identifier (CAIID). This refers to a specific layer containing specific content, instead of simply referring to a particular and potentially changing layer.
Now image authors can enforce a build from a specific and unchanging starting point as long as that image is in a version 2 repository. Append an @ symbol followed by the digest in place of the standard tag position.
Use docker image pull and observe the line labeled Digest in the output to discover the digest of an image from a remote repository. Once you have the digest, you can use it as the identifier to FROM instructions in a Dockerfile. For example, consider the following, which uses a specific snapshot of debian:stable as a base:
docker pull debian:stable
stable: Pulling from library/debian
31c6765cabf1: Pull complete
Digest: sha256:6aedee3ef827...

# Dockerfile:
FROM debian@sha256:6aedee3ef827...
...
Regardless of when or how many times the Dockerfile is used to build an image, each build will use the content identified with that CAIID as its base image. This is particularly useful for incorporating known updates to a base into your images and identifying the exact build of the software running on your computer.
Although this doesn’t directly limit the attack surface of your images, using CAIIDs will prevent it from changing without your knowledge. The next two practices do address the attack surface of an image.
8.6.2. User permissions
The known container breakout tactics all rely on having system administrator privileges inside the container. Chapter 6 covers the tools used to harden containers. That chapter includes a deep dive into user management and a discussion of the USR Linux namespace. This section covers standard practices for establishing reasonable user defaults for images.
First, please understand that a Docker user can always override image defaults when creating a container. For that reason, there’s no way for an image to prevent containers from running as the root user. The best things an image author can do are to create other nonroot users and establish a nonroot default user and group.
Dockerfile includes a USER instruction that sets the user and group in the same way you would with the docker container run or docker container create command. The instruction itself was covered in the Dockerfile primer. This section is about considerations and best practices.
The best practice and general guidance is to drop privileges as soon as possible. You can do this with the USER instruction before any containers are ever created or with a startup script that’s run at container boot time. The challenge for an image author is to determine the earliest appropriate time.
If you drop privileges too early, the active user may not have permission to complete the instructions in a Dockerfile. For example, this Dockerfile won’t build correctly:
FROM busybox:latest
USER 1000:1000
RUN touch /bin/busybox
Building that Dockerfile would result in step 2 failing with a message like touch: /bin/busybox: Permission denied. File access is obviously impacted by user changes. In this case, UID 1000 doesn’t have permission to change the ownership of the file /bin/busybox. That file is currently owned by root. Reversing the second and third lines would fix the build.
The second timing consideration is the permissions and capabilities needed at runtime. If the image starts a process that requires administrative access at runtime, it would make no sense to drop user access to a non-root user before that point. For example, any process that needs access to the system port range (1–1024) will need to be started by a user with administrative (at the very least CAP_NET _ADMIN) privileges. Consider what happens when you try to bind to port 80 as a nonroot user with Netcat. Place the following Dockerfile in a file named UserPermissionDenied.df:
FROM busybox:1.29
USER 1000:1000
ENTRYPOINT ["nc"]
CMD ["-l", "-p", "80", "0.0.0.0"]
Build the Dockerfile and run the resulting image in a container. In this case, the user (UID 1000) will lack the required privileges, and the command will fail:
docker image build \
    -t dockerinaction/ch8_perm_denied \
    -f UserPermissionDenied.df \
    .
docker container run dockerinaction/ch8_perm_denied
The container should print an error message:
nc: bind: Permission denied
In cases like these, you may see no benefit in changing the default user. Instead, any startup scripts that you build should take on the responsibility of dropping permissions as soon as possible. The last question is, which user should be dropped into?
In the default Docker configuration, containers use the same Linux USR namespace as the host. This means that UID 1000 in the container is UID 1000 on the host machine. All other aspects apart from the UID and GID are segregated, just as they would be between computers. For example, UID 1000 on your laptop might be your username, but the username associated with UID 1000 inside a BusyBox container could be default, busyuser, or whatever the BusyBox image maintainer finds convenient. When the Docker userns-remap feature described in chapter 6 is enabled, UIDs in the container are mapped to unprivileged UIDs on the host. USR namespace remapping provides full UID and GID segregation, even for root. But can you depend on userns-remap being in effect?
Image authors often do not know the Docker daemon configuration where their images will run. Even if Docker adopted USR namespace remapping in a default configuration, it will be difficult for image authors to know which UID/GID is appropriate to use. The only thing we can be sure of is that it’s inappropriate to use common or system-level UID/GIDs when doing so can be avoided. With that in mind, using raw UID/GID numbers is still burdensome. Doing so makes scripts and Dockerfiles less readable. For that reason, it’s typical for image authors to include RUN instructions that create users and groups used by the image. The following is the second instruction in a PostgreSQL Dockerfile:
# add our user and group first to make sure their IDs get assigned
# consistently, regardless of whatever dependencies get added
RUN groupadd -r postgres && useradd -r -g postgres postgres
This instruction simply creates a postgres user and group with automatically assigned UID and GID. The instruction is placed early in the Dockerfile so that it will always be cached between rebuilds, and the IDs remain consistent regardless of other users that are added as part of the build. This user and group could then be used in a USER instruction. That would make for a safer default. But PostgreSQL containers require elevated privileges during startup. Instead, this particular image uses a su or sudo-like program called gosu to start the PostgreSQL process as the postgres user. Doing so makes sure that the process runs without administrative access in the container.
User permissions are one of the more nuanced aspects of building Docker images. The general rule you should follow is that if the image you’re building is designed to run specific application code, the default execution should drop user permissions as soon as possible.
A properly functioning system should be reasonably secure with reasonable defaults in place. Remember, though, an application or arbitrary code is rarely perfect and could be intentionally malicious. For that reason, you should take additional steps to reduce the attack surface of your images.
8.6.3. SUID and SGID permissions
The last hardening action to cover is the mitigation of setuid (SUID) or setgid (SGID) permissions. The well-known filesystem permissions (read, write, execute) are only a portion of the set defined by Linux. In addition to those, two are of particular interest: SUID and SGID.
These two are similar in nature. An executable file with the SUID bit set will always execute as its owner. Consider a program like /usr/bin/passwd, which is owned by the root user and has the SUID permission set. If a nonroot user such as bob executes passwd, he will execute that program as the root user. You can see this in action by building an image from the following Dockerfile:
FROM ubuntu:latest
# Set the SUID bit on whoami
RUN chmod u+s /usr/bin/whoami
# Create an example user and set it as the default
RUN adduser --system --no-create-home --disabled-password --disabled-login \
    --shell /bin/sh example
USER example
# Set the default to compare the container user and
# the effective user for whoami
CMD  printf "Container running as:          %s\n" $(id -u -n) && \
     printf "Effectively running whoami as: %s\n" $(whoami)
Once you’ve created the Dockerfile, you need to build an image and run the default command in a container:
docker image build -t dockerinaction/ch8_whoami .
docker run dockerinaction/ch8_whoami
Doing so prints results like these to the terminal:
Container running as:          example
Effectively running whoami as: root
The output of the default command shows that even though you’ve executed the whoami command as the example user, it’s running from the context of the root user. The SGID works similarly. The difference is that the execution will be from the owning group’s context, not the owning user.
Running a quick search on your base image will give you an idea of how many and which files have these permissions:
docker run --rm debian:stretch find / -perm /u=s -type f
It will display a list like this:
/bin/umount
/bin/ping
/bin/su
/bin/mount
/usr/bin/chfn
/usr/bin/passwd
/usr/bin/newgrp
/usr/bin/gpasswd
/usr/bin/chsh
This command will find all of the SGID files:
docker container run --rm debian:stretch find / -perm /g=s -type f
The resulting list is much shorter:
/sbin/unix_chkpwd
/usr/bin/chage
/usr/bin/expiry
/usr/bin/wall
Each of the listed files in this particular image has the SUID or SGID permission, and a bug in any of them could be used to compromise the root account inside a container. The good news is that files that have either of these permissions set are typically useful during image builds but rarely required for application use cases. If your image is going to be running software that’s arbitrary or externally sourced, it’s a best practice to mitigate this risk of escalation.
Fix this problem and either delete all these files or unset their SUID and SGID permissions. Taking either action would reduce the image’s attack surface. The following Dockerfile instruction will unset the SUID and GUID permissions on all files currently in the image:
RUN for i in $(find / -type f \( -perm /u=s -o -perm /g=s \)); \
    do chmod ug-s $i; done
Hardening images will help users build hardened containers. Although it’s true that no hardening measures will protect users from intentionally building weak containers, those measures will help the more unsuspecting and most common type of user.
Summary
Most Docker images are built automatically from Dockerfiles. This chapter covers the build automation provided by Docker and Dockerfile best practices. Before moving on, make sure that you’ve understood these key points:
- Docker provides an automated image builder that reads instructions from Dockerfiles.
- Each Dockerfile instruction results in the creation of a single image layer.
- Merge instructions to minimize the size of images and layer count when possible.
- Dockerfiles include instructions to set image metadata including the default user, exposed ports, default command, and entrypoint.
- Other Dockerfile instructions copy files from the local filesystem or a remote location into the produced images.
- Downstream builds inherit build triggers that are set with ONBUILD instructions in an upstream Dockerfile.
- Dockerfile maintenance can be improved with multistage builds and the ARG instruction.
- Startup scripts should be used to validate the execution context of a container before launching the primary application.
- A valid execution context should have appropriate environment variables set, network dependencies available, and an appropriate user configuration.
- Init programs can be used to launch multiple processes, monitor those processes, reap orphaned child processes, and forward signals to child processes.
- Images should be hardened by building from content-addressable image identifiers, creating a nonroot default user, and disabling or removing any executable with SUID or SGID permissions.