Chapter 7. Packaging software in images
- Manual image construction and practices
- Images from a packaging perspective
- Working with flat images
- Image versioning best practices
The goal of this chapter is to help you understand the concerns of image design, learn the tools for building images, and discover advanced image patterns. You will accomplish these things by working through a thorough real-world example. Before getting started, you should have a firm grasp on the concepts in part 1 of this book.
You can create a Docker image by either modifying an existing image inside a container or defining and executing a build script called a Dockerfile. This chapter focuses on the process of manually changing an image, the fundamental mechanics of image manipulation, and the artifacts that are produced. Dockerfiles and build automation are covered in chapter 8.
7.1. Building Docker images from a container
It’s easy to get started building images if you’re already familiar with using containers. Remember, a union filesystem (UFS) mount provides a container’s filesystem. Any changes that you make to the filesystem inside a container will be written as new layers owned by the container that created them.
Before you work with real software, the next section details the typical workflow with a “Hello, World” example.
7.1.1. Packaging “Hello, World”
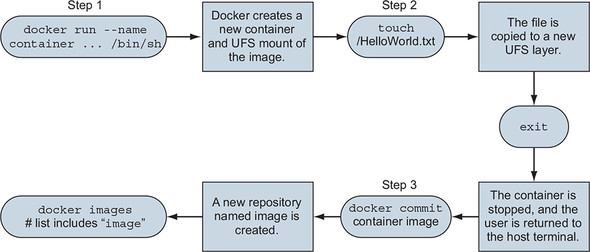
The basic workflow for building an image from a container includes three steps. First, you create a container from an existing image. You choose the image based on what you want to be included with the new finished image and the tools you need to make the changes.
The second step is to modify the filesystem of the container. These changes will be written to a new layer of the container’s union filesystem. We’ll revisit the relationship between images, layers, and repositories later in this chapter.
Once the changes have been made, the last step is to commit those changes. Then you’ll be able to create new containers from the resulting image. Figure 7.1 illustrates this workflow.
Figure 7.1. Building an image from a container
With these steps in mind, work through the following commands to create a new image named hw_image:
docker container run --name hw_container \
    ubuntu:latest \
    touch /HelloWorld                               1

docker container commit hw_container hw_image       2

docker container rm -vf hw_container                3

docker container run --rm \
    hw_image \
    ls -l /HelloWorld                               4
- 1 Modifies file in container
- 2 Commits change to new image
- 3 Removes changed container
- 4 Examines file in new container
If that seems stunningly simple, you should know that it does become a bit more nuanced as the images you produce become more sophisticated, but the basic steps will always be the same. Now that you have an idea of the workflow, you should try to build a new image with real software. In this case, you’ll be packaging a program called Git.
7.1.2. Preparing packaging for Git
Git is a popular, distributed version-control tool. Whole books have been written about the topic. If you’re unfamiliar with it, we recommend that you spend some time learning how to use Git. At the moment, though, you need to know only that it’s a program you’re going to install onto an Ubuntu image.
To get started building your own image, the first thing you’ll need is a container created from an appropriate base image:
docker container run -it --name image-dev ubuntu:latest /bin/bash
This will start a new container running the bash shell. From this prompt, you can issue commands to customize your container. Ubuntu ships with a Linux tool for software installation called apt-get. This will come in handy for acquiring the software that you want to package in a Docker image. You should now have an interactive shell running with your container. Next, you need to install Git in the container. Do that by running the following commands:
apt-get update
apt-get -y install git
This will tell APT to download and install Git and all its dependencies on the container’s filesystem. When it’s finished, you can test the installation by running the git program:
git version
# Output something like:
# git version 2.7.4
Package tools like apt-get make installing and uninstalling software easier than if you had to do everything by hand. But they provide no isolation to that software, and dependency conflicts often occur. You can be sure that other software you install outside this container won’t impact the version of Git you have installed in this container.
Now that Git has been installed on your Ubuntu container, you can simply exit the container:
exit
The container should be stopped but still present on your computer. Git has been installed in a new layer on top of the ubuntu:latest image. If you were to walk away from this example right now and return a few days later, how would you know exactly what changes were made? When you’re packaging software, it’s often useful to review the list of files that have been modified in a container, and Docker has a command for that.
7.1.3. Reviewing filesystem changes
Docker has a command that shows you all the filesystem changes that have been made inside a container. These changes include added, changed, or deleted files and directories. To review the changes that you made when you used APT to install Git, run the diff subcommand:
docker container diff image-dev 1
- 1 Outputs a LONG list of file changes
Lines that start with an A are files that were added. Those starting with a C were changed. Finally, those with a D were deleted. Installing Git with APT in this way made several changes. For that reason, it might be better to see this at work with a few specific examples:
docker container run --name tweak-a busybox:latest touch /HelloWorld   1
docker container diff tweak-a
# Output:
#    A /HelloWorld

docker container run --name tweak-d busybox:latest rm /bin/vi          2
docker container diff tweak-d
# Output:
#    C /bin
#    D /bin/vi

docker container run --name tweak-c busybox:latest touch /bin/vi       3
docker container diff tweak-c
# Output:
#    C /bin
#    C /bin/busybox
- 1 Adds new file to busybox
- 2 Removes existing file from busybox
- 3 Changes existing file in busybox
Always remember to clean up your workspace, like this:
docker container rm -vf tweak-a
docker container rm -vf tweak-d
docker container rm -vf tweak-c
Now that you’ve seen the changes you’ve made to the filesystem, you’re ready to commit the changes to a new image. As with most other things, this involves a single command that does several things.
7.1.4. Committing a new image
You use the docker container commit command to create an image from a modified container. It’s a best practice to use the -a flag that signs the image with an author string. You should also always use the -m flag, which sets a commit message. Create and sign a new image that you’ll name ubuntu-git from the image-dev container where you installed Git:
docker container commit -a "@dockerinaction" -m "Added git" \
  image-dev ubuntu-git
# Outputs a new unique image identifier like:
# bbf1d5d430cdf541a72ad74dfa54f6faec41d2c1e4200778e9d4302035e5d143
Once you’ve committed the image, it should show up in the list of images installed on your computer. Running docker images should include a line like this:
REPOSITORY    TAG      IMAGE ID      CREATED        VIRTUAL SIZE
ubuntu-git    latest   bbf1d5d430cd  5 seconds ago  248 MB
Make sure it works by testing Git in a container created from that image:
docker container run --rm ubuntu-git git version
Now you’ve created a new image based on an Ubuntu image and installed Git. That’s a great start, but what do you think will happen if you omit the command override? Try it to find out:
docker container run --rm ubuntu-git
Nothing appears to happen when you run that command. That’s because the command you started the original container with was committed with the new image. The command you used to start the container that the image was created by was /bin/bash. When you create a container from this image by using the default command, it will start a shell and immediately exit. That’s not a terribly useful default command.
I doubt that any users of an image named ubuntu-git would expect that they’d need to manually invoke Git each time. It would be better to set an entrypoint on the image to git. An entrypoint is the program that will be executed when the container starts. If the entrypoint isn’t set, the default command will be executed directly. If the entrypoint is set, the default command and its arguments will be passed to the entrypoint as arguments.
To set the entrypoint, you need to create a new container with the --entrypoint flag set and create a new image from that container:
docker container run --name cmd-git --entrypoint git ubuntu-git   1

docker container commit -m "Set CMD git" \
    -a "@dockerinaction" cmd-git ubuntu-git                       2

docker container rm -vf cmd-git                                   3

docker container run --name cmd-git ubuntu-git version            4
- 1 Shows standard git help and exit
- 2 Commits new image to same name
- 3 Cleanup
- 4 Test
Now that the entrypoint has been set to git, users no longer need to type the command at the end. This might seem like a marginal savings with this example, but many tools that people use are not as succinct. Setting the entrypoint is just one thing you can do to make images easier for people to use and integrate into their projects.
7.1.5. Configuring image attributes
When you use docker container commit, you commit a new layer to an image. The filesystem snapshot isn’t the only thing included with this commit. Each layer also includes metadata describing the execution context. Of the parameters that can be set when a container is created, all the following will carry forward with an image created from the container:
- All environment variables
- The working directory
- The set of exposed ports
- All volume definitions
- The container entrypoint
- Command and arguments
If these values weren’t specifically set for the container, the values will be inherited from the original image. Part 1 of this book covers each of these, so we won’t reintroduce them here. But it may be valuable to examine two detailed examples. First, consider a container that introduces two environment variable specializations:
docker container run --name rich-image-example \
    -e ENV_EXAMPLE1=Rich -e ENV_EXAMPLE2=Example \    1
    busybox:latest

docker container commit rich-image-example rie        2

docker container run --rm rie \
    /bin/sh -c "echo \$ENV_EXAMPLE1 \$ENV_EXAMPLE2"   3
Next, consider a container that introduces an entrypoint and command specialization as a new layer on top of the previous example:
docker container run --name rich-image-example-2 \
    --entrypoint "/bin/sh" \                          1
    rie \
    -c "echo \$ENV_EXAMPLE1 \$ENV_EXAMPLE2"           2

docker container commit rich-image-example-2 rie      3

docker container run --rm rie                         4
- 1 Sets default entrypoint
- 2 Sets default command
- 3 Commits image
- 4 Different command with same output
This example builds two additional layers on top of BusyBox. In neither case are files changed, but the behavior changes because the context metadata has been altered. These changes include two new environment variables in the first new layer. Those environment variables are clearly inherited by the second new layer, which sets the entrypoint and default command to display their values. The last command uses the final image without specifying any alternative behavior, but it’s clear that the previous defined behavior has been inherited.
Now that you understand how to modify an image, take the time to dive deeper into the mechanics of images and layers. Doing so will help you produce high-quality images in real-world situations.
7.2. Going deep on Docker images and layers
By this point in the chapter, you’ve built a few images. In those examples, you started by creating a container from an image such as ubuntu:latest or busybox:latest. Then you made changes to the filesystem or context within that container. Finally, everything seemed to just work when you used the docker container commit command to create a new image. Understanding how the container’s filesystem works and what the docker container commit command actually does will help you become a better image author. This section dives into that subject and demonstrates the impact to authors.
7.2.1. Exploring union filesystems
Understanding the details of union filesystems is important for image authors for two reasons:
- Authors need to know the impact that adding, changing, and deleting files have on resulting images.
- Authors need have a solid understanding of the relationship between layers and how layers relate to images, repositories, and tags.
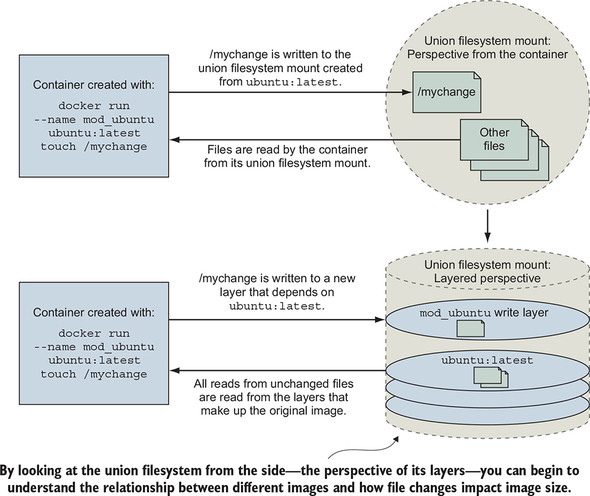
Start by considering a simple example. Suppose you want to make a single change to an existing image. In this case, the image is ubuntu:latest, and you want to add a file named mychange to the root directory. You should use the following command to do this:
docker container run --name mod_ubuntu ubuntu:latest touch /mychange
The resulting container (named mod_ubuntu) will be stopped but will have written that single change to its filesystem. As discussed in chapters 3 and 4, the root filesystem is provided by the image that the container was started from. That filesystem is implemented with a union filesystem.
A union filesystem is made up of layers. Each time a change is made to a union filesystem, that change is recorded on a new layer on top of all of the others. The union of all of those layers, or top-down view, is what the container (and user) sees when accessing the filesystem. Figure 7.2 illustrates the two perspectives for this example.
Figure 7.2. A simple file write example on a union filesystem from two perspectives
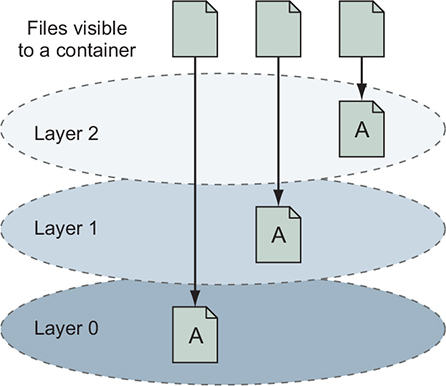
When you read a file from a union filesystem, that file will be read from the topmost layer where it exists. If a file was not created or changed on the top layer, the read will fall through the layers until it reaches a layer where that file does exist. This is illustrated in figure 7.3.
Figure 7.3. Reading files that are located on different layers
All this layer functionality is hidden by the union filesystem. No special actions need to be taken by the software running in a container to take advantage of these features. Understanding layers where files were added covers one of three types of filesystem writes. The other two are deletions and file changes.
Like additions, both file changes and deletions work by modifying the top layer. When a file is deleted, a delete record is written to the top layer, which hides any versions of that file on lower layers. When a file is changed, that change is written to the top layer, which again hides any versions of that file on lower layers. The changes made to the filesystem of a container are listed with the docker container diff command you used earlier in the chapter:
docker container diff mod_ubuntu
This command will produce the output:
A /mychange
The A in this case indicates that the file was added. Run the next two commands to see how a file deletion is recorded:
docker container run --name mod_busybox_delete busybox:latest rm /etc/passwd
docker container diff mod_busybox_delete
This time, the output will have two rows:
C /etc
D /etc/passwd
The D indicates a deletion, but this time the parent folder of the file is also included. The C indicates that it was changed. The next two commands demonstrate a file change:
docker container run --name mod_busybox_change busybox:latest touch \
     /etc/passwd
docker container diff mod_busybox_change
The diff subcommand will show two changes:
C /etc
C /etc/passwd
Again, the C indicates a change, and the two items are the file and the folder where it’s located. If a file nested five levels deep were changed, there would be a line for each level of the tree.
Changes to filesystem attributes such as file ownership and permissions are recorded in the same way as changes to files. Be careful when modifying filesystem attributes on large numbers of files, as those files will likely be copied into the layer performing the change. File-change mechanics are the most important thing to understand about union filesystems, and we will examine that a little deeper next.
Most union filesystems use something called copy-on-write, which is easier to understand if you think of it as copy-on-change. When a file in a read-only layer (not the top layer) is modified, the whole file is first copied from the read-only layer into the writable layer before the change is made. This has a negative impact on runtime performance and image size. Section 7.2.3 covers the way this should influence your image design.
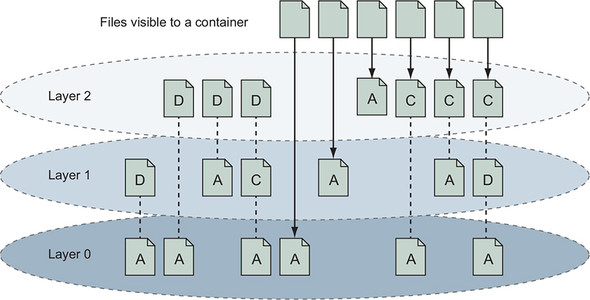
Take a moment to solidify your understanding of the system by examining how the more comprehensive set of scenarios is illustrated in figure 7.4. In this illustration, files are added, changed, deleted, and added again over a range of three layers.
Figure 7.4. Various file addition, change, and deletion combinations over a three-layered image
Knowing how filesystem changes are recorded, you can begin to understand what happens when you use the docker container commit command to create a new image.
7.2.2. Reintroducing images, layers, repositories, and tags
You’ve created an image by using the docker container commit command, and you understand that it commits the top-layer changes to an image. But we’ve yet to define commit.
Remember, a union filesystem is made up of a stack of layers, and new layers are added to the top of the stack. Those layers are stored separately as collections of the changes made in that layer and metadata for that layer. When you commit a container’s changes to its filesystem, you’re saving a copy of that top layer in an identifiable way.
When you commit the layer, a new ID is generated for it, and copies of all the file changes are saved. Exactly how this happens depends on the storage engine that’s being used on your system. It’s less important for you to understand the details than it is for you to understand the general approach. The metadata for a layer includes that generated identifier, the identifier of the layer below it (parent), and the execution context of the container that the layer was created from. Layer identities and metadata form the graph that Docker and the UFS use to construct images.
An image is the stack of layers that you get by starting with a given top layer and then following all the links defined by the parent ID in each layer’s metadata, as shown in figure 7.5.
Figure 7.5. An image is the collection of layers produced by traversing the parent graph from a top layer.

Images are stacks of layers constructed by traversing the layer dependency graph from a starting layer. The layer that the traversal starts from is the top of the stack. This means that a layer’s ID is also the ID of the image that it and its dependencies form. Take a moment to see this in action by committing the mod_ubuntu container you created earlier:
docker container commit mod_ubuntu
That commit subcommand will generate output that includes a new image ID like this:
6528255cda2f9774a11a6b82be46c86a66b5feff913f5bb3e09536a54b08234d
You can create a new container from this image by using the image ID as it’s presented to you. Like containers, layer IDs are large hexadecimal numbers that can be difficult for a person to work with directly. For that reason, Docker provides repositories.
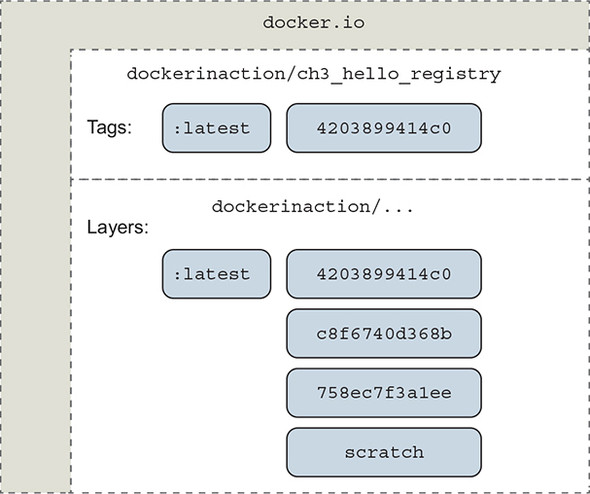
In chapter 3, a repository is roughly defined as a named bucket of images. More specifically, repositories are location/name pairs that point to a set of specific layer identifiers. Each repository contains at least one tag that points to a specific layer identifier and thus the image definition. Let’s revisit the example used in chapter 3:
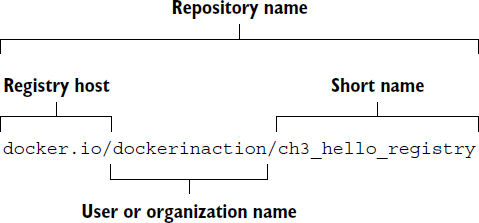
This repository is located in the Docker Hub registry, but we have used the fully qualified registry hostname, docker.io. It’s named for the user (dockerinaction) and a unique short name (ch3_hello_registry). If you pull this repository without specifying a tag, Docker will try to pull an image tagged with latest. You can pull all tagged images in a repository by adding the --all-tags option to your pull command. In this example, there’s only one tag: latest. That tag points to a layer with the short form ID 4203899414c0, as illustrated in figure 7.6.
Figure 7.6. A visual representation of repositories
Repositories and tags are created with the docker tag, docker container commit, or docker build commands. Revisit the mod_ubuntu container again and put it into a repository with a tag:
docker container commit mod_ubuntu myuser/myfirstrepo:mytag
# Outputs:
# 82ec7d2c57952bf57ab1ffdf40d5374c4c68228e3e923633734e68a11f9a2b59
The generated ID that’s displayed will be different because another copy of the layer was created. With this new friendly name, creating containers from your images requires little effort. If you want to copy an image, you need only to create a new tag or repository from the existing one. You can do that with the docker tag command. Every repository contains a latest tag by default. That will be used if the tag is omitted, as in the previous command:
docker tag myuser/myfirstrepo:mytag myuser/mod_ubuntu
By this point, you should have a strong understanding of basic UFS fundamentals as well as how Docker creates and manages layers, images, and repositories. With these in mind, let’s consider how they might impact image design.
All layers below the writable layer created for a container are immutable, meaning they can never be modified. This property makes it possible to share access to images instead of creating independent copies for every container. It also makes individual layers highly reusable. The other side of this property is that any time you make changes to an image, you need to add a new layer, and old layers are never removed. Knowing that images will inevitably need to change, you need to be aware of any image limitations and keep in mind how changes impact image size.
7.2.3. Managing image size and layer limits
If images evolved in the same way that most people manage their filesystems, Docker images would quickly become unusable. For example, suppose you want to make a different version of the ubuntu-git image you created earlier in this chapter. It may seem natural to modify that ubuntu-git image. Before you do, create a new tag for your ubuntu-git image. You’ll be reassigning the latest tag:
docker image tag ubuntu-git:latest ubuntu-git:2.7 1
- 1 Creates new tag: 2.7
The first thing you’ll do in building your new image is remove the version of Git you installed:
docker container run --name image-dev2 \
        --entrypoint /bin/bash \                        1
    ubuntu-git:latest -c "apt-get remove -y git"        2

docker container commit image-dev2 ubuntu-git:removed   3

docker image tag ubuntu-git:removed ubuntu-git:latest   4

docker image ls                                         5
- 1 Executes bash command
- 2 Removes Git
- 3 Commits image
- 4 Reassigns latest tag
- 5 Examines image sizes
The image list and sizes reported will look something like the following:
REPOSITORY   TAG        IMAGE ID        CREATED           VIRTUAL SIZE
ubuntu-git   latest     826c66145a59    10 seconds ago    226.6 MB
ubuntu-git   removed    826c66145a59    10 seconds ago    226.6 MB
ubuntu-git   2.7        3e356394c14e    41 hours ago      226 MB
...
Notice that even though you removed Git, the image actually increased in size. Although you could examine the specific changes with docker container diff, you should be quick to realize that the reason for the increase has to do with the union filesystem.
Remember, UFS will mark a file as deleted by actually adding a file to the top layer. The original file and any copies that existed in other layers will still be present in the image. It’s important to minimize image size for the sake of the people and systems that will be consuming your images. If you can avoid causing long download times and significant disk usage with smart image creation, your consumers will benefit. In the early days of Docker, image authors sometimes minimized the number of layers in an image because of the limits of image storage drivers. Modern Docker image storage drivers do not have image layer limits that normal users will encounter, so design for other attributes such as size and cacheability.
You can examine all the layers in an image by using the docker image history command. It will display the following:
- Abbreviated layer ID
- Age of the layer
- Initial command of the creating container
- Total file size of that layer
By examining the history of the ubuntu-git:removed image, you can see that three layers have already been added on the top of the original ubuntu:latest image:
docker image history ubuntu-git:removed
Outputs are something like this:
IMAGE          CREATED          CREATED BY                    SIZE
826c66145a59   24 minutes ago   /bin/bash -c apt-get remove   662 kB
3e356394c14e   42 hours ago     git                           0 B
bbf1d5d430cd   42 hours ago     /bin/bash                     37.68 MB
b39b81afc8ca   3 months ago     /bin/sh -c #(nop) CMD [/bin   0 B
615c102e2290   3 months ago     /bin/sh -c sed -i 's/^#\s*\   1.895 kB
837339b91538   3 months ago     /bin/sh -c echo '#!/bin/sh'   194.5 kB
53f858aaaf03   3 months ago     /bin/sh -c #(nop) ADD file:   188.1 MB
511136ea3c5a   22 months ago                                  0 B
You can flatten images by saving the image to a TAR file with docker image save, and then importing the contents of that filesystem back into Docker with docker image import. But that’s a bad idea, because you lose the original image’s metadata, its change history, and any savings customers might get when they download images with the same lower levels. The smarter thing to do in this case is to create a branch.
Instead of fighting the layer system, you can solve both the size and layer growth problems by using the layer system to create branches. The layer system makes it trivial to go back in the history of an image and make a new branch. You are potentially creating a new branch every time you create a container from the same image.
In reconsidering your strategy for your new ubuntu-git image, you should simply start from ubuntu:latest again. With a fresh container from ubuntu:latest, you could install whatever version of Git you want. The result would be that both the original ubuntu-git image you created and the new one would share the same parent, and the new image wouldn’t have any of the baggage of unrelated changes.
Branching increases the likelihood that you’ll need to repeat steps that were accomplished in peer branches. Doing that work by hand is prone to error. Automating image builds with Dockerfiles is a better idea.
Occasionally, the need arises to build a full image from scratch. Docker provides special handling for the scratch image that tells the build process to make the next command the first layer of the resulting image. This practice can be beneficial if your goal is to keep images small and if you’re working with technologies that have few dependencies such as the Go or Rust programming languages. Other times, you may want to flatten an image to trim an image’s history. In either case, you need a way to import and export full filesystems.
7.3. Exporting and importing flat filesystems
On some occasions, it’s advantageous to build images by working with the files destined for an image outside the context of the union filesystem or a container. To fill this need, Docker provides two commands for exporting and importing archives of files.
The docker container export command will stream the full contents of the flattened union filesystem to stdout or an output file as a tarball. The result is a tarball that contains all the files from the container perspective. This can be useful if you need to use the filesystem that was shipped with an image outside the context of a container. You can use the docker cp command for this purpose, but if you need several files, exporting the full filesystem may be more direct.
Create a new container and use the export subcommand to get a flattened copy of its filesystem:
docker container create --name export-test \
   dockerinaction/ch7_packed:latest ./echo For Export       1

docker container export --output contents.tar export-test

docker container rm export-test

tar -tf contents.tar                                        2
- 1 Exports filesystem contents
- 2 Shows archive contents
This will produce a file in the current directory named contents.tar. That file should contain two files from the ch7_packed image: message.txt and folder/message.txt. At this point, you could extract, examine, or change those files to whatever end. The archive will also contain some zero-byte files related to devices and files that Docker manages for every container such as /etc/resolv.conf. You can ignore these. If you had omitted the --output (or -o for short), then the contents of the filesystem would be streamed in tarball format to stdout. Streaming the contents to stdout makes the export command useful for chaining with other shell programs that work with tarballs.
The docker import command will stream the content of a tarball into a new image. The import command recognizes several compressed and uncompressed forms of tarballs. An optional Dockerfile instruction can also be applied during filesystem import. Importing filesystems is a simple way to get a complete minimum set of files into an image.
To see how useful this is, consider a statically linked Go version of “Hello, World.” Create an empty folder and copy the following code into a new file named helloworld.go:
package main
import "fmt"
func main() {
        fmt.Println("hello, world!")
}
You may not have Go installed on your computer, but that’s no problem for a Docker user. By running the next command, Docker will pull an image containing the Go compiler, compile and statically link the code (which means it can run all by itself), and place that program back into your folder:
docker container run --rm -v "$(pwd)":/usr/src/hello \
    -w /usr/src/hello golang:1.9 go build -v
If everything works correctly, you should have an executable program (binary file) in the same folder, named hello. Statically linked programs have no external file dependencies at runtime. That means this statically linked version of “Hello, World” can run in a container with no other files. The next step is to put that program in a tarball:
tar -cf static_hello.tar hello
Now that the program has been packaged in a tarball, you can import it by using the docker import command:
docker import -c "ENTRYPOINT [\"/hello\"]" - \
    dockerinaction/ch7_static < static_hello.tar     1
- 1 Tar file streamed via UNIX pipe
In this command, you use the -c flag to specify a Dockerfile command. The command you use sets the entrypoint for the new image. The exact syntax of the Dockerfile command is covered in chapter 8. The more interesting argument on this command is the hyphen (-)at the end of the first line. This hyphen indicates that the contents of the tarball will be streamed through stdin. You can specify a URL at this position if you’re fetching the file from a remote web server instead of from your local filesystem.
You tagged the resulting image as the dockerinaction/ch7_static repository. Take a moment to explore the results:
docker container run dockerinaction/ch7_static     1
docker history dockerinaction/ch7_static
- 1 Outputs: hello, world!
You’ll notice that the history for this image has only a single entry (and layer):
IMAGE           CREATED         CREATED BY     SIZE
edafbd4a0ac5    11 minutes ago                 1.824 MB
In this case, the image you produced was small for two reasons. First, the program you produced was only just over 1.8 MB, and you included no operating system files or support programs. This is a minimalistic image. Second, there’s only one layer. There are no deleted or unused files carried with the image in lower layers. The downside to using single-layer (or flat) images is that your system won’t benefit from layer reuse. That might not be a problem if all your images are small enough. But the overhead may be significant if you use larger stacks or languages that don’t offer static linking.
There are trade-offs to every image design decision, including whether or not to use flat images. Regardless of the mechanism you use to build images, your users need a consistent and predictable way to identify different versions.
7.4. Versioning best practices
Pragmatic versioning practices help users make the best use of images. The goal of an effective versioning scheme is to communicate clearly and provide flexibility to image users.
It’s generally insufficient to build or maintain only a single version of your software unless it’s your first. If you’re releasing the first version of your software, you should be mindful of your users’ adoption experience from the beginning. Versions are important because they identify contracts your adopters depend on. Unexpected software changes cause problems for adopters, and versions are one of the primary ways to signal software changes.
With Docker, the key to maintaining multiple versions of the same software is proper repository tagging. The understanding that every repository contains multiple tags and that multiple tags can reference the same image is at the core of a pragmatic tagging scheme.
The docker image tag command is unlike the other two commands that can be used to create tags. It’s the only one that’s applied to existing images. To understand how to use tags and how they impact the user adoption experience, consider the two tagging schemes for a repository shown in figure 7.7.
Figure 7.7. Two tagging schemes (left and right) for the same repository with three images. Dotted lines represent old relationships between a tag and an image.
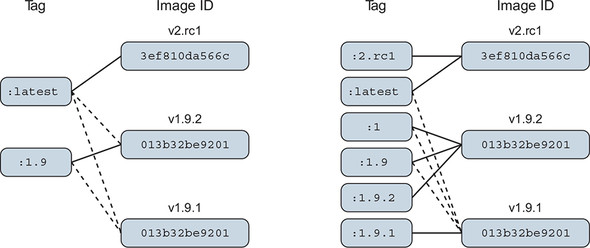
There are two problems with the tagging scheme on the left side of figure 7.7. First, it provides poor adoption flexibility. A user can choose to declare a dependency on 1.9 or latest. When a user adopts version 1.9 and that implementation is actually 1.9.1, they may develop dependencies on behavior defined by that build version. Without a way to explicitly depend on that build version, they will experience pain when 1.9 is updated to point to 1.9.2.
The best way to eliminate this problem is to define and tag versions at a level where users can depend on consistent contracts. This is not advocating a three-tiered versioning system. It means only that the smallest unit of the versioning system you use captures the smallest unit of contract iteration. By providing multiple tags at this level, you can let users decide how much version drift they want to accept.
Consider the right side of figure 7.7. A user who adopts version 1 will always use the highest minor and build version under that major version. Adopting 1.9 will always use the highest build version for that minor version. Adopters who need to carefully migrate between versions of their dependencies can do so with control and at times of their choosing.
The second problem is related to the latest tag. On the left, latest currently points to an image that’s not otherwise tagged, so an adopter has no way of knowing what version of the software that is. In this case, it’s referring to a release candidate for the next major version of the software. An unsuspecting user may adopt the latest tag with the impression that it’s referring to the latest build of an otherwise tagged version.
The latest tag has other problems. It’s adopted more frequently than it should be. This happens because it’s the default tag. The impact is that a responsible repository maintainer should always make sure that its repository’s latest refers to the latest stable build of its software instead of the true latest.
The last thing to keep in mind is that in the context of containers, you’re versioning not only your software but also a snapshot of all of your software’s packaged dependencies. For example, if you package software with a particular distribution of Linux, such as Debian, then those additional packages become part of your image’s interface contract. Your users will build tooling around your images and in some cases may come to depend on the presence of a particular shell or script in your image. If you suddenly rebase your software on something like CentOS but leave your software otherwise unchanged, your users will experience pain.
When software dependencies change, or the software needs to be distributed on top of multiple bases, then those dependencies should be included with your tagging scheme.
The Docker official repositories are ideal examples to follow. Consider this abbreviated tag list for the official golang repository, where each row represents a distinct image:
1.9,             1.9-stretch, 1.9.6
1.9-alpine
1,               1.10,        1.10.2,          latest,    stretch
1.10-alpine,     alpine
Users can determine that the latest version of Golang 1, 1.x, and 1.10 all currently point to version 1.10.2. A Golang user can select a tag that meets their needs for tracking changes in Golang or the base operating system. If an adopter needs the latest image built on the debian:stretch platform, they can use the stretch tag. This scheme puts the control and responsibility for upgrades in the hands of your adopters.
Summary
This is the first chapter to cover the creation of Docker images, tag management, and other distribution concerns such as image size. Learning this material will help you build images and become a better consumer of images. The following are the key points in the chapter:
- New images are created when changes to a container are committed using the docker container commit command.
- When a container is committed, the configuration it was started with will be encoded into the configuration for the resulting image.
- An image is a stack of layers that’s identified by its top layer.
- An image’s size on disk is the sum of the sizes of its component layers.
- Images can be exported to and imported from a flat tarball representation by using the docker container export and docker image import commands.
- The docker image tag command can be used to assign several tags to a single repository.
- Repository maintainers should keep pragmatic tags to ease user adoption and migration control.
- Tag your latest stable build with the latest tag.
- Provide fine-grained and overlapping tags so that adopters have control of the scope of their dependency version creep.