Chapter 6. Limiting risk with resource controls
- Setting resource limits
- Sharing container memory
- Setting users, permissions, and administrative privileges
- Granting access to specific Linux features
- Working with SELinux and AppArmor
Containers provide isolated process contexts, not whole system virtualization. The semantic difference may seem subtle, but the impact is drastic. Chapter 1 touched on the differences a bit. Chapters 2 through 5 each covered a different isolation feature set of Docker containers. This chapter covers the remaining four and includes information about enhancing security on your system.
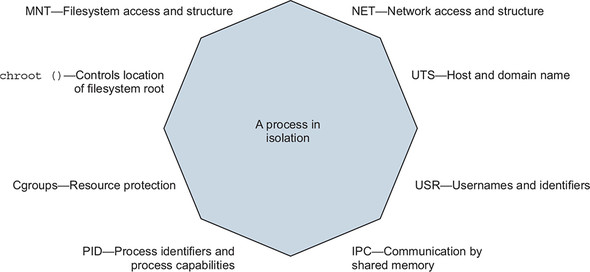
The features covered in this chapter focus on managing or limiting the risks of running software. These features prevent software from misbehaving because of a bug or attack from consuming resources that might leave your computer unresponsive. Containers can help ensure that software only uses the computing resources and accesses the data you expect. You will learn how to give containers resource allowances, access shared memory, run programs as specific users, control the type of changes that a container can make to your computer, and integrate with other Linux isolation tools. Some of these topics involve Linux features that are beyond the scope of this book. In those cases, we try to give you an idea about their purpose and basic usage examples, and how you can integrate them with Docker. Figure 6.1 shows the eight namespaces and features that are used to build Docker containers.
Figure 6.1. Eight-sided containers
One last reminder: Docker and the technology it uses are evolving projects. The examples in this chapter should work for Docker 1.13 and later. Once you learn the tools presented in this chapter, remember to check for developments, enhancements, and new best practices when you go to build something valuable.
6.1. Setting resource allowances
Physical system resources such as memory and time on the CPU are scarce. If the resource consumption of processes on a computer exceeds the available physical resources, the processes will experience performance issues and may stop running. Part of building a system that creates strong isolation includes providing resource allowances on individual containers.
If you want to make sure that a program won’t overwhelm other programs on your computer, the easiest thing to do is set limits on the resources that it can use. You can manage memory, CPU, and device resource allowances with Docker. By default, Docker containers may use unlimited CPU, memory, and device I/O resources. The docker container create and run commands provide flags for managing resources available to the container.
6.1.1. Memory limits
Memory limits are the most basic restriction you can place on a container. They restrict the amount of memory that processes inside a container can use. Memory limits are useful for ensuring that one container can’t allocate all of the system’s memory, starving other programs for the memory they need. You can put a limit in place by using the -m or --memory flag on the docker container run or docker container create commands. The flag takes a value and a unit. The format is as follows:
<number><optional unit> where unit = b, k, m or g
In the context of these commands, b refers to bytes, k to kilobytes, m to megabytes, and g to gigabytes. Put this new knowledge to use and start up a database application that you’ll use in other examples:
docker container run -d --name ch6_mariadb \
    --memory 256m \                             1
    --cpu-shares 1024 \
    --cap-drop net_raw \
    -e MYSQL_ROOT_PASSWORD=test \
    mariadb:5.5
- 1 Sets a memory constraint
With this command, you install database software called MariaDB and start a container with a memory limit of 256 megabytes. You might have noticed a few extra flags on this command. This chapter covers each of those, but you may already be able to guess what they do. Something else to note is that you don’t expose any ports or bind any ports to the host’s interfaces. It will be easiest to connect to this database by linking to it from another container on the host. Before we get to that, we want to make sure you have a full understanding of what happens here and how to use memory limits.
The most important thing to understand about memory limits is that they’re not reservations. They don’t guarantee that the specified amount of memory will be available. They’re only a protection from overconsumption. Additionally, the implementation of the memory accounting and limit enforcement by the Linux kernel is very efficient, so you don’t need to worry about runtime overhead for this feature.
Before you put a memory allowance in place, you should consider two things. First, can the software you’re running operate under the proposed memory allowance? Second, can the system you’re running on support the allowance?
The first question is often difficult to answer. It’s not common to see minimum requirements published with open source software these days. Even if it were, though, you’d have to understand how the memory requirements of the software scale based on the size of the data you’re asking it to handle. For better or worse, people tend to overestimate and adjust based on trial and error. One option is to run the software in a container with real workloads and use the docker stats command to see how much memory the container uses in practice. For the mariadb container we just started, docker stats ch6_mariadb shows that the container is using about 100 megabytes of memory, fitting well inside its 256-megabyte limit. In the case of memory-sensitive tools like databases, skilled professionals such as database administrators can make better-educated estimates and recommendations. Even then, the question is often answered by another: how much memory do you have? And that leads to the second question.
Can the system you’re running on support the allowance? It’s possible to set a memory allowance that’s bigger than the amount of available memory on the system. On hosts that have swap space (virtual memory that extends onto disk), a container may realize the allowance. It is possible to specify an allowance that’s greater than any physical memory resource. In those cases, the limitations of the system will always cap the container, and runtime behavior will be similar to not having specified an allowance at all.
Finally, understand that there are several ways that software can fail if it exhausts the available memory. Some programs may fail with a memory access fault, whereas others may start writing out-of-memory errors to their logging. Docker neither detects this problem nor attempts to mitigate the issue. The best it can do is apply the restart logic you may have specified using the --restart flag described in chapter 2.
6.1.2. CPU
Processing time is just as scarce as memory, but the effect of starvation is performance degradation instead of failure. A paused process that is waiting for time on the CPU is still working correctly. But a slow process may be worse than a failing one if it’s running an important latency-sensitive data-processing program, a revenue-generating web application, or a backend service for your app. Docker lets you limit a container’s CPU resources in two ways.
First, you can specify the relative weight of a container to other containers. Linux uses this to determine the percentage of CPU time the container should use relative to other running containers. That percentage is for the sum of the computing cycles of all processors available to the container.
To set the CPU shares of a container and establish its relative weight, both docker container run and docker container create offer a --cpu-shares flag. The value provided should be an integer (which means you shouldn’t quote it). Start another container to see how CPU shares work:
docker container run -d -P --name ch6_wordpress \
--memory 512m \
--cpu-shares 512 \           1
--cap-drop net_raw \
--link ch6_mariadb:mysql \
-e WORDPRESS_DB_PASSWORD=test \
wordpress:5.0.0-php7.2-apache
- 1 Sets a relative process weight
This command will download and start WordPress version 5.0. It’s written in PHP and is a great example of software that has been challenged by adapting to security risks. Here we’ve started it with a few extra precautions. If you’d like to see it running on your computer, use docker port ch6_wordpress to get the port number (we’ll call it <port>) that the service is running on and open http://localhost:<port> in your web browser. If you’re using Docker Machine, you’ll need to use docker-machine ip to determine the IP address of the virtual machine where Docker is running. When you have that, substitute that value for localhost in the preceding URL.
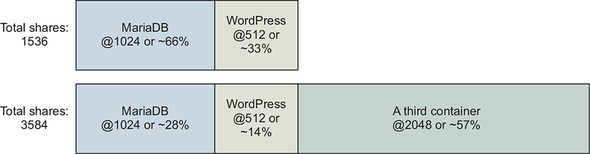
When you started the MariaDB container, you set its relative weight (cpu-shares) to 1024, and you set the relative weight of WordPress to 512. These settings create a system in which the MariaDB container gets two CPU cycles for every one WordPress cycle. If you started a third container and set its --cpu-shares value to 2048, it would get half of the CPU cycles, and MariaDB and WordPress would split the other half at the same proportions as they were before. Figure 6.2 shows how portions change based on the total weight of the system.
Figure 6.2. Relative weight and CPU shares
CPU shares differ from memory limits in that they’re enforced only when there is contention for time on the CPU. If other processes and containers are idle, the container may burst well beyond its limits. This approach ensures that CPU time is not wasted and that limited processes will yield if another process needs the CPU. The intent of this tool is to prevent one or a set of processes from overwhelming a computer, not to hinder performance of those processes. The defaults won’t limit the container, and it will be able to use 100% of the CPU if the machine is otherwise idle.
Now that you have learned how cpu-shares allocates CPU proportionately, we will introduce the cpus option, which provides a way to limit the total amount of CPU used by a container. The cpus option allocates a quota of CPU resources the container may use by configuring the Linux Completely Fair Scheduler (CFS). Docker helpfully allows the quota to be expressed as the number of CPU cores the container should be able to use. The CPU quota is allocated, enforced, and ultimately refreshed every 100ms by default. If a container uses all of its CPU quota, its CPU usage will be throttled until the next measurement period begins. The following command will let the previous WordPress example consume a maximum of 0.75 CPU cores:
docker container run -d -P --name ch6_wordpress \
--memory 512m \
--cpus 0.75 \                1
--cap-drop net_raw \
--link ch6_mariadb:mysql \
-e WORDPRESS_DB_PASSWORD=test \
wordpress:5.0.0-php7.2-apache
- 1 Uses a maximum of 0.75 cpus
Another feature Docker exposes is the ability to assign a container to a specific CPU set. Most modern hardware uses multicore CPUs. Roughly speaking, a CPU can process as many instructions in parallel as it has cores. This is especially useful when you’re running many processes on the same computer.
A context switch is the task of changing from executing one process to executing another. Context switching is expensive and may cause a noticeable impact on the performance of your system. In some cases, it makes sense to reduce context switching of critical processes by ensuring they are never executed on the same set of CPU cores. You can use the --cpuset-cpus flag on docker container run or docker container create to limit a container to execute only on a specific set of CPU cores.
You can see the CPU set restrictions in action by stressing one of your machine cores and examining your CPU workload:
# Start a container limited to a single CPU and run a load generator
docker container run -d \
    --cpuset-cpus 0 \                                   1
    --name ch6_stresser dockerinaction/ch6_stresser

# Start a container to watch the load on the CPU under load
docker container run -it --rm dockerinaction/ch6_htop
- 1 Restricts to CPU number 0
Once you run the second command, you’ll see htop display the running processes and the workload of the available CPUs. The ch6_stresser container will stop running after 30 seconds, so it’s important not to delay when you run this experiment. When you finish with htop, press Q to quit. Before moving on, remember to shut down and remove the container named ch6_stresser:
docker rm -vf ch6_stresser
We thought this was exciting when we first used it. To get the best appreciation, repeat this experiment a few times by using different values for the --cpuset-cpus flag. If you do, you’ll see the process assigned to different cores or different sets of cores. The value can be either a list or range:
- 0,1,2— A list including the first three cores of the CPU
- 0-2— A range including the first three cores of the CPU
6.1.3. Access to devices
Devices are the final resource type we will cover. Controlling access to devices differs from memory and CPU limits. Providing access to a host’s device inside a container is more like a resource-authorization control than a limit.
Linux systems have all sorts of devices, including hard drives, optical drives, USB drives, mouse, keyboard, sound devices, and webcams. Containers have access to some of the host’s devices by default, and Docker creates other devices specifically for each container. This works similarly to how a virtual terminal provides dedicated input and output devices to the user.
On occasion, it may be important to share other devices between a host and a specific container. Say you’re running computer vision software that requires access to a webcam, for example. In that case, you’ll need to grant access to the container running your software to the webcam device attached to the system; you can use the --device flag to specify a set of devices to mount into the new container. The following example would map your webcam at /dev/video0 to the same location within a new container. Running this example will work only if you have a webcam at /dev/video0:
docker container run -it --rm \
    --device /dev/video0:/dev/video0 \     1
    ubuntu:16.04 ls -al /dev
- 1 Mounts video0
The value provided must be a map between the device file on the host operating system and the location inside the new container. The device flag can be set many times to grant access to different devices.
People in situations with custom hardware or proprietary drivers will find this kind of access to devices useful. It’s preferable to resorting to modifying their host operating system.
6.2. Sharing memory
Linux provides a few tools for sharing memory between processes running on the same computer. This form of interprocess communication (IPC) performs at memory speeds. It’s often used when the latency associated with network or pipe-based IPC drags software performance down below requirements. The best examples of shared memory-based IPC use are in scientific computing and some popular database technologies such as PostgreSQL.
Docker creates a unique IPC namespace for each container by default. The Linux IPC namespace partitions share memory primitives such as named shared memory blocks and semaphores, as well as message queues. It’s OK if you’re not sure what these are. Just know that they’re tools used by Linux programs to coordinate processing. The IPC namespace prevents processes in one container from accessing the memory on the host or in other containers.
6.2.1. Sharing IPC primitives between containers
We’ve created an image named dockerinactionch6_ipc that contains both a producer and consumer. They communicate using shared memory. The following will help you understand the problem with running these in separate containers:
docker container run -d -u nobody --name ch6_ipc_producer \     1
    --ipc shareable \
    dockerinaction/ch6_ipc -producer

docker container run -d -u nobody --name ch6_ipc_consumer \     2
    dockerinaction/ch6_ipc -consumer
- 1 Starts producer
- 2 Starts consumer
These commands start two containers. The first creates a message queue and begins broadcasting messages on it. The second should pull from the message queue and write the messages to the logs. You can see what each is doing by using the following commands to inspect the logs of each:
docker logs ch6_ipc_producer

docker logs ch6_ipc_consumer
Notice that something is wrong with the containers you started. The consumer never sees any messages on the queue. Each process uses the same key to identify the shared memory resource, but they refer to different memory. The reason is that each container has its own shared memory namespace.
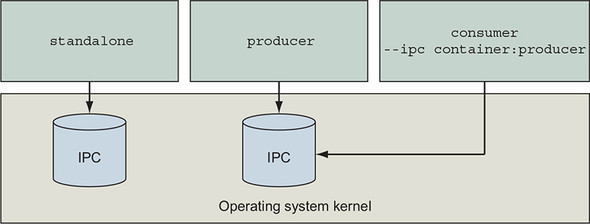
If you need to run programs that communicate with shared memory in different containers, then you’ll need to join their IPC namespaces with the --ipc flag. The --ipc flag has a container mode that will create a new container in the same IPC namespace as another target container. This works like the --network flag covered in chapter 5. Figure 6.3 illustrates the relationship between containers and their namespaced shared memory pools.
Figure 6.3. Three containers and their shared memory pools; producer and consumer share a single pool.
Use the following commands to test joined IPC namespaces for yourself:
docker container rm -v ch6_ipc_consumer               1

docker container run -d --name ch6_ipc_consumer \     2
    --ipc container:ch6_ipc_producer \                3
    dockerinaction/ch6_ipc -consumer
- 1 Removes original consumer
- 2 Starts new consumer
- 3 Joins IPC namespace
These commands rebuild the consumer container and reuse the IPC namespace of the ch6_ipc_producer container. This time, the consumer should be able to access the same memory location where the server is writing. You can see this working by using the following commands to inspect the logs of each:
docker logs ch6_ipc_producer

docker logs ch6_ipc_consumer
Remember to clean up your running containers before moving on:
docker rm -vf ch6_ipc_producer ch6_ipc_consumer
- The v option will clean up volumes.
- The f option will kill the container if it is running.
- The rm command takes a list of containers.
Reusing the shared memory namespaces of containers has obvious security implications. But this option is available if you need it. Sharing memory between containers is a safer alternative than sharing memory with the host. Sharing memory with the host is possible using the --ipc=host option. However, sharing host memory is difficult in modern Docker distributions because it contradicts Docker’s secure-by-default posture for containers.
Feel free to check out the source code for this example. It’s an ugly but simple C program. You can find it by checking out the source repository linked from the image’s page on Docker Hub.
6.3. Understanding users
Docker starts containers as the user that is specified by the image metadata by default, which is often the root user. The root user has almost full privileged access to the state of the container. Any processes running as that user inherit those permissions. It follows that if there’s a bug in one of those processes, it might damage the container. There are ways to limit the damage, but the most effective way to prevent these types of issues is not to use the root user.
Reasonable exceptions exist; sometimes using the root user is the best or only available option. You use the root user for building images, and at runtime when there’s no other option. Similarly, at times you might want to run system administration software inside a container. In those cases, the process needs privileged access not only to the container but also to the host operating system. This section covers the range of solutions to these problems.
6.3.1. Working with the run-as user
Before you create a container, it would be nice to be able to know what username (and user ID) is going to be used by default. The default is specified by the image. There’s currently no way to examine an image to discover attributes such as the default user in Docker Hub. You can inspect image metadata by using the docker inspect command. If you missed it in chapter 2, the inspect subcommand displays the metadata of a specific container or image. Once you’ve pulled or created an image, you can get the default username that the container is using with the following commands:
docker image pull busybox:1.29
docker image inspect busybox:1.29                          1
docker inspect --format "{{.Config.User}}" busybox:1.29    2
- 1 Displays all of busybox’s metadata
- 2 Shows only the run-as user defined by the busybox image
If the result is blank, the container will default to running as the root user. If it isn’t blank, either the image author specifically named a default run-as user or you set a specific run-as user when you created the container. The --format or -f option used in the second command allows you to specify a template to render the output. In this case, you’ve selected the User field of the Config property of the document. The value can be any valid Golang template, so if you’re feeling up to it, you can get creative with the results.
This approach has a problem. The run-as user might be changed by the entrypoint or command the image uses to start up. These are sometimes referred to as boot, or init, scripts. The metadata returned by docker inspect includes only the configuration that the container will start with. So if the user changes, it won’t be reflected there.
Currently, the only way to fix this problem is to look inside the image. You could expand the image files after you download them, and examine the metadata and init scripts by hand, but doing so is time-consuming and easy to get wrong. For the time being, it may be better to run a simple experiment to determine the default user. This will solve the first problem but not the second:
docker container run --rm --entrypoint "" busybox:1.29 whoami     1

docker container run --rm --entrypoint "" busybox:1.29 id         2
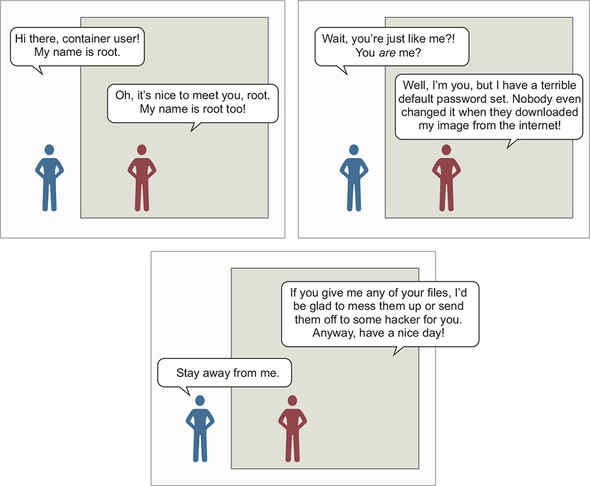
This demonstrates two commands that you might use to determine the default user of an image (in this case, busybox:1.29). Both the whoami and id commands are common among Linux distributions, and so they’re likely to be available in any given image. The second command is superior because it shows both the name and ID details for the run-as user. Both these commands are careful to unset the entrypoint of the container. This will make sure that the command specified after the image name is the command that is executed by the container. These are poor substitutes for a first-class image metadata tool, but they get the job done. Consider the brief exchange between two root users in figure 6.4.
Figure 6.4. Root versus root—a security drama
You can entirely avoid the default user problem if you change the run-as user when you create the container. The quirk with using this is that the username must exist on the image you’re using. Different Linux distributions ship with different users predefined, and some image authors reduce or augment that set. You can get a list of available users in an image with the following command:
docker container run --rm busybox:1.29 awk -F: '$0=$1' /etc/passwd
We won’t go into much detail here, but the Linux user database is stored in a file located at /etc/passwd. This command will read that file from the container filesystem and pull the list of usernames. Once you’ve identified the user you want to use, you can create a new container with a specific run-as user. Docker provides the --user or -u flag on docker container run and docker container create for setting the user. This will set the user to nobody:
docker container run --rm \
    --user nobody \           1
    busybox:1.29 id           2
- 1 Sets run-as user to nobody
- 2 Outputs: uid=65534(nobody) gid=65534(nogroup)
This command used the nobody user. That user is common and intended for use in restricted-privileges scenarios such as running applications. That is just one example. You can use any username defined by the image here, including root. This only scratches the surface of what you can do with the -u or --user flag. The value can accept any user or group pair. When you specify a user by name, that name is resolved to the user ID (UID) specified in the container’s passwd file. Then the command is run with that UID. This leads to another feature. The --user flag also accepts user and group names or IDs. When you use IDs instead of names, the options start to open up:
docker container run --rm \
    -u nobody:nogroup \        1
    busybox:1.29 id            2

docker container run --rm \
    -u 10000:20000 \           3
    busybox:1.29 id            4
- 1 Sets run-as user to nobody and group to nogroup
- 2 Outputs: uid=65534(nobody) gid=65534(nogroup)
- 3 Sets UID and GID
- 4 Outputs: uid=10000 gid=20000
The second command starts a new container that sets the run-as user and group to a user and group that do not exist in the container. When that happens, the IDs won’t resolve to a user or group name, but all file permissions will work as if the user and group did exist. Depending on how the software packaged in the container is configured, changing the run-as user may cause problems. Otherwise, this is a powerful feature that can simplify running applications with limited privileges and solving file-permission problems.
The best way to be confident in your runtime configuration is to pull images from trusted sources or build your own. As with any standard Linux distribution, it’s possible to do malicious things such as turning a default nonroot user into the root user by using an suid-enabled program or opening up access to the root account without authentication. The threat of the suid example can be mitigated by using the custom container security options described in section 6.6, specifically the --security-opt no-new-privileges option. However, that’s late in the delivery process to address that problem. Like a full Linux host, images should be analyzed and secured using the principle of least privilege. Fortunately, Docker images can be purpose-built to support the application that needs to be run with everything else left out. Chapters 7, 8, and 10 cover how to create minimal application images.
6.3.2. Users and volumes
Now that you’ve learned how users inside containers share the same user ID space as the users on your host system, you need to learn how those two might interact. The main reason for that interaction is the file permissions on files in volumes. For example, if you’re running a Linux terminal, you should be able to use these commands directly; otherwise, you’ll need to use the docker-machine ssh command to get a shell in your Docker Machine virtual machine:
echo "e=mc^2" > garbage                                        1

chmod 600 garbage                                              2

sudo chown root garbage                                        3

docker container run --rm -v "$(pwd)"/garbage:/test/garbage \
    -u nobody \
    ubuntu:16.04 cat /test/garbage                             4


docker container run --rm -v "$(pwd)"/garbage:/test/garbage \
    -u root ubuntu:16.04 cat /test/garbage                     5
# Outputs: "e=mc^2"

# cleanup that garbage
sudo rm -f garbage
- 1 Creates new file on your host
- 2 Makes file readable only by its owner
- 3 Makes file owned by root (assuming you have sudo access)
- 4 Tries to read file as nobody
- 5 Tries to read file as “container root”
The second-to-last docker command should fail with an error message like Permission denied. But the last docker command should succeed and show you the contents of the file you created in the first command. This means that file permissions on files in volumes are respected inside the container. But this also reflects that the user ID space is shared. Both root on the host and root in the container have user ID 0. So, although the container’s nobody user with ID 65534 can’t access a file owned by root on the host, the container’s root user can.
Unless you want a file to be accessible to a container, don’t mount it into that container with a volume.
The good news about this example is that you’ve seen how file permissions are respected and can solve some more mundane—but practical—operational issues. For example, how do you handle a log file written to a volume?
The preferred way is with volumes, as described in chapter 4. But even then you need to consider file ownership and permission issues. If logs are written to a volume by a process running as user 1001, and another container tries to access that file as user 1002, then file permissions might prevent the operation.
One way to overcome this obstacle would be to specifically manage the user ID of the running user. You can either edit the image ahead of time by setting the user ID of the user you’re going to run the container with, or you can use the desired user and group ID (GID):
mkdir logFiles

sudo chown 2000:2000 logFiles                                           1

docker container run --rm -v "$(pwd)"/logFiles:/logFiles \              2
    -u 2000:2000 ubuntu:16.04 \                                         3
    /bin/bash -c "echo This is important info > /logFiles/important.log"

docker container run --rm -v "$(pwd)"/logFiles:/logFiles \              4
    -u 2000:2000 ubuntu:16.04 \                                         5
    /bin/bash -c "echo More info >> /logFiles/important.log"

sudo rm –r logFiles
- 1 Sets ownership of directory to desired user and group
- 2 Writes important log file
- 3 Sets UID:GID to 2000:2000
- 4 Appends to log from another container
- 5 Also sets UID:GID to 2000:2000
After running this example, you’ll see that the file could be written to the directory that’s owned by user 2000. Not only that, but any container that uses a user or group with write access to the directory could write a file in that directory or to the same file if the permissions allow. This trick works for reading, writing, and executing files.
One UID and filesystem interaction bears special mention. By default, the Docker daemon API is accessible via a UNIX domain socket located on the host at /var/run/ docker.sock. The domain socket is protected with filesystem permissions ensuring that only the root user and members of the docker group may send commands or retrieve data from the Docker daemon. Some programs are built to interact directly with the Docker daemon API and know how to send commands to inspect or run containers.
The docker command-line program interacts with the Docker daemon almost entirely via the API, which should give you a sense of how powerful the API is. Any program that can read and write to the Docker API can do anything docker can do, subject to Docker’s Authorization plugin system.
Programs that manage or monitor containers often require the ability to read or even write to the Docker daemon’s endpoint. The ability to read or write to Docker’s API is often provided by running the management program as a user or group that has permission to read or write to docker.sock and mounting /var/run/docker.sock into the container:
docker container run --rm -it
  –v /var/run/docker.sock:/var/run/docker.sock:ro \     1
  -u root  monitoringtool                               2
- 1 Binds docker.sock from host into container as a read-only file
- 2 Container runs as root user, aligning with file permissions on host
The preceding example illustrates a relatively common request by authors of privileged programs. You should be careful about which users or programs on your systems can control your Docker daemon. If a user or program controls your Docker daemon, it effectively controls the root account on your host and can run any program or delete any file.
6.3.3. Introduction to the Linux user namespace and UID remapping
Linux’s user (USR) namespace maps users in one namespace to users in another. The user namespace operates like the process identifier (PID) namespace with container UIDs and GIDs partitioned from the host’s default identities.
By default, Docker containers do not use the USR namespace. This means that a container running with a user ID (number, not name) that’s the same as a user on the host machine has the same host file permissions as that user. This isn’t a problem. The filesystem available inside a container has been mounted so that changes made inside that container will stay inside that container’s filesystem. But this does impact volumes in which files are shared between containers or with the host.
When a user namespace is enabled for a container, the container’s UIDs are mapped to a range of unprivileged UIDs on the host. Operators activate user namespace remapping by defining subuid and subgid maps for the host in Linux and configuring the Docker daemon’s userns-remap option. The mappings determine how user IDs on the host correspond to user IDs in a container namespace. For example, UID remapping could be configured to map container UIDs to the host starting with host UID 5000 and a range of 1000 UIDs. The result is that UID 0 in containers would be mapped to host UID 5000, container UID 1 to host UID 5001, and so on for 1000 UIDs. Since UID 5000 is an unprivileged user from Linux’ perspective and doesn’t have permissions to modify the host system files, the risk of running with uid=0 in the container is greatly reduced. Even if a containerized process gets ahold of a file or other resource from the host, the containerized process will be running as a remapped UID without privileges to do anything with that resource unless an operator specifically gave it permissions to do so.
User namespace remapping is particularly useful for resolving file permission issues in cases like reading and writing to volumes. Let’s step through an example of sharing a filesystem between containers whose process runs as UID 0 in the container with user namespacing enabled. In our example, we will assume Docker is using the following:
- The (default) dockremap user for remapping container UID and GID ranges
- An entry in /etc/subuid of dockremap:5000:10000, providing a range of 10,000 UIDs starting at 5000
- An entry in /etc/subgid of dockremap:5000:10000, providing a range of 10,000 GIDs starting at 5000
First, let’s check the user and group ID of the dockeremap user on the host. Then, we will create a shared directory owned by the remapped container UID 0, host UID 5000.
# id dockremap                                              1
uid=997(dockremap) gid=993(dockremap) groups=993(dockremap)
# cat /etc/subuid
dockremap:5000:10000
# cat /etc/subgid
dockremap:5000:10000
# mkdir /tmp/shared
# chown -R 5000:5000 /tmp/shared                            2
- 1 Inspects user and group ID of dockremap user on host
- 2 Changes ownership of “shared” directory to UID used for remapped container UID 0
Now run a container as the container’s root user:
# docker run -it --rm --user root -v /tmp/shared:/shared -v /:/host alpine ash
/ # touch /host/afile                                                       1
touch: /host/afile: Permission denied
/ # echo "hello from $(id) in $(hostname)" >> /shared/afile
/ # exit
# back in the host shell
# ls -la /tmp/shared/afile
-rw-r--r--. 1 5000 5000 157 Apr 16 00:13 /tmp/shared/afile

# cat /tmp/shared/afile                                                     2
hello from uid=0(root) gid=0(root) groups=0(root),1(bin),2(daemon),         3
     3(sys),4(adm),6(disk),10(wheel),11(floppy),20(dialout),26(tape),       3
     27(video) in d3b497ac0d34                                              3
- 1 The /host mount is owned by host’s UID and GID: 0:0, so write disallowed
- 2 /tmp/shared is owned by host’s nonprivileged UID and GID: 5000:5000, so write allowed
- 3 UID for root in container was 0
This example demonstrates the implications on filesystem access when using user namespaces with containers. User namespaces can be useful in tightening security of applications that run or share data between containers as a privileged user. User namespace remapping can be disabled on a per container basis when creating or running the container, making it easier to make it the default execution mode. Note that user namespaces are incompatible with some optional features such as SELinux or using a privileged container. Consult the Security documentation on the Docker website for further details in designing and implementing a Docker configuration leveraging user namespace remapping that supports your use cases.
6.4. Adjusting OS feature access with capabilities
Docker can adjust a container’s authorization to use individual operating system features. In Linux, these feature authorizations are called capabilities, but as native support expands to other operating systems, other backend implementations would need to be provided. Whenever a process attempts to make a gated system call such as opening a network socket, the capabilities of that process are checked for the required capability. The call will succeed if the process has the required capability, and fail otherwise.
When you create a new container, Docker drops all capabilities except for an explicit list of capabilities that are necessary and safe to run most applications. This further isolates the running process from the administrative functions of the operating system. A sample of the 37 dropped capabilities follows, and you might be able to guess at the reasons for their removal:
- SYS_MODULE— Insert/remove kernel modules
- SYS_RAWIO— Modify kernel memory
- SYS_NICE— Modify priority of processes
- SYS_RESOURCE— Override resource limits
- SYS_TIME— Modify the system clock
- AUDIT_CONTROL— Configure audit subsystem
- MAC_ADMIN— Configure MAC configuration
- SYSLOG— Modify kernel print behavior
- NET_ADMIN— Configure the network
- SYS_ADMIN— Catchall for administrative functions
The default set of capabilities provided to Docker containers provides a reasonable feature reduction, but at times you’ll need to add or reduce this set further. For example, the capability NET_RAW can be dangerous. If you wanted to be a bit more careful than the default configuration, you could drop NET_RAW from the list of capabilities. You can drop capabilities from a container by using the --cap-drop flag on docker container create or docker container run. First, print the default capabilities of a containerized process running on your machine and notice that net_raw is in the list of capabilities:
docker container run --rm -u nobody \
    ubuntu:16.04 \
    /bin/bash -c "capsh --print | grep net_raw"
Now, drop the net_raw capability when starting the container. Grep cannot find the string net_raw because the capability has been dropped and so there is no visible output:
docker container run --rm -u nobody \
    --cap-drop net_raw \                     1
    ubuntu:16.04 \
    /bin/bash -c "capsh --print | grep net_raw"
- 1 Drops NET_RAW capability
In Linux documentation, you’ll often see capabilities named in all uppercase and prefixed with CAP_, but that prefix won’t work if provided to the capability-management options. Use unprefixed and lowercase names for the best results.
Similar to the --cap-drop flag, the --cap-add flag will add capabilities. If you needed to add the SYS_ADMIN capability for some reason, you’d use a command like the following:
docker container run --rm -u nobody \
    ubuntu:16.04 \
    /bin/bash -c "capsh --print | grep sys_admin"       1

docker container run --rm -u nobody \
    --cap-add sys_admin \                               2
    ubuntu:16.04 \
    /bin/bash -c "capsh --print | grep sys_admin"
- 1 SYS_ADMIN is not included.
- 2 Adds SYS_ADMIN
Like other container-creation options, both --cap-add and --cap-drop can be specified multiple times to add or drop multiple capabilities, respectively. These flags can be used to build containers that will let a process perform exactly and only what is required for proper operation. For example, you might be able to run a network management daemon as the nobody user and give it the NET_ADMIN capability instead of running it as root directly on the host or as a privileged container. If you are wondering whether any capabilities were added or dropped from a container, you can inspect the container and print the .HostConfig.CapAdd and .HostConfig.CapDrop members of the output.
6.5. Running a container with full privileges
When you need to run a system administration task inside a container, you can grant that container privileged access to your computer. Privileged containers maintain their filesystem and network isolation but have full access to shared memory and devices and possess full system capabilities. You can perform several interesting tasks, including running Docker inside a container, with privileged containers.
The bulk of the uses for privileged containers is administrative. Take, for example, an environment in which the root filesystem is read-only, or installing software outside a container has been disallowed, or you have no direct access to a shell on the host. If you wanted to run a program to tune the operating system (for something like load balancing) and you had access to run a container on that host, then you could simply run that program in a privileged container.
If you find a situation that can be solved only with the reduced isolation of a privileged container, use the --privileged flag on docker container create or docker container run to enable this mode:
docker container run --rm \
    --privileged \
    ubuntu:16.04 id                1


docker container run --rm \
    --privileged \
    ubuntu:16.04 capsh --print     2

docker container run --rm \
    --privileged \
    ubuntu:16.04 ls /dev           3

docker container run --rm \
    --privileged \
    ubuntu:16.04 networkctl        4
- 1 Checks out IDs
- 2 Checks out Linux capabilities
- 3 Checks out list of mounted devices
- 4 Examines network configuration
Privileged containers are still partially isolated. For example, the network namespace will still be in effect. If you need to tear down that namespace, you’ll need to combine this with --net host as well.
6.6. Strengthening containers with enhanced tools
Docker uses reasonable defaults and a “batteries included” toolset to ease adoption and promote best practices. Most modern Linux kernels enable seccomp, and Docker’s default seccomp profile blocks over 40 kernel system calls (syscalls) that most programs don’t need. You can enhance the containers Docker builds if you bring additional tools. Tools you can use to harden your containers include custom seccomp profiles, AppArmor, and SELinux.
Whole books have been written about each of these tools. They bring their own nuances, benefits, and required skillsets. Their use can be more than worth the effort. Support for each varies by Linux distribution, so you may be in for a bit of work. But once you’ve adjusted your host configuration, the Docker integration is simpler.
The information security space is complicated and constantly evolving. It’s easy to feel overwhelmed when reading through open conversations between InfoSec professionals. These are often highly skilled people with long memories and very different contexts from developers or general users. If you can take away any one thing from open InfoSec conversations, it is that balancing system security with user needs is complex.
One of the best things you can do if you’re new to this space is start with articles, papers, blogs, and books before you jump into conversations. This will give you an opportunity to digest one perspective and gain deeper insight before switching to thoughts from a different perspective. When you’ve had an opportunity to form your own insight and opinions, these conversations become much more valuable.
It’s difficult to read one paper or learn one thing and know the best possible way to build a hardened solution. Whatever your situation, the system will evolve to include improvements from several sources. The best thing you can do is take each tool and learn it by itself. Don’t be intimidated by the depth some tools require for a strong understanding. The effort will be worth the result, and you’ll understand the systems you use much better for it.
Docker isn’t a perfect solution. Some would argue that it’s not even a security tool. But the improvements it provides are far better than the alternative of forgoing any isolation because of perceived cost. If you’ve read this far, maybe you’d be willing to go further with these auxiliary topics.
6.6.1. Specifying additional security options
Docker provides a single --security-opt flag for specifying options that configure Linux’s seccomp and Linux Security Modules (LSM) features. Security options can be provided to the docker container run and docker container create commands. This flag can be set multiple times to pass multiple values.
Seccomp configures which Linux system calls a process may invoke. Docker’s default seccomp profile blocks all syscalls by default and then explicitly permits more than 260 syscalls as safe for use by most programs. The 44 blocked system calls are unneeded or are unsafe for normal programs (for example, unshare, used in creating new namespaces) or cannot be namespaced (for example, clock_settime, which sets the machine’s time). Changing Docker’s default seccomp profile is not recommended. If the default seccomp profile is too restrictive or permissive, a custom profile can be specified as a security option:
docker container run --rm -it \
    --security-opt seccomp=<FULL_PATH_TO_PROFILE> \
    ubuntu:16.04 sh
<FULL_PATH_TO_PROFILE> is the full path to a seccomp profile defining the allowed syscalls for the container. The Moby project on GitHub contains Docker’s default seccomp profile at profiles/seccomp/default.json that can be used as a starting point for a custom profile. Use the special value unconfined to disable use of seccomp for the container.
Linux Security Modules is a framework Linux adopted to act as an interface layer between the operating system and security providers. AppArmor and SELinux are LSM providers. Both provide mandatory access control, or MAC (the system defines access rules), and replace the standard Linux discretionary access control (file owners define access rules).
The LSM security option values are specified in one of seven formats:
- To prevent a container from gaining new privileges after it starts, use no-new-privileges.
- To set a SELinux user label, use the form label=user:<USERNAME>, where <USERNAME> is the name of the user you want to use for the label.
- To set a SELinux role label, use the form label=role:<ROLE>, where <ROLE> is the name of the role you want to apply to processes in the container.
- To set a SELinux type label, use the form label=type:<TYPE>, where <TYPE> is the type name of the processes in the container.
- To set a SELinux-level label, use the form label:level:<LEVEL>, where <LEVEL> is the level at which processes in the container should run. Levels are specified as low-high pairs. Where abbreviated to the low level only, SELinux will interpret the range as single level.
- To disable SELinux label confinement for a container, use the form label= disable.
- To apply an AppArmor profile on the container, use the form apparmor= <PROFILE>, where <PROFILE> is the name of the AppArmor profile to use.
As you can guess from these options, SELinux is a labeling system. A set of labels, called a context, is applied to every file and system object. A similar set of labels is applied to every user and process. At runtime, when a process attempts to interact with a file or system resource, the sets of labels are evaluated against a set of allowed rules. The result of that evaluation determines whether the interaction is allowed or blocked.
The last option will set an AppArmor profile. AppArmor is frequently substituted for SELinux because it works with file paths instead of labels and has a training mode that you can use to passively build profiles based on observed application behavior. These differences are often cited as reasons why AppArmor is easier to adopt and maintain.
Free and commercial tools that monitor a program’s execution and generate custom profiles tailored for applications are available. These tools help operators use information from actual program behavior in test and production environments to create a profile that works.
6.7. Building use-case-appropriate containers
Containers are a cross-cutting concern. There are more reasons and ways that people could use them than we could ever enumerate. So it’s important, when you use Docker to build containers to serve your own purposes, that you take the time to do so in a way that’s appropriate for the software you’re running.
The most secure tactic for doing so would be to start with the most isolated container you can build and justify reasons for weakening those restrictions. In reality, people tend to be a bit more reactive than proactive. For that reason, we think Docker hits a sweet spot with the default container construction. It provides reasonable defaults without hindering the productivity of users.
Docker containers are not the most isolated by default. Docker does not require that you enhance those defaults. It will let you do silly things in production if you want to. This makes Docker seem much more like a tool than a burden and something people generally want to use rather than feel like they have to use. For those who would rather not do silly things in production, Docker provides a simple interface to enhance container isolation.
6.7.1. Applications
Applications are the whole reason we use computers. Most applications are programs that other people wrote and that work with potentially malicious data. Consider your web browser.
A web browser is a type of application that’s installed on almost every computer. It interacts with web pages, images, scripts, embedded video, Flash documents, Java applications, and anything else out there. You certainly didn’t create all that content, and most people were not contributors on web browser projects. How can you trust your web browser to handle all that content correctly?
Some more cavalier readers might just ignore the problem. After all, what’s the worst thing that could happen? Well, if an attacker gains control of your web browser (or other application), they will gain all the capabilities of that application and the permissions of the user it’s running as. They could trash your computer, delete your files, install other malware, or even launch attacks against other computers from yours. So, this isn’t a good thing to ignore. The question remains: how do you protect yourself when this is a risk you need to take?
The best approach is to isolate the risk of running the program. First, make sure the application is running as a user with limited permissions. That way, if there’s a problem, it won’t be able to change the files on your computer. Second, limit the system capabilities of the browser. In doing so, you make sure your system configuration is safer. Third, set limits on how much of the CPU and memory the application can use. Limits help reserve resources to keep the system responsive. Finally, it’s a good idea to specifically whitelist devices that it can access. That will keep snoops off your webcam, USB, and the like.
6.7.2. High-level system services
High-level system services are a bit different from applications. They’re not part of the operating system, but your computer makes sure they’re started and kept running. These tools typically sit alongside applications outside the operating system, but they often require privileged access to the operating system to operate correctly. They provide important functionality to users and other software on a system. Examples include cron, syslogd, dnsmasq, sshd, and docker.
If you’re unfamiliar with these tools (hopefully not all of them), it’s all right. They do things like keep system logs, run scheduled commands, and provide a way to get a secure shell on the system from the network, and docker manages containers.
Although running services as root is common, few of them need full privileged access. Consider containerizing services and use capabilities to tune their access for the specific features they need.
6.7.3. Low-level system services
Low-level services control things like devices or the system’s network stack. They require privileged access to the components of the system they provide (for example, firewall software needs administrative access to the network stack).
It’s rare to see these run inside containers. Tasks such as filesystem management, device management, and network management are core host concerns. Most software run in containers is expected to be portable. So machine-specific tasks like these are a poor fit for general container use cases.
The best exceptions are short-running configuration containers. For example, in an environment where all deployments happen with Docker images and containers, you’d want to push network stack changes in the same way you push software. In this case, you might push an image with the configuration to the host and make the changes with a privileged container. The risk in this case is reduced because you authored the configuration to be pushed, the container is not long running, and changes like these are simple to audit.
Summary
This chapter introduced the isolation features provided by Linux and talked about how Docker uses those to build configurable containers. With this knowledge, you will be able to customize that container isolation and use Docker for any use case. The following points were covered in this chapter:
- Docker uses cgroups, which let a user set memory limits, CPU weight, limits, and core restrictions as well as restrict access to specific devices.
- Docker containers each have their own IPC namespace that can be shared with other containers or the host in order to facilitate communication over shared memory.
- Docker supports isolating the USR namespace. By default, user and group IDs inside a container are equivalent to the same IDs on the host machine. When the user namespace is enabled, user and group IDs in the container are remapped to IDs that do not exist on the host.
- You can and should use the -u option on docker container run and docker container create to run containers as nonroot users.
- Avoid running containers in privileged mode whenever possible.
- Linux capabilities provide operating system feature authorization. Docker drops certain capabilities in order to provide reasonably isolating defaults.
- The capabilities granted to any container can be set with the --cap-add and --cap-drop flags.
- Docker provides tooling for integrating easily with enhanced isolation technologies such as seccomp, SELinux, and AppArmor. These are powerful tools that security-conscious Docker adopters should investigate.