Chapter 5. Single-host networking
This chapter covers
- Networking background
- Creating Docker container networks
- Network-less and host-mode containers
- Publishing services on the ingress network
- Container network caveats
Networking is a whole field of computing, and so this chapter can only scratch the surface by covering specific challenges, structures, and tools required for container networks. If you want to run a website, database, email server, or any software that depends on networking, such as a web browser inside a Docker container, you need to understand how to connect that container to the network. After reading this chapter, you’ll be able to create containers with network exposure appropriate for the application you’re running, use network software in one container from another, and understand how containers interact with the host and the host’s network.
5.1. Networking background (for beginners)
A quick overview of relevant networking concepts will be helpful for understanding the topics in this chapter. This section includes only high-level detail; if you’re an expert, feel free to skip ahead.
Networking is all about communicating between processes that may or may not share the same local resources. To understand the material in this chapter, you need to consider only a few basic network abstractions that are commonly used by processes. The better understanding you have of networking, the more you’ll learn about the mechanics at work. But a deep understanding isn’t required to use the tools provided by Docker. If anything, the material contained herein should prompt you to independently research selected topics as they come up. Those basic abstractions used by processes include protocols, network interfaces, and ports.
5.1.1. Basics: Protocols, interfaces, and ports
A protocol with respect to communication and networking is a sort of language. Two parties that agree on a protocol can understand what the other is communicating. This is key to effective communication. Hypertext Transfer Protocol (HTTP) is one popular network protocol that many people have heard of. It’s the protocol that provides the World Wide Web. A huge number of network protocols and several layers of communication are created by those protocols. For now, it’s only important that you know what a protocol is so that you can understand network interfaces and ports.
A network interface has an address and represents a location. You can think of interfaces as analogous to real-world locations with addresses. A network interface is like a mailbox. Messages are delivered to a mailbox for recipients at that address, and messages are taken from a mailbox to be delivered elsewhere.
Whereas a mailbox has a postal address, a network interface has an IP address, which is defined by the Internet Protocol. The details of IP are interesting but outside of the scope of this book. The important thing to know about IP addresses is that they are unique in their network and contain information about their location on their network.
It’s common for computers to have two kinds of interfaces: an Ethernet interface and a loopback interface. An Ethernet interface is what you’re likely most familiar with. It’s used to connect to other interfaces and processes. A loopback interface isn’t connected to any other interface. At first this might seem useless, but it’s often useful to be able to use network protocols to communicate with other programs on the same computer. In those cases, a loopback is a great solution.
In keeping with the mailbox metaphor, a port is like a recipient or a sender. Several people might receive messages at a single address. For example, a single address might receive messages for Wendy Webserver, Deborah Database, and Casey Cache, as illustrated in figure 5.1. Each recipient should open only their own messages.
Figure 5.1. Processes use the same interface and are uniquely identified in the same way that multiple people might use the same mailbox.
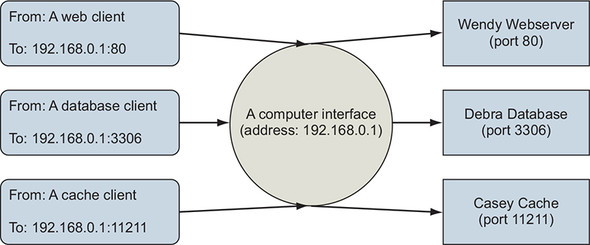
In reality, ports are just numbers and defined as part of the Transmission Control Protocol (TCP) or User Datagram Protocol (UDP). Again, the details of the protocol are beyond the scope of this book, but we encourage you to read about it sometime. People who created standards for protocols, or companies that own a particular product, decide which port number should be used for specific purposes. For example, web servers provide HTTP on port 80 by default. MySQL, a database product, serves its protocol on port 3306 by default. Memcached, a fast cache technology, provides its protocol on port 11211. Ports are written on TCP messages just as names are written on envelopes.
Interfaces, protocols, and ports are all immediate concerns for software and users. By learning about these things, you develop a better appreciation for the way programs communicate as well as the way your computer fits into the bigger picture.
5.1.2. Bigger picture: Networks, NAT, and port forwarding
Interfaces are single points in larger networks. Networks are defined in the way that interfaces are linked together, and that linkage determines an interface’s IP address.
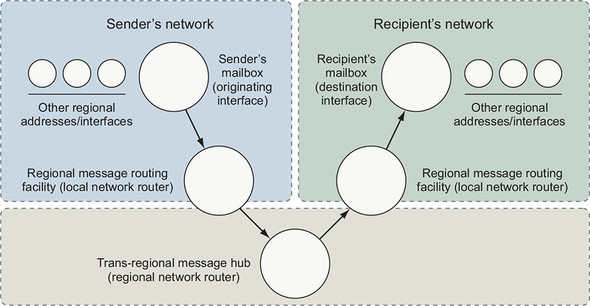
Sometimes a message has a recipient that an interface is not directly linked to, so instead it’s delivered to an intermediary that knows how to route the message for delivery. Coming back to the mail metaphor, this is similar to the way real-world mail carriers operate.
When you place a message in your outbox, a mail carrier picks it up and delivers it to a local routing facility. That facility is itself an interface. It will take the message and send it along to the next stop on the route to a destination. A local routing facility for a mail carrier might forward a message to a regional facility, and then to a local facility for the destination, and finally to the recipient. It’s common for network routes to follow a similar pattern. Figure 5.2 illustrates the described route and draws the relationships between physical message routing and network routing.
Figure 5.2. The path of a message in a postal system and a computer network
This chapter is concerned with interfaces that exist on a single computer, so the networks and routes we consider won’t be anywhere near that complicated. In fact, this chapter is about two specific networks and the way containers are attached to them. The first network is the one that your computer is connected to. The second is a virtual network that Docker creates to connect all of the running containers to the network that the computer is connected to. That second network is called a bridge.
A bridge is an interface that connects multiple networks so that they can function as a single network, as shown in figure 5.3. Bridges work by selectively forwarding traffic between the connected networks based on another type of network address. To understand the material in this chapter, you need to be comfortable with only this abstract idea.
Figure 5.3. A bridge interface connecting two distinct networks

This has been a very rough introduction to some nuanced topics. The explanation only scratched the surface in order to help you understand how to use Docker and the networking facilities that it simplifies.
5.2. Docker container networking
Docker abstracts the underlying host-attached network from containers. Doing so provides a degree of runtime environment agnosticism for the application, and allows infrastructure managers to adapt the implementation to suit the operating environment. A container attached to a Docker network will get a unique IP address that is routable from other containers attached to the same Docker network.
The main problem with this approach is that there is no easy way for any software running inside a container to determine the IP address of the host where the container is running. This inhibits a container from advertising its service endpoint to other services outside the container network. Section 5.5 covers a few methods for dealing with this edge case.
Docker also treats networks as first-class entities. This means that they have their own life cycle and are not bound to any other objects. You can define and manage them directly by using the docker network subcommands.
To get started with networks in Docker, examine the default networks that are available with every Docker installation. Running docker network ls will print a table of all the networks to the terminal. The resulting table should look like this:
NETWORK ID          NAME                DRIVER              SCOPE
63d93214524b        bridge              bridge              local
6eeb489baff0        host                host                local
3254d02034ed        none                null                local
By default, Docker includes three networks, and each is provided by a different driver. The network named bridge is the default network and provided by a bridge driver. The bridge driver provides intercontainer connectivity for all containers running on the same machine. The host network is provided by the host driver, which instructs Docker not to create any special networking namespace or resources for attached containers. Containers on the host network interact with the host’s network stack like uncontained processes. Finally, the none network uses the null driver. Containers attached to the none network will not have any network connectivity outside themselves.
The scope of a network can take three values: local, global, or swarm. This indicates whether the network is constrained to the machine where the network exists (local), should be created on every node in a cluster but not route between them (global), or seamlessly spans all of the hosts participating in a Docker swarm (multihost or cluster-wide). As you can see, all of the default networks have the local scope, and will not be able to directly route traffic between containers running on different machines.
The default bridge network maintains compatibility with legacy Docker and cannot take advantage of modern Docker features including service discovery or load balancing. Using it is not recommended. So the first thing you should do is create your own bridge network.
5.2.1. Creating a user-defined bridge network
The Docker bridge network driver uses Linux namespaces, virtual Ethernet devices, and the Linux firewall to build a specific and customizable virtual network topology called a bridge. The resulting virtual network is local to the machine where Docker is installed and creates routes between participating containers and the wider network where the host is attached. Figure 5.4 illustrates two containers attached to a bridge network and its components.
Figure 5.4. The default local Docker network topology and two attached containers
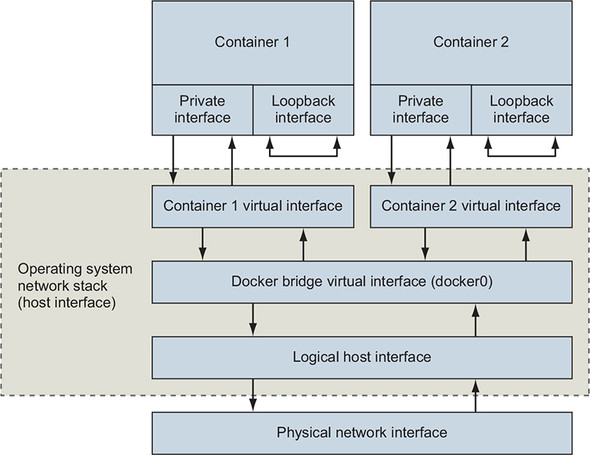
Containers have their own private loopback interface and a separate virtual Ethernet interface linked to another virtual interface in the host’s namespace. These two linked interfaces form a link between the host’s network and the container. Just like typical home networks, each container is assigned a unique private IP address that’s not directly reachable from the external network. Connections are routed through another Docker network that routes traffic between containers and may connect to the host’s network to form a bridge.
Build a new network with a single command:
docker network create \
  --driver bridge \
  --label project=dockerinaction \
  --label chapter=5 \
  --attachable \
  --scope local \
  --subnet 10.0.42.0/24 \
  --ip-range 10.0.42.128/25 \
  user-network
This command creates a new local bridge network named user-network. Adding label metadata to the network will help in identifying the resource later. Marking the new network as attachable allows you to attach and detach containers to the network at any time. Here you’ve manually specified the network scope property and set it to the default value for this driver. Finally, a custom subnet and assignable address range was defined for this network, 10.0.42.0/24, assigning from the upper half of the last octet (10.0.42.128/25). This means that as you add containers to this network, they will receive IP addresses in the range from 10.0.42.128 to 10.0.42.255.
You can inspect networks like other first-class Docker entities. The next section demonstrates how to use containers with user networks and inspect the resulting network configuration.
5.2.2. Exploring a bridge network
If you’re going to run network software inside a container on a container network, you should have a solid understanding of what that network looks like from within a container. Start exploring your new bridge network by creating a new container attached to that network:
docker run -it \
  --network user-network \
  --name network-explorer \
  alpine:3.8 \
    sh
Get a list of the IPv4 addresses available in the container from your terminal (which is now attached to the running container) by running the following:
ip -f inet -4 -o addr
The results should look something like this:
1: lo    inet 127.0.0.1/8 scope host lo\ ...
18: eth0    inet 10.0.42.129/24 brd 10.0.42.255 scope global eth0\ ...
You can see from this list that the container has two network devices with IPv4 addresses. Those are the loopback interface (or localhost) and eth0 (a virtual Ethernet device), which is connected to the bridge network. Further, you can see that eth0 has an IP address within the range and subnet specified by the user-network configuration (the range from 10.0.42.128 to 10.0.42.255). That IP address is the one that any other container on this bridge network would use to communicate with services you run in this container. The loopback interface can be used only for communication within the same container.
Next, create another bridge network and attach your running network-explorer container to both networks. First, detach your terminal from the running container (press Ctrl-P and then Ctrl-Q) and then create the second bridge network:
docker network create \
  --driver bridge \
  --label project=dockerinaction \
  --label chapter=5 \

  --attachable \
  --scope local \
  --subnet 10.0.43.0/24 \
  --ip-range 10.0.43.128/25 \
  user-network2
Once the second network has been created, you can attach the network-explorer container (still running):
docker network connect \
  user-network2 \           1
  network-explorer          2
- 1 Network name (or ID)
- 2 Target container name (or ID)
After the container has been attached to the second network, reattach your terminal to continue your exploration:
docker attach network-explorer
Now, back in the container, examining the network interface configuration again will show something like this:
1: lo    inet 127.0.0.1/8 scope host lo\ ...
18: eth0    inet 10.0.42.129/24 brd 10.0.42.255 scope global eth0\ ...
20: eth1    inet 10.0.43.129/24 brd 10.0.43.255 scope global eth1\ ...
As you might expect, this output shows that the network-explorer container is attached to both user-defined bridge networks.
Networking is all about communication between multiple parties, and examining a network with only one running container can be a bit boring. But is there anything else attached to a bridge network by default? Another tool is needed to continue exploring. Install the nmap package inside your running container by using this command:
apk update && apk add nmap
Nmap is a powerful network inspection tool that can be used to scan network address ranges for running machines, fingerprint those machines, and determine what services they are running. For our purposes, we simply want to determine what other containers or other network devices are available on our bridge network. Run the following command to scan the 10.0.42.0/24 subnet that we defined for our bridge network:
nmap -sn 10.0.42.* -sn 10.0.43.* -oG /dev/stdout | grep Status
The command should output something like this:
Host: 10.0.42.128 ()       Status: Up
Host: 10.0.42.129 (7c2c161261cb)   Status: Up

Host: 10.0.43.128 ()       Status: Up
Host: 10.0.43.129 (7c2c161261cb)   Status: Up
This shows that only two devices are attached to each of the bridge networks: the gateway adapters created by the bridge network driver and the currently running container. Create another container on one of the two bridge networks for more interesting results.
Detach from the terminal again (Ctrl-P, Ctrl-Q) and start another container attached to user-network2. Run the following:
docker run -d \
  --name lighthouse \
  --network user-network2 \
  alpine:3.8 \
    sleep 1d
After the lighthouse container has started, reattach to your network-explorer container:
docker attach network-explorer
And from the shell in that container, run the network scan again. The results show that the lighthouse container is up and running, and accessible from the network-explorer container via its attachment to user-network2. The output should be similar to this:
Host: 10.0.42.128 ()       Status: Up
Host: 10.0.42.129 (7c2c161261cb)   Status: Up
Host: 10.0.43.128 ()       Status: Up
Host: 10.0.43.130 (lighthouse.user-network2)       Status: Up
Host: 10.0.43.129 (7c2c161261cb)    Status: Up
Discovering the lighthouse container on the network confirms that the network attachment works as expected, and demonstrates how the DNS-based service discovery system works. When you scanned the network, you discovered the new node by its IP address, and nmap was able to resolve that IP address to a name. This means that you (or your code) can discover individual containers on the network based on their name. Try this yourself by running nslookup lighthouse inside the container. Container hostnames are based on the container name, or can be set manually at container creation time by specifying the --hostname flag.
This exploration has demonstrated your ability to shape bridge networks to fit your environment, the ability to attach a running container to more than one network, and what those networks look like to running software inside an attached container. But bridge networks work on only a single machine. They are not cluster-aware, and the container IP addresses are not routable from outside that machine.
5.2.3. Beyond bridge networks
Depending on your use case, bridge networks might be enough. For example, bridge networks are typically great for single-server deployments such as a LAMP stack running a content management system, or most local development tasks. But if you are running a multiserver environment that is designed to tolerate machine failure, you need to be able to seamlessly route traffic between containers on different machines. Bridge networks will not do this.
Docker has a few options to handle this use case out of the box. The best option depends on the environment where you are building the network. If you are using Docker on Linux hosts and have control of the host network, you can use underlay networks provided by the macvlan or ipvlan network drivers. Underlay networks create first-class network addresses for each container. Those identities are discoverable and routable from the same network where the host is attached. Each container running on a machine just looks like an independent node on the network.
If you are running Docker for Mac or Docker for Windows or are running in a managed cloud environment, those options will not work. Further, underlay network configuration is dependent on the host network, and so definitions are rarely portable. The more popular multihost container network option is overlay networks.
The overlay network driver is available on Docker engines where swarm mode is enabled. Overlay networks are similar in construction to bridge networks, but the logical bridge component is multihost-aware and can route intercontainer connections between every node in a swarm.
Just like on a bridge network, containers on an overlay network are not directly routable from outside the cluster. But intercontainer communication is simple, and network definitions are mostly independent of the host network environment.
In some cases, you’ll have special network requirements that aren’t covered by underlay or overlay networks. Maybe you need to be able to tune the host network configuration or to make sure that a container operates with total network isolation. In those cases, you should use one of the special container networks.
5.3. Special container networks: host and none
When you list the available networks with docker network list, the results will include two special entries: host and none. These are not really networks; instead, they are network attachment types with special meaning.
When you specify the --network host option on a docker run command, you are telling Docker to create a new container without any special network adapters or network namespace. Whatever software is running inside the resulting container will have the same degree of access to the host network as it would running outside the container. Since there is no network namespace, all of the kernel tools for tuning the network stack are available for modification (as long as the modifying process has access to do so).
Containers running on the host network are able to access host services running on localhost and are able to see and bind to any of the host network interfaces. The following command demonstrates this by listing all of the available network interfaces from inside a container on the host network:
docker run --rm \
    --network host \
    alpine:3.8 ip -o addr
Running on the host network is useful for system services or other infrastructure components. But it is not appropriate in multitenant environments and should be disallowed for third-party containers. Along these lines, you’ll often want to not attach a container to a network. In the spirit of building systems of least privilege, you should use the none network whenever possible.
Creating a container on the none network instructs Docker not to provision any connected virtual Ethernet adapters for the new container. It will have its own network namespace and so it will be isolated, but without adapters connected across the namespace boundary, it will not be able to use the network to communicate outside the container. Containers configured this way will still have their own loopback interface, and so multiprocess containers can still use connections to localhost for interprocess communication.
You can verify this by inspecting the network configuration yourself. Run the following command to list the available interfaces inside a container on the none network:
docker run --rm \
    --network none \
    alpine:3.8 ip -o addr
Running this example, you can see that the only network interface available is the loopback interface, bound to the address 127.0.0.1. This configuration means three things:
- Any program running in the container can connect to or wait for connections on that interface.
- Nothing outside the container can connect to that interface.
- No program running inside that container can reach anything outside the container.
That last point is important and easily demonstrated. If you’re connected to the internet, try to reach a popular service that should always be available. In this case, try to reach Cloudflare’s public DNS service:
docker run --rm \
    --network none \       1
    alpine:3.8 \
    ping -w 2 1.1.1.1      2
In this example, you create a network-isolated container and try to test the speed between your container and the public DNS server provided by Cloudflare. This attempt should fail with a message like ping: send-to: Network is unreachable. This makes sense because we know that the container has no route to the larger network.
The none network should be used when the need for network isolation is the highest or whenever a program doesn’t require network access. For example, running a terminal text editor shouldn’t require network access. Running a program to generate a random password should be run inside a container without network access to prevent the theft of that secret.
Containers on the none network are isolated from each other and the rest of the world, but remember that even containers on the bridge network are not directly routable from outside the host running the Docker engine.
Bridge networks use network address translation (NAT) to make all outbound container traffic with destinations outside the bridge network look like it is coming from the host itself. This means that the service software you have running in containers is isolated from the rest of the world, and the parts of the network where most of your clients and customers are located. The next section describes how to bridge that gap.
5.4. Handling inbound traffic with NodePort publishing
Docker container networks are all about simple connectivity and routing between containers. Connecting services running in those containers with external network clients requires an extra step. Since container networks are connected to the broader network via network address translation, you have to specifically tell Docker how to forward traffic from the external network interfaces. You need to specify a TCP or UDP port on the host interface and a target container and container port, similar to forwarding traffic through a NAT barrier on your home network.
NodePort publishing is a term we’ve used here to match Docker and other ecosystem projects. The Node portion is an inference to the host as typically a node in a larger cluster of machines.
Port publication configuration is provided at container creation time and cannot be changed later. The docker run and docker create commands provide a -p or --publish list option. Like other options, the -p option takes a colon-delimited string argument. That argument specifies the host interface, the port on the host to forward, the target port, and the port protocol. All of the following arguments are equivalent:
Each of those options will forward TCP port 8080 from all host interfaces to TCP port 8080 in the new container. The first argument is the full form. To put the syntax in a more complete context, consider the following example commands:
docker run --rm \
  -p 8080 \
  alpine:3.8 echo "forward ephemeral TCP -> container TCP 8080"

docker run --rm \
  -p 8088:8080/udp \
  alpine:3.8 echo "host UDP 8088 -> container UDP 8080"

docker run --rm \
  -p 127.0.0.1:8080:8080/tcp \
  -p 127.0.0.1:3000:3000/tcp \
  alpine:3.8 echo "forward multiple TCP ports from localhost"
These commands all do different things and demonstrate the flexibility of the syntax. The first problem that new users encounter is in presuming that the first example will map 8080 on the host to port 8080 in the container. What actually happens is the host operating system will select a random host port, and traffic will be routed to port 8080 in the container. The benefit to this design and default behavior is that ports are scarce resources, and choosing a random port allows the software and the tooling to avoid potential conflicts. But programs running inside a container have no way of knowing that they are running inside a container, that they are bound to a container network, or which port is being forwarded from the host.
Docker provides a mechanism for looking up port mappings. That feature is critical when you let the operating system choose a port. Run the docker port subcommand to see the ports forwarded to any given container:
docker run -d -p 8080 --name listener alpine:3.8 sleep 300
docker port listener
This information is also available in summary form with the docker ps subcommand, but picking specific mappings out of the table can be tiresome and does not compose well with other commands. The docker port subcommand also allows you to narrow the lookup query by specifying the container port and protocol. That is particularly useful when multiple ports are published:
docker run -d \
  -p 8080 \                         1
  -p 3000 \                         1
  -p 7500 \                         1
  --name multi-listener \
  alpine:3.8 sleep 300

docker port multi-listener 3000     2
With the tools covered in this section, you should be able to manage routing any inbound traffic to the correct container running on your host. But there are several other ways to customize container network configurations and caveats in working with Docker networks. Those are covered in the next section.
5.5. Container networking caveats and customizations
Networking is used by all kinds of applications and in many contexts. Some bring requirements that cannot be fulfilled today, or might require further network customization. This section covers a short list of topics that any user should be familiar with in adopting containers for networked applications.
5.5.1. No firewalls or network policies
Today Docker container networks do not provide any access control or firewall mechanisms between containers. Docker networking was designed to follow the namespace model that is in use in so many other places in Docker. The namespace model solves resource access-control problems by transforming them into addressability problems. The thinking is that software that’s in two containers in the same container network should be able to communicate. In practice, this is far from the truth, and nothing short of application-level authentication and authorization can protect containers from each other on the same network. Remember, different applications carry different vulnerabilities and might be running in containers on different hosts with different security postures. A compromised application does not need to escalate privileges before it opens network connections. The firewall will not protect you.
This design decision impacts the way we have to architect internetwork service dependencies and model common service deployments. In short, always deploy containers with appropriate application-level access-control mechanisms because containers on the same container network will have mutual (bidirectional) unrestricted network access.
5.5.2. Custom DNS configuration
Domain Name System (DNS) is a protocol for mapping hostnames to IP addresses. This mapping enables clients to decouple from a dependency on a specific host IP and instead depend on whatever host is referred to by a known name. One of the most basic ways to change outbound communications is by creating names for IP addresses.
Typically, containers on the bridge network and other computers on your network have private IP addresses that aren’t publicly routable. This means that unless you’re running your own DNS server, you can’t refer to them by a name. Docker provides different options for customizing the DNS configuration for a new container.
First, the docker run command has a --hostname flag that you can use to set the hostname of a new container. This flag adds an entry to the DNS override system inside the container. The entry maps the provided hostname to the container’s bridge IP address:
docker run --rm \
    --hostname barker \     1
    alpine:3.8 \
    nslookup barker         2
- 1 Sets the container hostname
- 2 Resolves the hostname to an IP address
This example creates a new container with the hostname barker and runs a program to look up the IP address for the same name. Running this example will generate output that looks something like the following:
Server:    10.0.2.3
Address 1: 10.0.2.3

Name:      barker
Address 1: 172.17.0.22 barker
The IP address on the last line is the bridge IP address for the new container. The IP address provided on the line labeled Server is the address of the server that provided the mapping.
Setting the hostname of a container is useful when programs running inside a container need to look up their own IP address or must self-identify. Because other containers don’t know this hostname, its uses are limited. But if you use an external DNS server, you can share those hostnames.
The second option for customizing the DNS configuration of a container is the ability to specify one or more DNS servers to use. To demonstrate, the following example creates a new container and sets the DNS server for that container to Google’s public DNS service:
docker run --rm \
    --dns 8.8.8.8 \          1
    alpine:3.8 \
    nslookup docker.com      2
- 1 Sets primary DNS server
- 2 Resolves IP address of docker.com
Using a specific DNS server can provide consistency if you’re running Docker on a laptop and often move between internet service providers. It’s a critical tool for people building services and networks. There are a few important notes on setting your own DNS server:
- The value must be an IP address. If you think about it, the reason is obvious: the container needs a DNS server to perform the lookup on a name.
- The --dns=[] flag can be set multiple times to set multiple DNS servers (in case one or more are unreachable).
- The --dns=[] flag can be set when you start up the Docker engine that runs in the background. When you do so, those DNS servers will be set on every container by default. But if you stop the engine with containers running and change the default when you restart the engine, the running containers will still have the old DNS settings. You’ll need to restart those containers for the change to take effect.
The third DNS-related option, --dns-search=[], allows you to specify a DNS search domain, which is like a default hostname suffix. With one set, any hostnames that don’t have a known top-level domain (for example, .com or .net) will be searched for with the specified suffix appended:
docker run --rm \
    --dns-search docker.com \    1
    alpine:3.8 \
    nslookup hub                 2
- 1 Sets search domain
- 2 Looks up shortcut for hub.docker.com
This command will resolve to the IP address of hub.docker.com because the DNS search domain provided will complete the hostname. It works by manipulating /etc/resolv.conf, a file used to configure common name-resolution libraries. The following command shows how these DNS manipulation options impact the file:
docker run --rm \
    --dns-search docker.com \           1
    --dns 1.1.1.1 \                     2
    alpine:3.8 cat /etc/resolv.conf
# Will display contents that look like:
# search docker.com
# nameserver 1.1.1.1
- 1 Sets search domain
- 2 Sets primary DNS server
This feature is most often used for trivialities such as shortcut names for internal corporate networks. For example, your company might maintain an internal documentation wiki that you can simply reference at http://wiki/. But this can be much more powerful.
Suppose you maintain a single DNS server for your development and test environments. Rather than building environment-aware software (with hardcoded environment-specific names such as myservice.dev.mycompany.com), you might consider using DNS search domains and using environment-unaware names (for example, myservice):
docker run --rm \
    --dns-search dev.mycompany \       1
    alpine:3.8 \
    nslookup myservice                 2

docker run --rm \
    --dns-search test.mycompany \      3
    alpine:3.8 \
    nslookup myservice                 4
- 1 Note dev prefix.
- 2 Resolves to myservice.dev.mycompany
- 3 Note test prefix.
- 4 Resolves to myservice.test.mycompany
Using this pattern, the only change is the context in which the program is running. As with providing custom DNS servers, you can provide several custom search domains for the same container. Simply set the flag as many times as you have search domains. For example:
docker run --rm \
    --dns-search mycompany \
    --dns-search myothercompany ...
This flag can also be set when you start up the Docker engine to provide defaults for every container created. Again, remember that these options are set for a container only when it is created. If you change the defaults when a container is running, that container will maintain the old values.
The last DNS feature to consider provides the ability to override the DNS system. This uses the same system that the --hostname flag uses. The --add-host=[] flag on the docker run command lets you provide a custom mapping for an IP address and hostname pair:
docker run --rm \
    --add-host test:10.10.10.255 \    1
    alpine:3.8 \
    nslookup test                     2
- 1 Adds host entry
- 2 Resolves to 10.10.10.255
Like --dns and --dns-search, this option can be specified multiple times. But unlike those other options, this flag can’t be set as a default at engine startup.
This feature is a sort of name-resolution scalpel. Providing specific name mappings for individual containers is the most fine-grained customization possible. You can use this to effectively block targeted hostnames by mapping them to a known IP address such as 127.0.0.1. You could use it to route traffic for a particular destination through a proxy. This is often used to route unsecure traffic through secure channels such as an SSH tunnel. Adding these overrides is a trick that has been used for years by web developers who run their own local copies of a web application. If you spend some time thinking about the interface that name-to-IP address mappings provide, we’re sure you can come up with all sorts of uses.
All the custom mappings live in a file at /etc/hosts inside your container. If you want to see what overrides are in place, all you have to do is inspect that file. Rules for editing and parsing this file can be found online and are a bit beyond the scope of this book:
docker run --rm \
    --hostname mycontainer \             1
    --add-host docker.com:127.0.0.1 \    2
    --add-host test:10.10.10.2 \         3
    alpine:3.8 \
    cat /etc/hosts                       4
- 1 Sets hostname
- 2 Creates host entry
- 3 Creates another host entry
- 4 Views all entries
This should produce output that looks something like the following:
172.17.0.45  mycontainer
127.0.0.1    localhost
::1          localhost ip6-localhost ip6-loopback
fe00::0      ip6-localnet
ff00::0      ip6-mcastprefix
ff02::1      ip6-allnodes
ff02::2      ip6-allrouters
10.10.10.2   test
127.0.0.1    docker.com
DNS is a powerful system for changing behavior. The name-to-IP address map provides a simple interface that people and programs can use to decouple themselves from specific network addresses. If DNS is your best tool for changing outbound traffic behavior, then the firewall and network topology is your best tool for controlling inbound traffic.
5.5.3. Externalizing network management
Finally, some organizations, infrastructures, or products require direct management of container network configuration, service discovery, and other network-related resources. In those cases, you or the container orchestrator you are using will create containers by using the Docker none network. Then use some other container-aware tooling to create and manage the container network interfaces, manage NodePort publishing, register containers with service-discovery systems, and integrate with upstream load-balancing systems.
Kubernetes has a whole ecosystem of networking providers, and depending on how you are consuming Kubernetes (as the project, a productized distribution, or managed service), you may or may not have any say in which provider you use. Entire books could be written about networking options for Kubernetes. I won’t do them the disservice of attempting to summarize them here.
Above the network provider layer, a whole continuum of service-discovery tools use various features of Linux and container technology. Service discovery is not a solved problem, so the solution landscape changes quickly. If you find Docker networking constructs insufficient to solve your integration and management problems, survey the field. Each tool has its own documentation and implementation patterns, and you will need to consult those guides to integrate them effectively with Docker.
When you externalize network management, Docker is still responsible for creating the network namespace for the container, but it will not create or manage any of the network interfaces. You will not be able to use any of the Docker tooling to inspect the network configuration or port mapping. If you are running a blended environment in which some container networking has been externalized, the built-in service discovery mechanisms cannot be used to route traffic from Docker-managed containers to externalized containers. Blended environments are rare and should be avoided.
Summary
Networking is a broad subject that would take several books to cover properly. This chapter should help readers with a basic understanding of network fundamentals adopt the single-host networking facilities provided by Docker. In reading this material, you learned the following:
- Docker networks are first-class entities that can be created, listed, and removed just like containers, volumes, and images.
- Bridge networks are a special kind of network that allows direct intercontainer network communication with built-in container name resolution.
- Docker provides two other special networks by default: host and none.
- Networks created with the none driver will isolate attached containers from the network.
- A container on a host network will have full access to the network facilities and interfaces on the host.
- Forward network traffic to a host port into a target container and port with NodePort publishing.
- Docker bridge networks do not provide any network firewall or access-control functionality.
- The network name-resolution stack can be customized for each container. Custom DNS servers, search domains, and static hosts can be defined.
- Network management can be externalized with third-party tooling and by using the Docker none network.