Chapter 4. Working with storage and volumes
This chapter covers
- Introducing mount points
- How to share data between the host and a container
- How to share data between containers
- Using temporary, in-memory filesystems
- Managing data with volumes
- Advanced storage with volume plugins
At this point in the book, you’ve installed and run a few programs. You’ve seen a few toy examples but haven’t run anything that resembles the real world. The difference between the examples in the first three chapters and the real world is that in the real world, programs work with data. This chapter introduces Docker volumes and strategies that you’ll use to manage data with containers.
Consider what it might look like to run a database program inside a container. You would package the software with the image, and when you start the container, it might initialize an empty database. When programs connect to the database and enter data, where is that data stored? Is it in a file inside the container? What happens to that data when you stop the container or remove it? How would you move your data if you wanted to upgrade the database program? What happens to that storage on a cloud machine when it is terminated?
Consider another situation where you’re running a couple of different web applications inside different containers. Where would you write log files so that they will outlive the container? How would you get access to those logs to troubleshoot a problem? How can other programs such as log digest tools get access to those files?
The union filesystem is not appropriate for working with long-lived data or sharing data between containers, or a container and the host. The answer to all these questions involves managing the container filesystem and mount points.
4.1. File trees and mount points
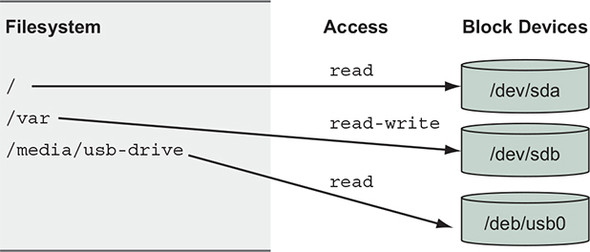
Unlike other operating systems, Linux unifies all storage into a single tree. Storage devices such as disk partitions or USB disk partitions are attached to specific locations in that tree. Those locations are called mount points. A mount point defines the location in the tree, the access properties to the data at that point (for example, writability), and the source of the data mounted at that point (for example, a specific hard disk, USB device, or memory-backed virtual disk). Figure 4.1 depicts a filesystem constructed from multiple storage devices, with each device mounted to a specific location and level of access.
Figure 4.1. Storage devices attached to a filesystem tree at their mount point
Mount points allow software and users to use the file tree in a Linux environment without knowing exactly how that tree is mapped into specific storage devices. This is particularly useful in container environments.
Every container has something called a MNT namespace and a unique file tree root. This is discussed in detail in chapter 6. For now, it is enough to understand that the image that a container is created from is mounted at that container’s file tree root, or at the / point, and that every container has a different set of mount points.
Logic follows that if different storage devices can be mounted at various points in a file tree, we can mount nonimage-related storage at other points in a container file tree. That is exactly how containers get access to storage on the host filesystem and share storage between containers.
The rest of this chapter elaborates on how to manage storage and the mount points in containers. The best place to start is by understanding the three most common types of storage mounted into containers:
- Bind mounts
- In-memory storage
- Docker volumes
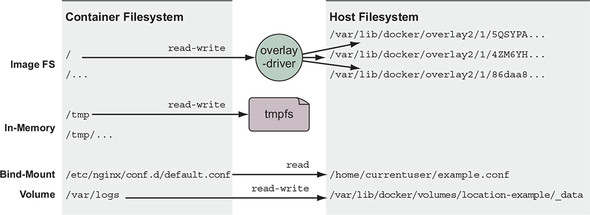
These storage types can be used in many ways. Figure 4.2 shows an example of a container filesystem that starts with the files from the image, adds an in-memory tmpfs at /tmp, bind-mounts a configuration file from the host, and writes logs into a Docker volume on the host.
Figure 4.2. Example of common container storage mounts
All three types of mount points can be created using the --mount flag on the docker run and docker create subcommands.
4.2. Bind mounts
Bind mounts are mount points used to remount parts of a filesystem tree onto other locations. When working with containers, bind mounts attach a user-specified location on the host filesystem to a specific point in a container file tree. Bind mounts are useful when the host provides a file or directory that is needed by a program running in a container, or when that containerized program produces a file or log that is processed by users or programs running outside containers.
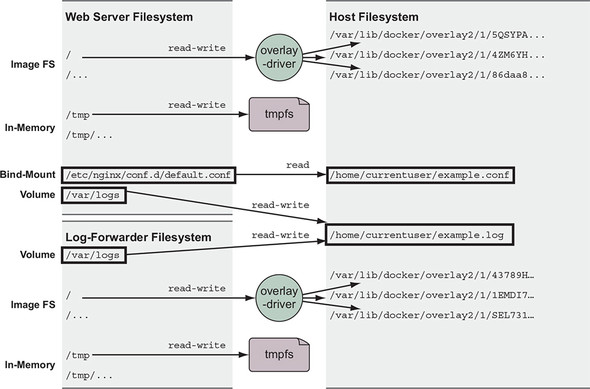
Consider the example in figure 4.3. Suppose you’re running a web server that depends on sensitive configuration on the host and emits access logs that need to be forwarded by your log-shipping system. You could use Docker to launch the web server in a container and bind-mount the configuration location as well as the location where you want the web server to write logs.
Figure 4.3. Host files shared as a bind-mount volumes
You can try this for yourself. Create a placeholder log file and create a special NGINX configuration file named example.conf. Run the following commands to create and populate the files:
touch ~/example.log
cat >~/example.conf <<EOF
server {
  listen 80;
  server_name localhost;
  access_log /var/log/nginx/custom.host.access.log main;
  location / {
    root /usr/share/nginx/html;
    index index.html index.htm;
  }
}
EOF
Once a server is started with this configuration file, it will offer the NGINX default site at http://localhost/, and access logs for that site will be written to a file in the container at /var/log/nginx/custom.host.access.log. The following command will start an NGINX HTTP server in a container where your new configuration is bind-mounted to the server’s configuration root:
CONF_SRC=~/example.conf; \
CONF_DST=/etc/nginx/conf.d/default.conf; \

LOG_SRC=~/example.log; \
LOG_DST=/var/log/nginx/custom.host.access.log; \
docker run -d --name diaweb \
  --mount type=bind,src=${CONF_SRC},dst=${CONF_DST} \
  --mount type=bind,src=${LOG_SRC},dst=${LOG_DST} \
  -p 80:80 \
  nginx:latest
With this container running, you should be able to point your web browser at http://localhost/ and see the NGINX hello-world page, and you will not see any access logs in the container log stream: docker logs diaweb. However, you will be able to see those logs if you examine the example.log file in your home directory: cat ~/example.log.
In this example you used the --mount option with the type=bind option. The other two mount parameters, src and dst, define the source location on the host file tree and the destination location on the container file tree. You must specify locations with absolute paths, but in this example, we used shell expansion and shell variables to make the command easier to read.
This example touches on an important feature of volumes. When you mount a volume on a container filesystem, it replaces the content that the image provides at that location. By default, the nginx:latest image provides some default configuration at /etc/nginx/conf.d/default.conf, but when you created the bind mount with a destination at that path, the content provided by the image was overridden by the content on the host. This behavior is the basis for the polymorphic container pattern discussed later in the chapter.
Expanding on this use case, suppose you want to make sure that the NGINX web server can’t change the contents of the configuration volume. Even the most trusted software can contain vulnerabilities, and it’s best to minimize the impact of an attack on your website. Fortunately, Linux provides a mechanism to make mount points read-only. You can do this by adding the readonly=true argument to the mount specification. In the example, you should change the run command to something like the following:
docker rm -f diaweb

CONF_SRC=~/example.conf; \
CONF_DST=/etc/nginx/conf.d/default.conf; \
LOG_SRC=~/example.log; \
LOG_DST=/var/log/nginx/custom.host.access.log; \
docker run -d --name diaweb \
  --mount type=bind,src=${CONF_SRC},dst=${CONF_DST},readonly=true \     1
  --mount type=bind,src=${LOG_SRC},dst=${LOG_DST} \
  -p 80:80 \
  nginx:latest
- 1 Note the readonly flag.
By creating the read-only mount, you can prevent any process inside the container from modifying the content of the volume. You can see this in action by running a quick test:
docker exec diaweb \
    sed -i "s/listen 80/listen 8080/" /etc/nginx/conf.d/default.conf
This command executes a sed command inside the diaweb container and attempts to modify the configuration file. The command fails because the file is mounted as read-only.
The first problem with bind mounts is that they tie otherwise portable container descriptions to the filesystem of a specific host. If a container description depends on content at a specific location on the host filesystem, that description isn’t portable to hosts where the content is unavailable or available in some other location.
The next big problem is that they create an opportunity for conflict with other containers. It would be a bad idea to start multiple instances of Cassandra that all use the same host location as a bind mount for data storage. In that case, each of the instances would compete for the same set of files. Without other tools such as file locks, that would likely result in corruption of the database.
Bind mounts are appropriate tools for workstations, machines with specialized concerns, or in systems combined with more traditional configuration management tooling. It’s better to avoid these kinds of specific bindings in generalized platforms or hardware pools.
4.3. In-memory storage
Most service software and web applications use private key files, database passwords, API key files, or other sensitive configuration files, and need upload buffering space. In these cases, it is important that you never include those types of files in an image or write them to disk. Instead, you should use in-memory storage. You can add in-memory storage to containers with a special type of mount.
Set the type option on the mount flag to tmpfs. This is the easiest way to mount a memory-based filesystem into a container’s file tree. Consider this command:
docker run --rm \
    --mount type=tmpfs,dst=/tmp \
    --entrypoint mount \
    alpine:latest -v
This command creates an empty tmpfs device and attaches it to the new container’s file tree at /tmp. Any files created under this file tree will be written to memory instead of disk. More than that, the mount point is created with sensible defaults for generic workloads. Running the command will display a list of all the mount points for the container. The list will include the following line:
tmpfs on /tmp type tmpfs (rw,nosuid,nodev,noexec,relatime)
This line describes the mount-point configuration. From left-to-right it indicates the following:
- A tmpfs device is mounted to the tree at /tmp.
- The device has a tmpfs filesystem.
- The tree is read/write capable.
- suid bits will be ignored on all files in this tree.
- No files in this tree will be interpreted as special devices.
- No files in this tree will be executable.
- File access times will be updated if they are older than the current modify or change time.
Additionally, the tmpfs device will not have any size limits by default and will be world-writable (has file permissions 1777 in octal). You can add a size limit and change the file mode with two additional options: tmpfs-size and tmpfs-mode:
docker run --rm \
    --mount type=tmpfs,dst=/tmp,tmpfs-size=16k,tmpfs-mode=1770 \
    --entrypoint mount \
    alpine:latest -v
This command limits the tmpfs device mounted at /tmp to 16 KB and is not readable by other in-container users.
4.4. Docker volumes
Docker volumes are named filesystem trees managed by Docker. They can be implemented with disk storage on the host filesystem, or another more exotic backend such as cloud storage. All operations on Docker volumes can be accomplished using the docker volume subcommand set. Using volumes is a method of decoupling storage from specialized locations on the filesystem that you might specify with bind mounts.
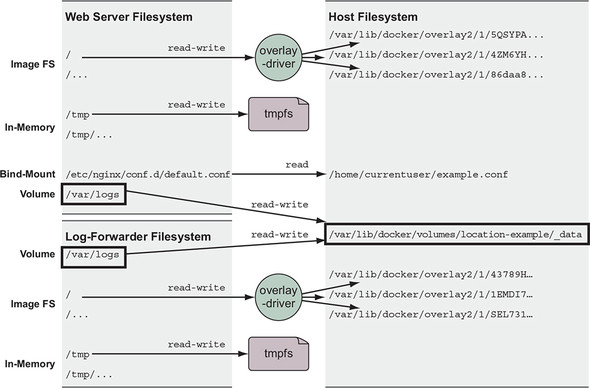
If you were to convert the web server and log-forwarding container example from section 4.2 to use a volume for sharing access to the logs, the pair could run on any machine without considering other software that might have a conflict with static locations on disk. That example would look like figure 4.4, and the containers would read and write logs through the location-example volume.
Figure 4.4. Sharing files between containers with a volume
You can create and inspect volumes by using the docker volume create and docker volume inspect subcommands. By default, Docker creates volumes by using the local volume plugin. The default behavior will create a directory to store the contents of a volume somewhere in a part of the host filesystem under control of the Docker engine. For example, the following two commands will create a volume named location-example and display the location of the volume host filesystem tree:
docker volume create \                1
    --driver local \                  2
    --label example=location \        3
    location-example
docker volume inspect \               4
    --format "{{json .Mountpoint}}" \ 5
    location-example
- 1 Creates the volume
- 2 Specifies the “local” plugin
- 3 Adds a volume label
- 4 Inspects the volume
- 5 Selects the location on the host
Docker volumes may seem difficult to work with if you’re manually building or linking tools together on your desktop, but for larger systems in which specific locality of the data is less important, volumes are a much more effective way to organize your data. Using them decouples volumes from other potential concerns of the system. By using Docker volumes, you’re simply stating, “I need a place to put some data that I’m working with.” This is a requirement that Docker can fill on any machine with Docker installed.
Further, when you’re finished with a volume and you ask Docker to clean things up for you, Docker can confidently remove any directories or files that are no longer being used by a container. Using volumes in this way helps manage clutter. As Docker middleware or plugins evolve, volume users will be able to adopt more advanced features.
Sharing access to data is a key feature of volumes. If you have decoupled volumes from known locations on the filesystem, you need to know how to share volumes between containers without exposing the exact location of managed containers. The next section describes two ways to share data between containers by using volumes.
4.4.1. Volumes provide container-independent data management
Semantically, a volume is a tool for segmenting and sharing data that has a scope or life cycle that’s independent of a single container. That makes volumes an important part of any containerized system design that shares or writes files. Examples of data that differs in scope or access from a container include the following:
- Database software versus database data
- Web application versus log data
- Data processing application versus input and output data
- Web server versus static content
- Products versus support tools
Volumes enable separation of concerns and create modularity for architectural components. That modularity helps you understand, build, support, and reuse parts of larger systems more easily.
Think about it this way: images are appropriate for packaging and distributing relatively static files such as programs; volumes hold dynamic data or specializations. This distinction makes images reusable and data simple to share. This separation of relatively static and dynamic file space allows application or image authors to implement advanced patterns such as polymorphic and composable tools.
A polymorphic tool is one that maintains a consistent interface but might have several implementations that do different things. Consider an application such as a general application server. Apache Tomcat, for example, is an application that provides an HTTP interface on a network and dispatches any requests it receives to pluggable programs. Tomcat has polymorphic behavior. Using volumes, you can inject behavior into containers without modifying an image. Alternatively, consider a database program like MongoDB or MySQL. The value of a database is defined by the data it contains. A database program always presents the same interface but takes on a wholly different value depending on the data that can be injected with a volume. The polymorphic container pattern is the subject of section 4.5.1.
More fundamentally, volumes enable the separation of application and host concerns. At some point, an image will be loaded onto a host and a container created from it. Docker knows little about the host where it’s running and can make assertions only about what files should be available to a container. Docker alone has no way to take advantage of host-specific facilities like mounted network storage or mixed spinning and solid-state hard drives. But a user with knowledge of the host can use volumes to map directories in a container to appropriate storage on that host.
Now that you’re familiar with what volumes are and why they’re important, you can get started with them in a real-world example.
4.4.2. Using volumes with a NoSQL database
The Apache Cassandra project provides a column database with built-in clustering, eventual consistency, and linear write scalability. It’s a popular choice in modern system designs, and an official image is available on Docker Hub. Cassandra is like other databases in that it stores its data in files on disk. In this section, you’ll use the official Cassandra image to create a single-node Cassandra cluster, create a keyspace, delete the container, and then recover that keyspace on a new node in another container.
Get started by creating the volume that will store the Cassandra database files. This volume uses disk space on the local machine and in a part of the filesystem managed by the Docker engine:
docker volume create \
    --driver local \
    --label example=cassandra \
    cass-shared
This volume is not associated with any containers; it is just a named bit of disk that can be accessed by containers. The volume you just created is named cass-shared. In this case, you added a label to the volume with the key example and the value cassandra. Adding label metadata to your volumes can help you organize and clean up volumes later. You’ll use this volume when you create a new container running Cassandra:
docker run -d \
    --volume cass-shared:/var/lib/cassandra/data \      1
    --name cass1 \
    cassandra:2.2
- 1 Mounts the volume into the container
After Docker pulls the cassandra:2.2 image from Docker Hub, it creates a new container with the cass-shared volume mounted at /var/lib/cassandra/data. Next, start a container from the cassandra:2.2 image, but run a Cassandra client tool (CQLSH) and connect to your running server:
docker run -it --rm \
    --link cass1:cass \
    cassandra:2.2 cqlsh cass
Now you can inspect or modify your Cassandra database from the CQLSH command line. First, look for a keyspace named docker_hello_world:
select *
from system.schema_keyspaces
where keyspace_name = 'docker_hello_world';
Cassandra should return an empty list. This means the database hasn’t been modified by the example. Next, create that keyspace with the following command:
create keyspace docker_hello_world
with replication = {
    'class' : 'SimpleStrategy',
    'replication_factor': 1
};
Now that you’ve modified the database, you should be able to issue the same query again to see the results and verify that your changes were accepted. The following command is the same as the one you ran earlier:
select *
from system.schema_keyspaces
where keyspace_name = 'docker_hello_world';
This time, Cassandra should return a single entry with the properties you specified when you created the keyspace. If you’re satisfied that you’ve connected to and modified your Cassandra node, quit the CQLSH program to stop the client container:
# Leave and stop the current container
quit
The client container was created with the --rm flag and was automatically removed when the command stopped. Continue cleaning up the first part of this example by stopping and removing the Cassandra node you created:
docker stop cass1
docker rm -vf cass1
Both the Cassandra client and server you created will be deleted after running those commands. If the modifications you made are persisted, the only place they could remain is the cass-shared volume. You can test this by repeating these steps. Create a new Cassandra node, attach a client, and query for the keyspace. Figure 4.5 illustrates the system and what you will have built.
Figure 4.5. Key steps in creating and recovering data persisted to a volume with Cassandra
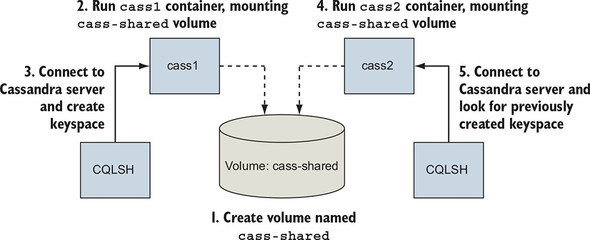
The next three commands test recovery of the data:
docker run -d \
    --volume cass-shared:/var/lib/cassandra/data \
    --name cass2 \
    cassandra:2.2

docker run -it --rm \
    --link cass2:cass \
    cassandra:2.2 \
    cqlsh cass

select *
from system.schema_keyspaces
where keyspace_name = 'docker_hello_world';
The last command in this set returns a single entry, and it matches the keyspace you created in the previous container. This confirms the previous claims and demonstrates how volumes might be used to create durable systems. Before moving on, quit the CQLSH program and clean up your workspace. Make sure to remove that volume container as well:
quit

docker rm -vf cass2 cass-shared
This example demonstrates one way to use volumes without going into how they work, the patterns in use, or how to manage volume life cycle. The remainder of this chapter dives deeper into each facet of volumes, starting with the types available.
4.5. Shared mount points and sharing files
Sharing access to the same set of files between multiple containers is where the value of volumes becomes most obvious. Compare the bind-mount and volume-based approaches.
Bind mounts are the most obvious way to share disk space between containers. You can see it in action in the following example:
LOG_SRC=~/web-logs-example
mkdir ${LOG_SRC}                                    1

docker run --name plath -d \                        2
    --mount type=bind,src=${LOG_SRC},dst=/data \    2
    dockerinaction/ch4_writer_a                     2

docker run --rm \
    --mount type=bind,src=${LOG_SRC},dst=/data \    3
    alpine:latest \                                 3
    head /data/logA                                 3

cat ${LOG_SRC}/logA                                 4

docker rm -f plath                                  5
- 1 Sets up a known location
- 2 Bind-mounts the location into a log-writing container
- 3 Bind-mounts the same location into a container for reading
- 4 Views the logs from the host
- 5 Stops the writer
In this example, you created two containers: one named plath that writes lines to a file and another that views the top part of the file. These containers share a common bind-mount definition. Outside any container, you can see the changes by listing the contents of the directory you created or viewing the new file. The major drawback to this approach is that all containers involved must agree on the exact location on the host file path, and they may conflict with other containers that also intend to read or manipulate files at that location.
Now compare that bind-mount example with an example that uses volumes. The following commands are equivalent to the prior example but have no host-specific dependencies:
docker volume create \                                      1
    --driver local \                                        1
    logging-example                                         1

docker run --name plath -d \                                2
    --mount type=volume,src=logging-example,dst=/data \     2
    dockerinaction/ch4_writer_a                             2

docker run --rm \
    --mount type=volume,src=logging-example,dst=/data \     3
    alpine:latest \                                         3
    head /data/logA                                         3

cat "$(docker volume inspect \
    --format "{{json .Mountpoint}}" logging-example)"/logA  4

docker stop plath                                           5
- 1 Sets up a named volume
- 2 Mounts the volume into a log-writing container
- 3 Mounts the same volume into a container for reading
- 4 Views the logs from the host
- 5 Stops the writer
Unlike shares based on bind mounts, named volumes enable containers to share files without any knowledge of the underlying host filesystem. Unless the volume needs to use specific settings or plugins, it does not have to exist before the first container mounts it. Docker will automatically create volumes named in run or create commands by using the defaults. However, it is important to remember that a named volume that exists on the host will be reused and shared by any other containers with the same volume dependency.
This name conflict problem can be solved by using anonymous volumes and mount-point definition inheritance between containers.
4.5.1. Anonymous volumes and the volumes-from flag
An anonymous volume is created without a name either before use with the docker volume create subcommand, or just in time with defaults using a docker run or docker create command. When the volume is created, it is assigned a unique identifier such as 1b3364a8debb5f653d1ecb9b190000622549ee2f812a4fb4ec8a83c43d87531b instead of a human-friendly name. These are more difficult to work with if you are manually stitching together dependencies, but they are useful when you need to eliminate potential volume-naming conflicts. The Docker command line provides another way to specify mount dependencies instead of referencing volumes by name.
The docker run command provides a flag, --volumes-from, that will copy the mount definitions from one or more containers to the new container. It can be set multiple times to specify multiple source containers. By combining this flag and anonymous volumes, you can build rich shared-state relationships in a host-independent way. Consider the following example:
docker run --name fowler \
    --mount type=volume,dst=/library/PoEAA \
    --mount type=bind,src=/tmp,dst=/library/DSL \
    alpine:latest \
    echo "Fowler collection created."
docker run --name knuth \
    --mount type=volume,dst=/library/TAoCP.vol1 \
    --mount type=volume,dst=/library/TAoCP.vol2 \
    --mount type=volume,dst=/library/TAoCP.vol3 \
    --mount type=volume,dst=/library/TAoCP.vol4.a \
    alpine:latest \
    echo "Knuth collection created"

docker run --name reader \                          1
    --volumes-from fowler \                         1
    --volumes-from knuth \                          1
    alpine:latest ls -l /library/

docker inspect --format "{{json .Mounts}}" reader   2
- 1 Lists all volumes as they were copied into new container
- 2 Checks out volume list for reader
In this example, you created two containers that defined anonymous volumes as well as a bind-mount volume. To share these with a third container without the --volumes-from flag, you’d need to inspect the previously created containers and then craft bind-mount volumes to the Docker-managed host directories. Docker does all this on your behalf when you use the --volumes-from flag. It copies all mount-point definitions present on a referenced source container into the new container. In this case, the container named reader copied all the mount points defined by both fowler and knuth.
You can copy volumes directly or transitively. This means that if you’re copying the volumes from another container, you’ll also copy the volumes that it copied from some other container. Using the containers created in the preceding example yields the following:
docker run --name aggregator \     1
    --volumes-from fowler \
    --volumes-from knuth \
    alpine:latest \
    echo "Collection Created."

docker run --rm \                  2
    --volumes-from aggregator \
    alpine:latest \
    ls -l /library/
- 1 Creates an aggregation
- 2 Consumes volumes from a single source and lists them
Copied volumes always have the same mount point. That means that you can’t use --volumes-from in three situations.
In the first situation, you can’t use --volumes-from if the container you’re building needs a shared volume mounted to a different location. It offers no tooling for remapping mount points. It will only copy and union the mount points indicated by the specified containers. For example, if the student in the previous example wanted to mount the library to a location like /school/library, they wouldn’t be able to do so.
The second situation occurs when the volume sources conflict with each other or a new volume specification. If one or more sources create a managed volume with the same mount point, a consumer of both will receive only one of the volume definitions:
docker run --name chomsky --volume /library/ss \
    alpine:latest echo "Chomsky collection created."
docker run --name lamport --volume /library/ss \
    alpine:latest echo "Lamport collection created."

docker run --name student \
    --volumes-from chomsky --volumes-from lamport \
    alpine:latest ls -l /library/

docker inspect -f "{{json .Mounts}}" student
When you run the example, the output of docker inspect will show that the last container has only a single volume listed at /library/ss, and its value is the same as one of the other two. Each source container defines the same mount point, and you create a race condition by copying both to the new container. Only one of the two copy operations can succeed.
A real-world example of this limitation may occur if you copy the volumes of several web servers into a single container for inspection. If those servers are all running the same software or share common configuration (which is more likely than not in a containerized system), all those servers might use the same mount points. In that case, the mount points would conflict, and you’d be able to access only a subset of the required data.
The third situation in which you can’t use --volumes-from occurs when you need to change the write permission of a volume. This is because --volumes-from copies the full volume definition. For example, if your source has a volume mounted with read/write access, and you want to share that with a container that should have only read access, using --volumes-from won’t work.
Sharing volumes with the --volumes-from flag is an important tool for building portable application architectures, but it does introduce some limitations. The more challenging of these are in managing file permissions.
Using volumes decouples containers from the data and filesystem structure of the host machine, and that’s critical for most production environments. The files and directories that Docker creates for managed volumes still need to be accounted for and maintained. The next section shows you how to keep a Docker environment clean.
4.6. Cleaning up volumes
By this point in the chapter, you should have quite a few containers and volumes to clean up. You can see all of the volumes present on your system by running the docker volume list subcommand. The output will list the type and name of each volume. Any volumes that were created with a name will be listed with that name. Any anonymous volumes will be listed by their identifier.
Anonymous volumes can be cleaned up in two ways. First, anonymous volumes are automatically deleted when the container they were created for are automatically cleaned up. This happens when containers are deleted via the docker run --rm or docker rm -v flags. Second, they can be manually deleted by issuing a docker volume remove command:
docker volume create --driver=local
# Outputs:
# 462d0bb7970e47512cd5ebbbb283ed53d5f674b9069b013019ff18ccee37d75d

docker volume remove \
    462d0bb7970e47512cd5ebbbb283ed53d5f674b9069b013019ff18ccee37d75d
# Outputs:
# 462d0bb7970e47512cd5ebbbb283ed53d5f674b9069b013019ff18ccee37d75d
Unlike anonymous volumes, named volumes must always be deleted manually. This behavior can be helpful when containers are running jobs that collect partitioned or periodic data. Consider the following:
for i in amazon google microsoft; \
do \
docker run --rm \
    --mount type=volume,src=$i,dst=/tmp \

    --entrypoint /bin/sh \
    alpine:latest -c "nslookup $i.com > /tmp/results.txt"; \
done
This command performs a DNS lookup on amazon.com, google.com, and microsoft.com in three separate containers and records the results in three different volumes. Those volumes are named amazon, google, and microsoft. Even though the containers are being cleaned up automatically, the named volumes will remain. If you run the command, you should be able to see the new volumes when you run docker volume list.
The only way to delete these named volumes is by specifying their name in the docker volume remove command:
docker volume remove \
    amazon google microsoft
The remove subcommand supports a list argument for specifying volume names and identifiers. The preceding command will delete all three named volumes.
There is only one constraint for deleting volumes: no volume that is currently in use can be deleted. More specifically, no volume attached to any container in any state can be deleted. If you attempt to do so, the Docker command will respond with a message stating, volume is in use and display the identifier of the container using the volume.
It can be annoying to determine which volumes are candidates for removal if you simply want to remove all or some of the volumes that can be removed. This happens all the time as part of periodic maintenance. The docker volume prune command is built for this case.
Running docker volume prune with no options will prompt you for confirmation and delete all volumes that can be deleted. You can filter that candidate set by providing volume labels:
docker volume prune --filter example=cassandra
This command would prompt for confirmation and delete the volume you created earlier in the Cassandra example. If you’re automating these cleanup procedures, you might want to suppress the confirmation step. In that case, use the --force or -f flag:
docker volume prune --filter example=location --force
Understanding volumes is critical for working with real-world containers, but in many cases using volumes on local disks can create problems. If you’re running software on a cluster of machines, the data that software stores in volumes will stay on the disk where it was written. If a container is moved to a different machine, it will lose access to its data in an old volume. You can solve this problem for your organization with volume plugins.
4.7. Advanced storage with volume plugins
Docker provides a volume plugin interface as a means for the community to extend the default engine capabilities. That has been implemented by several storage management tools, and today users are free to use all types of backing storage including proprietary cloud block storage, network filesystem mounts, specialized storage hardware, and on-premises cloud solutions such as Ceph and vSphere storage.
These community and vendor plugins will help you solve the hard problems associated with writing files to disk on one machine and depending on them from another. They are simple to install, configure, and remove using the appropriate docker plugin subcommands.
Docker plugins are not covered in detail in this text. They are always environment specific and difficult to demonstrate without using paid resources or endorsing specific cloud providers. Choosing a plugin depends on the storage infrastructure you want to integrate with, although a few projects simplify this to some degree. REX-Ray (https://github.com/rexray/rexray) is a popular open source project that provides volumes on several cloud and on-premises storage platforms. If you’ve come to the point in your container journey that you need more sophisticated volume backends, you should look at the latest offerings on Docker Hub and look into the current status of REX-Ray.
Summary
One of the first major hurdles in learning how to use Docker is understanding how to work with files that are not part of images and might be shared with other containers or the host. This chapter covers mount points in depth, including the following:
- Mount points allow many filesystems from many devices to be attached to a single file tree. Every container has its own file tree.
- Containers can use bind mounts to attach parts of the host filesystem into a container.
- In-memory filesystems can be attached to a container file tree so that sensitive or temporary data is not written to disk.
- Docker provides anonymous or named storage references called volumes.
- Volumes can be created, listed, and deleted using the appropriate docker volume subcommand.
- Volumes are parts of the host filesystem that Docker mounts into containers at specified locations.
- Volumes have life cycles of their own and might need to be periodically cleaned up.
- Docker can provide volumes backed by network storage or other more sophisticated tools if the appropriate volume plugin is installed.