Chapter 3. Software installation simplified
This chapter covers
- Identifying software
- Finding and installing software with Docker Hub
- Installing software from alternative sources
- Understanding filesystem isolation
- Working with images and layers
Chapters 1 and 2 introduced new concepts and abstractions provided by Docker. This chapter dives deeper into container filesystems and software installation. It breaks software installation into three steps, as illustrated in figure 3.1.
Figure 3.1. Flow of topics covered in this chapter

The first step in installing any software is identifying the software you want to install. You know that software is distributed using images, but you need to know how to tell Docker exactly which image you want to install. We’ve already mentioned that repositories hold images, but this chapter shows how repositories and tags are used to identify images in order to install the software you want.
This chapter details the three main ways to install Docker images:
- Using Docker registries
- Using image files with docker save and docker load
- Building images with Dockerfiles
In the course of reading this material, you’ll learn how Docker isolates installed software and you’ll be exposed to a new term, layer. Layers, an important concept when dealing with images, provide multiple important features. This chapter closes with a section about how images work. That knowledge will help you evaluate image quality and establish a baseline skillset for part 2 of this book.
3.1. Identifying software
Suppose you want to install a program called TotallyAwesomeBlog 2.0. How would you tell Docker what you want to install? You would need a way to name the program, specify the version that you want to use, and specify the source that you want to install it from. Learning how to identify specific software is the first step in software installation, as illustrated in figure 3.2.
Figure 3.2. Step 1—software identification

You’ve learned that Docker creates containers from images. An image is a file. It holds files that will be available to containers created from it and metadata about the image. This metadata contains labels, environment variables, default execution context, the command history for an image, and more.
Every image has a globally unique identifier. You can use that identifier with image and container commands, but in practice it’s rare to actually work with raw image identifiers. They are long, unique sequences of letters and numbers. Each time a change is made to an image, the image identifier changes. Image identifiers are difficult to work with because they’re unpredictable. Instead, users work with named repositories.
3.1.1. What is a named repository?
A named repository is a named bucket of images. The name is similar to a URL. A repository’s name is made up of the name of the host where the image is located, the user account that owns the image, and a short name, as shown in figure 3.3. For example, later in this chapter you will install an image from the repository named docker.io/dockerinaction/ch3_hello_registry.
Figure 3.3. The Docker image repository name
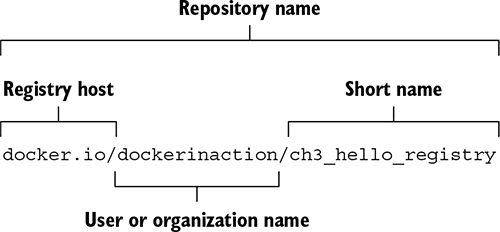
Just as there can be several versions of software, a repository can hold several images. Each image in a repository is identified uniquely with tags. If you were to release a new version of docker.io/dockerinaction/ch3_hello_registry, you might tag it v2 while tagging the old version with v1. If you wanted to download the old version, you could specifically identify that image by its v1 tag.
In chapter 2, you installed an image from the NGINX repository on Docker Hub that was identified with the latest tag. A repository name and tag form a composite key, or a unique reference made up of a combination of nonunique components. In that example, the image was identified by nginx:latest. Although identifiers built in this fashion may occasionally be longer than raw image identifiers, they’re predictable and communicate the intention of the image.
3.1.2. Using tags
Tags are both an important way to uniquely identify an image and a convenient way to create useful aliases. Whereas a tag can be applied to only a single image in a repository, a single image can have several tags. This allows repository owners to create useful versioning or feature tags.
For example, the Java repository on Docker Hub maintains the following tags: 11-stretch, 11-jdk-stretch, 11.0-stretch, 11.0-jdk-stretch, 11.0.4-stretch, and 11.0.4-jdk-stretch. All these tags are applied to the same image. This image is built by installing the current Java 11 Development Kit (JDK) into a Debian Stretch base image. As the current patch version of Java 11 increases, and the maintainers release Java 11.0.5, the 11.0.4 tag will be replaced in this set with 11.0.5. If you care about which minor or patch version of Java 11 you’re running, you have to keep up with those tag changes. If you just want to make sure you’re always running the most recent version of Java 11, use the image tagged with 11-stretch. It should always be assigned to the newest release of Java 11. These tags give users great flexibility.
It’s also common to see different tags for images with different software configurations. For example, we’ve released two images for an open source program called freegeoip. It’s a web application that can be used to get the rough geographical location associated with a network address. One image is configured to use the default configuration for the software. It’s meant to run by itself with a direct link to the world. The second is configured to run behind a web load balancer. Each image has a distinct tag that allows the user to easily identify the image with the features required.
Tip
When you’re looking for software to install, always pay careful attention to the tags offered in a repository. Many repositories publish multiple releases of their software, sometimes on multiple operating systems or in full or slim versions to support different use cases. Consult the repository's documentation for specifics of what the repository's tags mean and the image release practices.
That is all there is to identifying software for use with Docker. With this knowledge, you’re ready to start looking for and installing software with Docker.
3.2. Finding and installing software
You can identify software by a repository name, but how do you find the repositories that you want to install? Discovering trustworthy software is complex, and it is the second step in learning how to install software with Docker, as shown in figure 3.4.
Figure 3.4. Step 2—locating repositories

The easiest way to find images is to use an index. Indexes are search engines that catalog repositories. There are several public Docker indexes, but by default docker is integrated with an index named Docker Hub.
Docker Hub is a registry and index with a web user interface run by Docker Inc. It’s the default registry and index used by docker and is located at the host docker.io. When you issue a docker pull or docker run command without specifying an alternative registry, Docker will default to looking for the repository on Docker Hub. Docker Hub makes Docker more useful out of the box.
Docker Inc. has made efforts to ensure that Docker is an open ecosystem. It publishes a public image to run your own registry, and the docker command-line tool can be easily configured to use alternative registries. Later in this chapter, we cover alternative image installation and distribution tools included with Docker. But first, the next section covers how to use Docker Hub so you can get the most from the default toolset.
3.2.1. Working with Docker registries from the command line
An image author can publish images to a registry such as Docker Hub in two ways:
- Use the command line to push images that they built independently and on their own systems.
- Make a Dockerfile publicly available and use a continuous build system to publish images. Dockerfiles are scripts for building images. Images created from these automated builds are preferred because the Dockerfile is available for examination prior to installing the image.
Most registries will require image authors to authenticate before publishing and enforce authorization checks on the repository they are updating. In these cases, you can use the docker login command to log in to specific registry servers such as Docker Hub. Once you’ve logged in, you’ll be able to pull from private repositories, tag images in your repositories, and push to any repository that you control. Chapter 7 covers tagging and pushing images.
Running docker login will prompt you for your Docker.com credentials. Once you’ve provided them, your command-line client will be authenticated, and you’ll be able to access your private repositories. When you’ve finished working with your account, you can log out with the docker logout command. If you’re using a different registry, you can specify the server name as an argument to the docker login and docker logout subcommands.
3.2.2. Using alternative registries
Docker makes the registry software available for anyone to run. Cloud companies including AWS and Google offer private registries, and companies that use Docker EE or that use the popular Artifactory project already have private registries. Running a registry from open source components is covered in chapter 8, but it’s important that you learn how to use them early.
Using an alternative registry is simple. It requires no additional configuration. All you need is the address of the registry. The following command will download another “Hello, World” type of example from an alternative registry:
docker pull quay.io/dockerinaction/ch3_hello_registry:latest
The registry address is part of the full repository specification covered in section 3.1. The full pattern is as follows:
[REGISTRYHOST:PORT/][USERNAME/]NAME[:TAG]
Docker knows how to talk to Docker registries, so the only difference is that you specify the registry host. In some cases, working with registries will require an authentication step. If you encounter a situation where this is the case, consult the documentation or the group that configured the registry to find out more. When you’re finished with the hello-registry image you installed, remove it with the following command:
docker rmi quay.io/dockerinaction/ch3_hello_registry
Registries are powerful. They enable a user to relinquish control of image storage and transportation. But running your own registry can be complicated and may create a potential single point of failure for your deployment infrastructure. If running a custom registry sounds a bit complicated for your use case, and third-party distribution tools are out of the question, you might consider loading images directly from a file.
3.2.3. Working with images as files
Docker provides a command to load images into Docker from a file. With this tool, you can load images that you acquired through other channels. Maybe your company has chosen to distribute images through a central file server or some type of version-control system. Maybe the image is small enough that your friend just sent it to you over email or shared it via flash drive. However you came upon the file, you can load it into Docker with the docker load command.
You’ll need an image file to load before we can show you the docker load command. Because it’s unlikely that you have an image file lying around, we’ll show you how to save one from a loaded image. For the purposes of this example, you’ll pull busybox:latest. That image is small and easy to work with. To save that image to a file, use the docker save command. Figure 3.5 demonstrates docker save by creating a file from BusyBox.
Figure 3.5. Parts of the pull and save subcommands
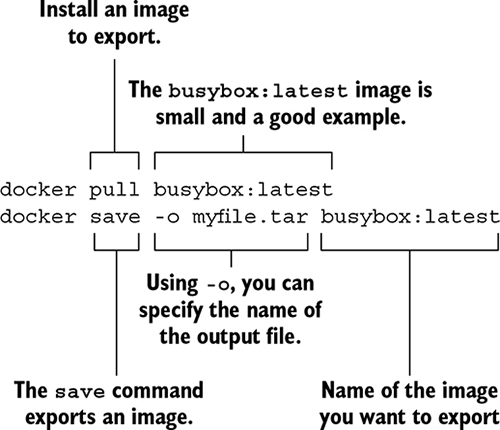
We used the .tar filename suffix in this example because the docker save command creates TAR archive files. You can use any filename you want. If you omit the –o flag, the resulting file will be streamed to the terminal.
Tip
Other ecosystems that use TAR archives for packing define custom file extensions. For example, Java uses .jar, .war, and .ear. In cases like these, using custom file extensions can help hint at the purpose and content of the archive. Although there are no defaults set by Docker and no official guidance on the matter, you may find using a custom extension useful if you work with these files often.
After running the save command, the docker program will terminate unceremoniously. Check that it worked by listing the contents of your current working directory. If the specified file is there, use this command to remove the image from Docker:
docker rmi busybox
After removing the image, load it again from the file you created by using the docker load command. As with docker save, if you run docker load without the –i command, Docker will use the standard input stream instead of reading the archive from a file:
docker load –i myfile.tar
Once you’ve run the docker load command, the image should be loaded. You can verify this by running the docker images command again. If everything worked correctly, BusyBox should be included in the list.
Working with images as files is as easy as working with registries, but you miss out on all the nice distribution facilities that registries provide. If you want to build your own distribution tools, or you already have something else in place, it should be trivial to integrate with Docker by using these commands.
Another popular project distribution pattern uses bundles of files with installation scripts. This approach is popular with open source projects that use public version-control repositories for distribution. In these cases, you work with a file, but the file is not an image; it is a Dockerfile.
3.2.4. Installing from a Dockerfile
A Dockerfile is a script that describes steps for Docker to take to build a new image. These files are distributed along with software that the author wants to be put into an image. In this case, you’re not technically installing an image. Instead, you’re following instructions to build an image. Working with Dockerfiles is covered in depth in chapter 7.
Distributing a Dockerfile is similar to distributing image files. You’re left to your own distribution mechanisms. A common pattern is to distribute a Dockerfile with software from common version-control systems like Git or Mercurial. If you have Git installed, you can try this by running an example from a public repository:
git clone https://github.com/dockerinaction/ch3_dockerfile.git
docker build -t dia_ch3/dockerfile:latest ch3_dockerfile
In this example, you copy the project from a public source repository onto your computer and then build and install a Docker image by using the Dockerfile included with that project. The value provided to the -t option of docker build is the repository where you want to install the image. Building images from Dockerfiles is a light way to move projects around that fits into existing workflows.
This approach has two disadvantages. First, depending on the specifics of the project, the build process might take some time. Second, dependencies may drift between the time when the Dockerfile was authored and when an image is built on a user’s computer. These issues make distributing build files less than an ideal experience for a user. But it remains popular in spite of these drawbacks.
When you’re finished with this example, make sure to clean up your workspace:
docker rmi dia_ch3/dockerfile
rm -rf ch3_dockerfile
3.2.5. Using Docker Hub from the website
If you have yet to stumble upon it while browsing the Docker website, you should take a moment to check out https://hub.docker.com. Docker Hub lets you search for repositories, organizations, or specific users. User and organization profile pages list the repositories that the account maintains, recent activity on the account, and the repositories that the account has starred. On repository pages you can see the following:
- General information about the image provided by the image publisher
- A list of the tags available in the repository
- The date the repository was created
- The number of times it has been downloaded
- Comments from registered users
Docker Hub is free to join, and you’ll need an account later in this book. When you’re signed in, you can star and comment on repositories. You can create and manage your own repositories. We will do that in part 2. For now, just get a feel for the site and what it has to offer.
It’s good to practice finding software on Docker Hub by using the skills you learned in chapter 2. This activity is designed to encourage you to use Docker Hub and practice creating containers. You will also be introduced to three new options on the docker run command.
In this activity, you’ll create containers from two images that are available through Docker Hub. The first is available from the dockerinaction/ch3_ex2_hunt repository. In that image, you’ll find a small program that prompts you for a password. You can find the password only by finding and running a container from the second mystery repository on Docker Hub. To use the programs in these images, you need to attach your terminal to the containers so that the input and output of your terminal are connected directly to the running container. The following command demonstrates how to do that and run a container that will be removed automatically when stopped:
docker run -it --rm dockerinaction/ch3_ex2_hunt
When you run this command, the scavenger hunt program will prompt you for the password. If you know the answer already, go ahead and enter it now. If not, just enter anything, and it will give you a hint. At this point, you should have all the tools you need to complete the activity. The following diagram illustrates what you need to do from this point.
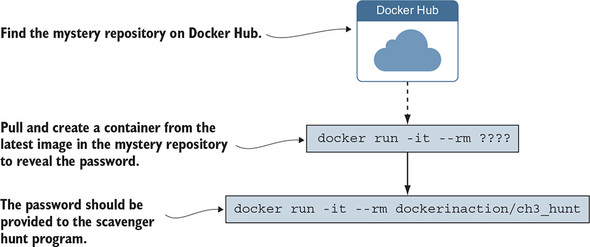
Still stuck? We can give you one more hint. The mystery repository is one that was created for this book. Maybe you should try searching for this book’s Docker Hub repositories. Remember, repositories are named with a username/repository pattern.
When you get the answer, pat yourself on the back and remove the images by using the docker rmi command. The commands you run should look something like these:
docker rmi dockerinaction/ch3_ex2_hunt
docker rmi <mystery repository>
If you were following the examples and using the --rm option on your docker run commands, you should have no containers to clean up. You learned a lot in this example. You found a new image on Docker Hub and used the docker run command in a new way. There’s a lot to know about running interactive containers. The next section covers that in greater detail.
Docker Hub is by no means the only source for software. Depending on the goals and perspective of software publishers, Docker Hub may not be an appropriate distribution point. Closed source or proprietary projects may not want to risk publishing their software through a third party. You can install software in three other ways:
- You can use alternative repository registries or run your own registry.
- You can manually load images from a file.
- You can download a project from some other source and build an image by using a provided Dockerfile.
All three options are viable for private projects or corporate infrastructure. The next few subsections cover how to install software from each alternative source. Chapter 9 covers Docker image distribution in detail. After reading this section, you should have a complete picture of your options to install software with Docker. When you install software, you should have an idea about what is in the software package and the changes being made to your computer.
3.3. Installation files and isolation
Understanding how images are identified, discovered, and installed is a minimum proficiency for a Docker user. If you understand what files are actually installed and how those files are built and isolated at runtime, you’ll be able to answer more difficult questions that come up with experience, such as these:
- What image properties factor into download and installation speeds?
- What are all these unnamed images that are listed when I use the docker images command?
- Why does output from the docker pull command include messages about pulling dependent layers?
- Where are the files that I wrote to my container’s filesystem?
Learning this material is the third and final step to understanding software installation with Docker, as illustrated in figure 3.6.
Figure 3.6. Step 3—understanding how software is installed

So far, when we’ve written about installing software, we’ve used the term image. This was to infer that the software you were going to use was in a single image and that an image was contained within a single file. Although this may occasionally be accurate, most of the time what we’ve been calling an image is actually a collection of image layers.
A layer is set of files and file metadata that is packaged and distributed as an atomic unit. Internally, Docker treats each layer like an image, and layers are often called intermediate images. You can even promote a layer to an image by tagging it. Most layers build upon a parent layer by applying filesystem changes to the parent. For example, a layer might update the software in an image with a package manager by using, for example, Debian’s apt-get update. The resulting image contains the combined set of files from the parent and the layer that was added. It is easier to understand layers when you see them in action.
3.3.1. Image layers in action
In this example, you’ll install the two images. Both depend on Java 11. The applications themselves are simple “Hello, World”–style programs. We want you to keep an eye on what Docker does when you install each. You should notice how long it takes to install the first compared to the second and read what the docker pull command prints to the terminal. When an image is being installed, you can watch Docker determine which dependencies it needs to download and then see the progress of the individual image layer downloads. Java is great for this example because the layers are quite large, and that will give you a moment to really see Docker in action.
The two images you’re going to install are dockerinaction/ch3_myapp and docker-inaction/ch3_myotherapp. You should just use the docker pull command because you need to only see the images install, not start a container from them. Here are the commands you should run:
docker pull dockerinaction/ch3_myapp
docker pull dockerinaction/ch3_myotherapp
Did you see it? Unless your network connection is far better than mine, or you had already installed OpenJDK 11.0.4 (slim) as a dependency of some other image, the download of dockerinaction/ch3_myapp should have been much slower than docker-inaction/ch3_myotherapp.
When you installed ch3_myapp, Docker determined that it needed to install the openjdk:11.0.4-jdk-slim image because it’s the direct dependency (parent layer) of the requested image. When Docker went to install that dependency, it discovered the dependencies of that layer and downloaded those first. Once all the dependencies of a layer are installed, that layer is installed. Finally, openjdk:11.0.4-jdk-slim was installed, and then the tiny ch3_myapp layer was installed.
When you issued the command to install ch3_myotherapp, Docker identified that openjdk:11.0.4-jdk-slim was already installed and immediately installed the image for ch3_myotherapp. Since the second application shared almost all of its image layers with the first application, Docker had much less to do. Installing the unique layer of ch3_myotherapp was very fast because less than one megabyte of data was transferred. But again, to the user it was an identical process.
From the user perspective, this ability is nice to have, but you wouldn’t want to have to try to optimize for it. Just take the benefits where they happen to work out. From the perspective of a software or image author, this ability should play a major factor in your image design. Chapter 7 covers this in more detail.
If you run docker images now, you’ll see the following repositories listed:
- dockerinaction/ch3_myapp
- dockerinaction/ch3_myotherapp
By default, the docker images command will show only repositories. As with other commands, if you specify the -a flag, the list will include every installed intermediate image or layer. Running docker images -a will show a list that includes several repositories and may also include some listed as <none>. Unnamed images can exist for several reasons, such as building an image without tagging it. The only way to refer to these is to use the value in the IMAGE ID column.
In this example, you installed two images. Let’s clean them up now. You can do so more easily if you use the condensed docker rmi syntax:
docker rmi \
    dockerinaction/ch3_myapp \
    dockerinaction/ch3_myotherapp
The docker rmi command allows you to specify a space-separated list of images to be removed. This comes in handy when you need to remove a small set of images after an example. We’ll be using this when appropriate throughout the rest of the examples in this book.
3.3.2. Layer relationships
Images maintain parent/child relationships. In these relationships, they build from their parents and form layers. The files available to a container are the union of all layers in the lineage of the image that the container was created from. Images can have relationships with any other image, including images in different repositories with different owners. The two application images in section 3.3.1 use an OpenJDK 11.0.4 image as their parent. The OpenJDK image’s parent is a minimal version of the Debian Linux Buster operating system release. Figure 3.7 illustrates the full image ancestry of both images and the layers contained in each image.
Figure 3.7. The full lineage of the two Docker images used in section 3.3.1
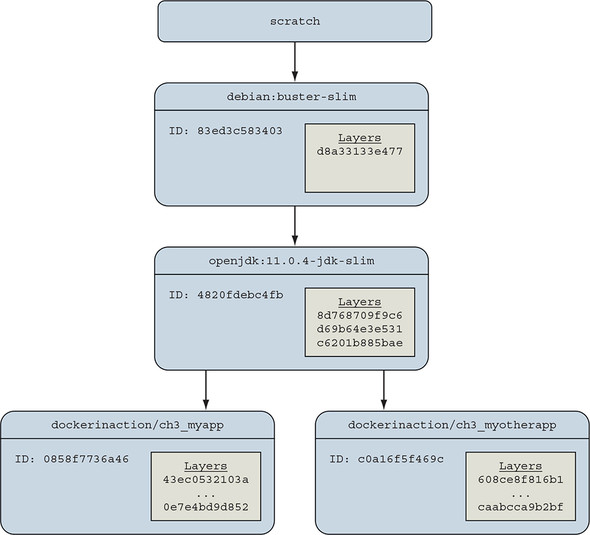
The images and layers in figure 3.7 show that the application images will inherit three layers from openjdk:11.0.4-jdk-slim and one more layer from debian:buster-slim. The three layers from OpenJDK contain common libraries and dependencies of the Java 11 software, and the Debian image contributes a minimal operating system toolchain.
An image is named when its author tags and publishes it. A user can create aliases, as you did in chapter 2 by using the docker tag command. Until an image is tagged, the only way to refer to it is to use its unique identifier (ID) that was generated when the image was built. In figure 3.7, the parent image of the OpenJDK 11.0.4 image is the Debian Buster OS whose ID is 83ed3c583403. The Debian image authors tagged and published this image as debian:buster-slim. The figure labels these images with the first 12 digits of their image ID, a common convention. Docker truncates the ID from 65 (base 16) digits to 12 in output of common commands for the benefit of its human users. Internally and through API access, Docker uses the full 65.
Even these “slim” Java images are sizable and were chosen to illustrate a point. At the time of this writing, the openjdk:11.0.4-jdk-slim image is 401 MB. You get some space savings when you use the runtime-only images, but even openjdk:11.0.4-jre-slim-buster is 204 MB. Because Docker uniquely identifies images and layers, it is able to recognize shared image dependencies between applications and avoid downloading those dependencies again. This is done without requiring any coordination between applications at runtime, only build time. Chapter 10 discusses image build pipelines in depth. Let’s continue by examining container filesystems.
3.3.3. Container filesystem abstraction and isolation
Programs running inside containers know nothing about image layers. From inside a container, the filesystem operates as though it’s not running in a container or operating on an image. From the perspective of the container, it has exclusive copies of the files provided by the image. This is made possible with something called a union file-system (UFS).
Docker uses a variety of union filesystems and will select the best fit for your system. The details of how the union filesystem works are beyond what you need to know to use Docker effectively. A union filesystem is part of a critical set of tools that combine to create effective filesystem isolation. The other tools are MNT namespaces and the chroot system call.
The filesystem is used to create mount points on your host’s filesystem that abstract the use of layers. The layers created are bundled into Docker image layers. Likewise, when a Docker image is installed, its layers are unpacked and appropriately configured for use by the specific filesystem provider chosen for your system.
The Linux kernel provides a namespace for the MNT system. When Docker creates a container, that new container will have its own MNT namespace, and a new mount point will be created for the container to the image.
Lastly, chroot is used to make the root of the image filesystem the root in the container’s context. This prevents anything running inside the container from referencing any other part of the host filesystem.
Using chroot and MNT namespaces is common for container technologies. By adding a union filesystem to the recipe, Docker containers have several benefits.
3.3.4. Benefits of this toolset and filesystem structure
The first and perhaps most important benefit of this approach is that common layers need to be installed only once. If you install any number of images and they all depend on a common layer, that common layer and all of its parent layers will need to be downloaded or installed only once. This means you might be able to install several specializations of a program without storing redundant files on your computer or downloading redundant layers. By contrast, most virtual machine technologies will store the same files as many times as you have redundant virtual machines on a computer.
Second, layers provide a coarse tool for managing dependencies and separating concerns. This is especially handy for software authors, and chapter 7 talks more about this. From a user perspective, this benefit will help you quickly identify what software you’re running by examining which images and layers you’re using.
Lastly, it’s easy to create software specializations when you can layer minor changes on top of a basic image. That’s another subject covered in detail in chapter 7. Providing specialized images helps users get exactly what they need from software with minimal customization. This is one of the best reasons to use Docker.
3.3.5. Weaknesses of union filesystems
Docker selects sensible defaults when it is started, but no implementation is perfect for every workload. In fact, in some specific use cases, you should pause and consider using another Docker feature.
Different filesystems have different rules about file attributes, sizes, names, and characters. Union filesystems are in a position where they often need to translate between the rules of different filesystems. In the best cases, they’re able to provide acceptable translations. In the worst cases, features are omitted. For example, neither Btrfs nor OverlayFS provides support for the extended attributes that make SELinux work.
Union filesystems use a pattern called copy-on-write, and that makes implementing memory-mapped files (the mmap system call) difficult. Some union filesystems provide implementations that work under the right conditions, but it may be a better idea to avoid memory-mapping files from an image.
The backing filesystem is another pluggable feature of Docker. You can determine which filesystem your installation is using with the info subcommand. If you want to specifically tell Docker which filesystem to use, do so with the --storage-driver or -s option when you start the Docker daemon. Most issues that arise with writing to the union filesystem can be addressed without changing the storage provider. These can be solved with volumes, the subject of chapter 4.
Summary
The task of installing and managing software on a computer presents a unique set of challenges. This chapter explains how you can use Docker to address them. The core ideas and features covered by this chapter are as follows:
- Human users of Docker use repository names to communicate which software they would like Docker to install.
- Docker Hub is the default Docker registry. You can find software on Docker Hub through either the website or the docker command-line program.
- The docker command-line program makes it simple to install software that’s distributed through alternative registries or in other forms.
- The image repository specification includes a registry host field.
- The docker load and docker save commands can be used to load and save images from TAR archives.
- Distributing a Dockerfile with a project simplifies image builds on user machines.
- Images are usually related to other images in parent/child relationships. These relationships form layers. When we say that we have installed an image, we are saying that we have installed a target image and each image layer in its lineage.
- Structuring images with layers enables layer reuse and saves bandwidth during distribution and storage space on your computer and image distribution servers.