Chapter 2. Running software in containers
This chapter covers
- Running interactive and daemon terminal programs in containers
- Basic Docker operations and commands
- Isolating programs from each other and injecting configuration
- Running multiple programs in a container
- Durable containers and the container life cycle
- Cleaning up
Before the end of this chapter, you’ll understand all the basics for working with containers and how to control basic process isolation with Docker. Most examples in this book use real software. Practical examples will help introduce Docker features and illustrate how you will use them in daily activities. Using off-the-shelf images also reduces the learning curve for new users. If you have software that you want to containerize and you’re in a rush, then part 2 will likely answer more of your direct questions.
In this chapter, you’ll install a web server called NGINX. Web servers are programs that make website files and programs accessible to web browsers over a network. You’re not going to build a website, but you are going to install and start a web server with Docker.
2.1. Controlling containers: Building a website monitor
Suppose a new client walks into your office and makes an outrageous request for you to build them a new website: they want a website that’s closely monitored. This particular client wants to run their own operations, so they’ll want the solution you provide to email their team when the server is down. They’ve also heard about this popular web server software called NGINX and have specifically requested that you use it. Having read about the merits of working with Docker, you’ve decided to use it for this project. Figure 2.1 shows your planned architecture for the project.
Figure 2.1. The three containers that you’ll build in this example
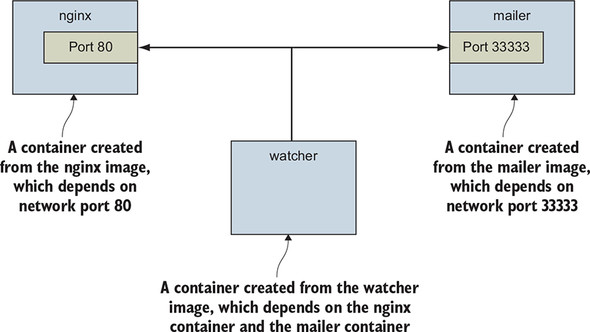
This example uses three containers. The first will run NGINX; the second will run a program called a mailer. Both of these will run as detached containers. Detached means that the container will run in the background, without being attached to any input or output stream. A third program named watcher will run as a monitoring agent in an interactive container. Both the mailer and watcher agent are small scripts created for this example. In this section, you’ll learn how to do the following:
- Create detached and interactive containers
- List containers on your system
- View container logs
- Stop and restart containers
- Reattach a terminal to a container
- Detach from an attached container
Without further delay, let’s get started filling your client’s order.
2.1.1. Creating and starting a new container
Docker calls the collection of files and instructions needed to run a software program an image. When we install software with Docker, we are really using Docker to download or create an image. There are different ways to install an image and several sources for images. Images are covered in more detail in chapter 3, but for now you can think of them as the shipping containers used to transport physical goods around the world. Docker images hold everything a computer needs in order to run software.
In this example, we’re going to download and install an image for NGINX from Docker Hub. Remember, Docker Hub is the public registry provided by Docker Inc. The NGINX image is what Docker Inc. calls a trusted repository. Generally, the person or foundation that publishes the software controls the trusted repositories for that software. Running the following command will download, install, and start a container running NGINX:
docker run --detach \          1
    --name web nginx:latest
- 1 Note the detach flag.
When you run this command, Docker will install nginx:latest from the NGINX repository hosted on Docker Hub (covered in chapter 3) and run the software. After Docker has installed and started running NGINX, one line of seemingly random characters will be written to the terminal. It will look something like this:
7cb5d2b9a7eab87f07182b5bf58936c9947890995b1b94f412912fa822a9ecb5
That blob of characters is the unique identifier of the container that was just created to run NGINX. Every time you run docker run and create a new container, that new container will get a unique identifier. It’s common for users to capture this output with a variable for use with other commands. You don’t need to do so for the purposes of this example.
After the identifier is displayed, it might not seem like anything has happened. That’s because you used the --detach option and started the program in the background. This means that the program started but isn’t attached to your terminal. It makes sense to start NGINX this way because we’re going to run a few programs. Server software is generally run in detached containers because it is rare that the software depends on an attached terminal.
Running detached containers is a perfect fit for programs that sit quietly in the background. That type of program is called a daemon, or a service. A daemon generally interacts with other programs or humans over a network or some other communication channel. When you launch a daemon or other program in a container that you want to run in the background, remember to use either the --detach flag or its short form, -d.
Another daemon that your client needs in this example is a mailer. A mailer waits for connections from a caller and then sends an email. The following command installs and run a mailer that will work for this example:
docker run -d \            1
    --name mailer \
    dockerinaction/ch2_mailer
- 1 Starts detached
This command uses the short form of the --detach flag to start a new container named mailer in the background. At this point, you’ve run two commands and delivered two-thirds of the system that your client wants. The last component, called the agent, is a good fit for an interactive container.
2.1.2. Running interactive containers
A terminal-based text editor is a great example of a program that requires an attached terminal. It takes input from the user via a keyboard (and maybe mouse) and displays output on the terminal. It is interactive over its input and output streams. Running interactive programs in Docker requires that you bind parts of your terminal to the input or output of a running container.
To get started working with interactive containers, run the following command:
docker run --interactive --tty \      1
    --link web:web \
    --name web_test \
    busybox:1.29 /bin/sh
- 1 Creates a virtual terminal and binds stdin
The command uses two flags on the run command: --interactive (or -i) and --tty (or -t). First, the --interactive option tells Docker to keep the standard input stream (stdin) open for the container even if no terminal is attached. Second, the --tty option tells Docker to allocate a virtual terminal for the container, which will allow you to pass signals to the container. This is usually what you want from an interactive command-line program. You’ll usually use both of these when you’re running an interactive program such as a shell in an interactive container.
Just as important as the interactive flags, when you started this container, you specified the program to run inside the container. In this case, you ran a shell program called sh. You can run any program that’s available inside the container.
The command in the interactive container example creates a container, starts a UNIX shell, and is linked to the container that’s running NGINX. From this shell, you can run a command to verify that your web server is running correctly:
wget -O - http://web:80/
This uses a program called wget to make an HTTP request to the web server (the NGINX server you started earlier in a container) and then display the contents of the web page on your terminal. Among the other lines, there should be a message like Welcome to NGINX! If you see that message, then everything is working correctly, and you can go ahead and shut down this interactive container by typing exit. This will terminate the shell program and stop the container.
It’s possible to create an interactive container, manually start a process inside that container, and then detach your terminal. You can do so by holding down the Ctrl (or Control) key and pressing P and then Q. This will work only when you’ve used the --tty option.
To finish the work for your client, you need to start an agent. This is a monitoring agent that will test the web server as you did in the preceding example and send a message with the mailer if the web server stops. This command will start the agent in an interactive container by using the short-form flags:
docker run -it \            1
    --name agent \
    --link web:insideweb \
    --link mailer:insidemailer \
    dockerinaction/ch2_agent
- 1 Creates a virtual terminal and binds stdin
When running, the container will test the web container every second and print a message like the following:
System up.
Now that you’ve seen what it does, detach your terminal from the container. Specifically, when you start the container and it begins writing System up, hold the Ctrl (or Control) key and then press P and then Q. After doing so, you’ll be returned to the shell for your host computer. Do not stop the program; otherwise, the monitor will stop checking the web server.
Although you’ll usually use detached or daemon containers for software that you deploy to servers on your network, interactive containers are useful for running software on your desktop or for manual work on a server. At this point, you’ve started all three applications in containers that your client needs. Before you can confidently claim completion, you should test the system.
2.1.3. Listing, stopping, restarting, and viewing output of containers
The first thing you should do to test your current setup is check which containers are currently running by using the docker ps command:
docker ps
Running the command will display the following information about each running container:
- The container ID
- The image used
- The command executed in the container
- The time since the container was created
- The duration that the container has been running
- The network ports exposed by the container
- The name of the container
At this point, you should have three running containers with names: web, mailer, and agent. If any is missing but you’ve followed the example thus far, it may have been mistakenly stopped. This isn’t a problem because Docker has a command to restart a container. The next three commands will restart each container by using the container name. Choose the appropriate ones to restart the containers that were missing from the list of running containers:
docker restart web
docker restart mailer
docker restart agent
Now that all three containers are running, you need to test that the system is operating correctly. The best way to do that is to examine the logs for each container. Start with the web container:
docker logs web
That should display a long log with several lines that contain this substring:
"GET / HTTP/1.0" 200
This means that the web server is running and that the agent is testing the site. Each time the agent tests the site, one of these lines will be written to the log. The docker logs command can be helpful for these cases but is dangerous to rely on. Anything that the program writes to the stdout or stderr output streams will be recorded in this log. The problem with this pattern is that the log is never rotated or truncated by default, so the data written to the log for a container will remain and grow as long as the container exists. That long-term persistence can be a problem for long-lived processes. A better way to work with log data uses volumes and is discussed in chapter 4.
You can tell that the agent is monitoring the web server by examining the logs for web alone. For completeness, you should examine the log output for mailer and agent as well:
docker logs mailer
docker logs agent
The logs for mailer should look something like this:
CH2 Example Mailer has started.
The logs for agent should contain several lines like the one you watched it write when you started the container:
System up.
Tip
The docker logs command has a flag, --follow or -f, that will display the logs and then continue watching and updating the display with changes to the log as they occur. When you’ve finished, press Ctrl-C (or Command-C) to interrupt the logs command.
Now that you’ve validated that the containers are running and that the agent can reach the web server, you should test that the agent will notice when the web container stops. When that happens, the agent should trigger a call to the mailer, and the event should be recorded in the logs for both agent and mailer. The docker stop command tells the program with PID 1 in the container to halt. Use it in the following commands to test the system:
docker stop web       1
docker logs mailer    2
- 1 Stops the web server by stopping the container
- 2 Waits a couple of seconds and checks the mailer logs
Look for a line at the end of the mailer logs that reads like this:
Sending email: To: admin@work Message: The service is down!
That line means the agent successfully detected that the NGINX server in the container named web had stopped. Congratulations! Your client will be happy, and you’ve built your first real system with containers and Docker.
Learning the basic Docker features is one thing, but understanding why they’re useful and how to use them to customize isolation is another task entirely.
2.2. Solved problems and the PID namespace
Every running program—or process—on a Linux machine has a unique number called a process identifier (PID). A PID namespace is a set of unique numbers that identify processes. Linux provides tools to create multiple PID namespaces. Each namespace has a complete set of possible PIDs. This means that each PID namespace will contain its own PID 1, 2, 3, and so on.
Most programs will not need access to other running processes or be able to list the other running processes on the system. And so Docker creates a new PID namespace for each container by default. A container’s PID namespace isolates processes in that container from processes in other containers.
From the perspective of a process in one container with its own namespace, PID 1 might refer to an init system process such as runit or supervisord. In a different container, PID 1 might refer to a command shell such as bash. Run the following to see it in action:
docker run -d --name namespaceA \
    busybox:1.29 /bin/sh -c "sleep 30000"
docker run -d --name namespaceB \
    busybox:1.29 /bin/sh -c "nc -l 0.0.0.0 -p 80"

docker exec namespaceA ps      1
docker exec namespaceB ps      2
Command 1 should generate a process list similar to the following:
PID   USER     TIME  COMMAND
  1   root     0:00  sleep 30000
  8   root     0:00  ps
Command 2 should generate a slightly different process list:
PID   USER     TIME  COMMAND
  1   root     0:00  nc -l 0.0.0.0 -p 80
  9   root     0:00  ps
In this example, you use the docker exec command to run additional processes in a running container. In this case, the command you use is called ps, which shows all the running processes and their PID. From the output, you can clearly see that each container has a process with PID 1.
Without a PID namespace, the processes running inside a container would share the same ID space as those in other containers or on the host. A process in a container would be able to determine what other processes were running on the host machine. Worse, processes in one container might be able to control processes in other containers. A process that cannot reference any processes outside its namespace is limited in its ability to perform targeted attacks.
Like most Docker isolation features, you can optionally create containers without their own PID namespace. This is critical if you are using a program to perform a system administration task that requires process enumeration from within a container. You can try this yourself by setting the --pid flag on docker create or docker run and setting the value to host. Try it yourself with a container running BusyBox Linux and the ps Linux command:
docker run --pid host busybox:1.29 ps 1
- 1 Should list all processes running on the computer
Because containers all have their own PID namespace, they both cannot gain meaningful insight from examining it, and can take more static dependencies on it. Suppose a container runs two processes: a server and a local process monitor. That monitor could take a hard dependency on the server’s expected PID and use that to monitor and control the server. This is an example of environment independence.
Consider the previous web-monitoring example. Suppose you were not using Docker and were just running NGINX directly on your computer. Now suppose you forgot that you had already started NGINX for another project. When you start NGINX again, the second process won’t be able to access the resources it needs because the first process already has them. This is a basic software conflict example. You can see it in action by trying to run two copies of NGINX in the same container:
docker run -d --name webConflict nginx:latest
docker logs webConflict                            1
docker exec webConflict nginx -g 'daemon off;'     2
- 1 Output should be empty.
- 2 Starts a second NGINX process in the same container
The last command should display output like this:
2015/03/29 22:04:35 [emerg] 10#0: bind() to 0.0.0.0:80 failed (98:
Address already in use)
nginx: [emerg] bind() to 0.0.0.0:80 failed (98: Address already in use)
...
The second process fails to start properly and reports that the address it needs is already in use. Called a port conflict, this is a common issue in real-world systems in which several processes are running on the same computer or multiple people contribute to the same environment. It’s a great example of a conflict problem that Docker simplifies and solves. Run each in a different container, like this:
docker run -d --name webA nginx:latest    1

docker logs webA                          2

docker run -d --name webB nginx:latest    3

docker logs webB                          4
- 1 Starts the first NGINX instance
- 2 Verifies that it is working; should be empty.
- 3 Starts the second instance
- 4 Verifies that it is working; should be empty
Environment independence provides the freedom to configure software taking dependencies on scarce system resources without regard for other co-located software with conflicting requirements. Here are some common conflict problems:
- Two programs want to bind to the same network port.
- Two programs use the same temporary filename, and file locks are preventing that.
- Two programs want to use different versions of a globally installed library.
- Two processes want to use the same PID file.
- A second program you installed modified an environment variable that another program uses. Now the first program breaks.
- Multiple processes are competing for memory or CPU time.
All these conflicts arise when one or more programs have a common dependency but can’t agree to share or have different needs. As in the earlier port conflict example, Docker solves software conflicts with such tools as Linux namespaces, resource limits, filesystem roots, and virtualized network components. All these tools are used to isolate software inside a Docker container.
2.3. Eliminating metaconflicts: Building a website farm
In the preceding section, you saw how Docker helps you avoid software conflicts with process isolation. But if you’re not careful, you can end up building systems that create metaconflicts, or conflicts between containers in the Docker layer.
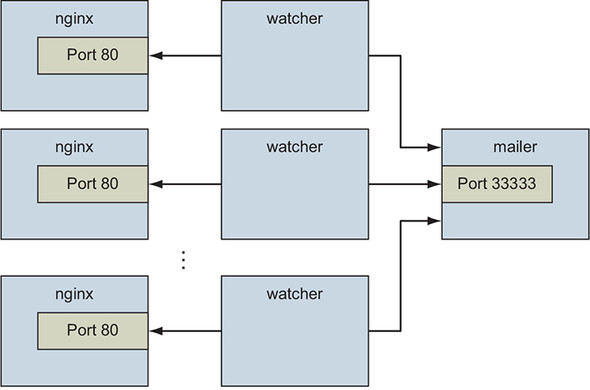
Consider another example: a client has asked you to build a system on which you can host a variable number of websites for their customers. They’d also like to employ the same monitoring technology that you built earlier in this chapter. Expanding the system you built earlier would be the simplest way to get this job done without customizing the configuration for NGINX. In this example, you’ll build a system with several containers running web servers and a monitoring watcher for each web server. The system will look like the architecture described in figure 2.2.
Figure 2.2. A fleet of web server containers and related monitoring agents
Your first instinct might be to simply start more web containers. But that’s not as simple as it looks. Identifying containers gets complicated as the number of containers increases.
2.3.1. Flexible container identification
The best way to find out why simply creating more copies of the NGINX container you used in the previous example is a bad idea is to try it for yourself:
docker run -d --name webid nginx      1

docker run -d --name webid nginx      2
- 1 Creates a container named "webid"
- 2 Creates another container named "webid"
The second command here will fail with a conflict error:
FATA[0000] Error response from daemon: Conflict. The name "webid" is
already in use by container 2b5958ba6a00. You have to delete (or rename)
that container to be able to reuse that name.
Using fixed container names such as web is useful for experimentation and documentation, but in a system with multiple containers, using fixed names like that can create conflicts. By default, Docker assigns a unique (human-friendly) name to each container it creates. The --name flag overrides that process with a known value. If a situation arises in which the name of a container needs to change, you can always rename the container with the docker rename command:
docker rename webid webid-old        1
docker run -d --name webid nginx     2
- 1 Renames the current web container to "webid-old"
- 2 Creates another container named "webid"
Renaming containers can help alleviate one-off naming conflicts but does little to help avoid the problem in the first place. In addition to the name, Docker assigns a unique identifier that was mentioned in the first example. These are hex-encoded 1024-bit numbers and look something like this:
7cb5d2b9a7eab87f07182b5bf58936c9947890995b1b94f412912fa822a9ecb5
When containers are started in detached mode, their identifier will be printed to the terminal. You can use these identifiers in place of the container name with any command that needs to identify a specific container. For example, you could use the previous ID with a stop or exec command:
docker exec \
    7cb5d2b9a7eab87f07182b5bf58936c9947890995b1b94f412912fa822a9ecb5 \
echo hello

docker stop \
    7cb5d2b9a7eab87f07182b5bf58936c9947890995b1b94f412912fa822a9ecb5
The high probability of uniqueness of the IDs that are generated means that it is unlikely that there will ever be a collision with this ID. To a lesser degree, it is also unlikely that there would even be a collision of the first 12 characters of this ID on the same computer. So in most Docker interfaces, you’ll see container IDs truncated to their first 12 characters. This makes generated IDs a bit more user-friendly. You can use them wherever a container identifier is required. The previous two commands could be written like this:
docker exec 7cb5d2b9a7ea ps
docker stop 7cb5d2b9a7ea
Neither of these IDs is particularly well suited for human use. But they work well with scripts and automation techniques. Docker has several means of acquiring the ID of a container to make automation possible. In these cases, the full or truncated numeric ID will be used.
The first way to get the numeric ID of a container is to simply start or create a new one and assign the result of the command to a shell variable. As you saw earlier, when a new container is started in detached mode, the container ID will be written to the terminal (stdout). You’d be unable to use this with interactive containers if this were the only way to get the container ID at creation time. Luckily, you can use another command to create a container without starting it. The docker create command is similar to docker run, the primary difference being that the container is created in a stopped state:
docker create nginx
The result should be a line like this:
b26a631e536d3caae348e9fd36e7661254a11511eb2274fb55f9f7c788721b0d
If you’re using a Linux command shell such as sh or bash, you can assign that result to a shell variable and use it again later:
CID=$(docker create nginx:latest)     1
echo $CID
- 1 This will work on POSIX-compliant shells.
Shell variables create a new opportunity for conflict, but the scope of that conflict is limited to the terminal session or current processing environment in which the script was launched. Those conflicts should be easily avoidable because one use or program is managing that environment. The problem with this approach is that it won’t help if multiple users or automated processes need to share that information. In those cases, you can use a container ID (CID) file.
Both the docker run and docker create commands provide another flag to write the ID of a new container to a known file:
docker create --cidfile /tmp/web.cid nginx     1

cat /tmp/web.cid                               2
Like the use of shell variables, this feature increases the opportunity for conflict. The name of the CID file (provided after --cidfile) must be known or have some known structure. Just like manual container naming, this approach uses known names in a global (Docker-wide) namespace. The good news is that Docker won’t create a new container by using the provided CID file if that file already exists. The command will fail just as it does when you create two containers with the same name.
One reason to use CID files instead of names is that CID files can be shared with containers easily and renamed for that container. This uses a Docker feature called volumes, which is covered in chapter 4.
Tip
One strategy for dealing with CID file-naming collisions is to partition the namespace by using known or predictable path conventions. For example, in this scenario, you might use a path that contains all web containers under a known directory and further partition that directory by the customer ID. This would result in a path such as /containers/web/customer1/web.cid or /containers/web/customer8/web.cid.
In other cases, you can use other commands such as docker ps to get the ID of a container. For example, if you want to get the truncated ID of the last created container, you can use this:
CID=$(docker ps --latest --quiet)     1
echo $CID

CID=$(docker ps -l -q)                2
echo $CID
- 1 This will work on POSIX-compliant shells.
- 2 Run again with the short-form flags.
Tip
If you want to get the full container ID, you can use the --no-trunc option on the docker ps command.
Automation cases are covered by the features you’ve seen so far. But even though truncation helps, these container IDs are rarely easy to read or remember. For this reason, Docker also generates human-readable names for each container.
The naming convention uses a personal adjective; an underscore; and the last name of an influential scientist, engineer, inventor, or other such thought leader. Examples of generated names are compassionate_swartz, hungry_goodall, and distracted_turing. These seem to hit a sweet spot for readability and memory. When you’re working with the docker tool directly, you can always use docker ps to look up the human-friendly names.
Container identification can be tricky, but you can manage the issue by using the ID and name-generation features of Docker.
2.3.2. Container state and dependencies
With this new knowledge, the new system might look something like this:
MAILER_CID=$(docker run -d dockerinaction/ch2_mailer)     1
WEB_CID=$(docker create nginx)

AGENT_CID=$(docker create --link $WEB_CID:insideweb \
    --link $MAILER_CID:insidemailer \
    dockerinaction/ch2_agent)
- 1 Make sure mailer from first example is running.
This snippet could be used to seed a new script that launches a new NGINX and agent instance for each of your client’s customers. You can use docker ps to see that they’ve been created:
docker ps
The reason neither the NGINX nor the agent was included with the output has to do with container state. Docker containers will be in one of the states shown in figure 2.3. The Docker container management commands to move between states annotate each transition.
Figure 2.3. The state transition diagram for Docker containers
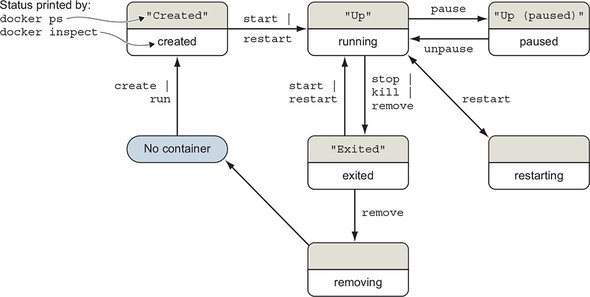
Neither of the new containers you started appears in the list of containers because docker ps shows only running containers by default. Those containers were specifically created with docker create and never started (the created state). To see all the containers (including those in the created state), use the -a option:
docker ps -a
The status of the new containers should be "Created". The docker ps command displays the container state using the “friendly” names shown in gray in figure 2.3. The docker inspect command uses the names shown in the bottom half of each state (for example, created). The restarting, removing, and dead (not illustrated) states are internal to Docker and are used to track transitions between the states visible in docker ps.
Now that you’ve verified that both of the containers were created, you need to start them. For that, you can use the docker start command:
docker start $AGENT_CID
docker start $WEB_CID
Running those commands will result in an error. The containers need to be started in reverse order of their dependency chain. Because you tried to start the agent container before the web container, Docker reported a message like this one:
Error response from daemon: Cannot start container
03e65e3c6ee34e714665a8dc4e33fb19257d11402b151380ed4c0a5e38779d0a: Cannot
link to a non running container: /clever_wright AS /modest_hopper/insideweb
FATA[0000] Error: failed to start one or more containers
In this example, the agent container has a dependency on the web container. You need to start the web container first:
docker start $WEB_CID
docker start $AGENT_CID
This makes sense when you consider the mechanics at work. The link mechanism injects IP addresses into dependent containers, and containers that aren’t running don’t have IP addresses. If you tried to start a container that has a dependency on a container that isn’t running, Docker wouldn’t have an IP address to inject. In chapter 5, you’ll learn to connect containers with user-defined bridge networks to avoid this particular dependency problem. The key point here is that Docker will try to resolve a container’s dependencies before creating or starting a container to avoid application runtime failures.
You may notice that the Docker documentation describes network links as a legacy feature. Network links were an early and popular way to connect containers. Links create a unidirectional network connection from one container to other containers on the same host. Significant portions of the container ecosystem asked for fully peered, bidirectional connections between containers. Docker provides this with the user-defined networks described in chapter 5. These networks can also extend across a cluster of hosts as described in chapter 13. Network links and user-defined networks are not equivalent, but Docker recommends migrating to user-defined networks.
It is uncertain whether the container network linking feature will ever be removed. Numerous useful tools and unidirectional communication patterns depend on linking, as illustrated by the containers used to inspect and watch the web and mailer components in this section.
Whether you’re using docker run or docker create, the resulting containers need to be started in the reverse order of their dependency chain. This means that circular dependencies are impossible to build using Docker container relationships.
At this point, you can put everything together into one concise script that looks like this:
MAILER_CID=$(docker run -d dockerinaction/ch2_mailer)

WEB_CID=$(docker run -d nginx)

AGENT_CID=$(docker run -d \
    --link $WEB_CID:insideweb \
    --link $MAILER_CID:insidemailer \
    dockerinaction/ch2_agent)
Now you’re confident that this script can be run without exception each time your client needs to provision a new site. Your client has returned and thanked you for the web and monitoring work you’ve completed so far, but things have changed.
They’ve decided to focus on building their websites with WordPress (a popular open source content-management and blogging program). Luckily, WordPress is published through Docker Hub in a repository named wordpress. All you’ll need to deliver is a set of commands to provision a new WordPress website that has the same monitoring and alerting features that you’ve already delivered.
An interesting thing about content-management systems and other stateful systems is that the data they work with makes each running program specialized. Adam’s WordPress blog is different from Betty’s WordPress blog, even if they’re running the same software. Only the content is different. Even if the content is the same, they’re different because they’re running on different sites.
If you build systems or software that know too much about their environment—for example, addresses or fixed locations of dependency services—it’s difficult to change that environment or reuse the software. You need to deliver a system that minimizes environment dependence before the contract is complete.
2.4. Building environment-agnostic systems
Much of the work associated with installing software or maintaining a fleet of computers lies in dealing with specializations of the computing environment. These specializations come as global-scoped dependencies (for example, known host filesystem locations), hardcoded deployment architectures (environment checks in code or configuration), or data locality (data stored on a particular computer outside the deployment architecture). Knowing this, if your goal is to build low-maintenance systems, you should strive to minimize these things.
Docker has three specific features to help build environment-agnostic systems:
- Read-only filesystems
- Environment variable injection
- Volumes
Working with volumes is a big subject and the topic of chapter 4. To learn the first two features, consider a requirement change for the example situation used in the rest of this chapter: WordPress uses a database program called MySQL to store most of its data, so it’s a good idea to provide the container running WordPress with a read-only filesystem to ensure data is written only to the database.
2.4.1. Read-only filesystems
Using read-only filesystems accomplishes two positive things. First, you can have confidence that the container won’t be specialized from changes to the files it contains. Second, you have increased confidence that an attacker can’t compromise files in the container.
To get started working on your client’s system, create and start a container from the WordPress image by using the --read-only flag:
docker run -d --name wp --read-only \
    wordpress:5.0.0-php7.2-apache
When this is finished, check that the container is running. You can do so using any of the methods introduced previously, or you can inspect the container metadata directly. The following command will print true if the container named wp is running, and false otherwise:
docker inspect --format "{{.State.Running}}" wp
The docker inspect command will display all the metadata (a JSON document) that Docker maintains for a container. The format option transforms that metadata, and in this case, it filters everything except for the field indicating the running state of the container. This command should simply output false.
In this case, the container isn’t running. To determine why, examine the logs for the container:
docker logs wp
That command should output something like this:
WordPress not found in /var/www/html - copying now... Complete! WordPress has been successfully copied to /var/www/html ... skip output ... Wed Dec 12 15:17:36 2018 (1): Fatal Error Unable to create lock file:Bad file descriptor (9)
When running WordPress with a read-only filesystem, the Apache web server process reports that it is unable to create a lock file. Unfortunately, it does not report the location of the files it is trying to create. If we have the locations, we can create exceptions for them. Let’s run a WordPress container with a writable filesystem so that Apache is free to write where it wants:
docker run -d --name wp_writable wordpress:5.0.0-php7.2-apache
Now let’s check where Apache changed the container’s filesystem with the docker diff command:
docker container diff wp_writable
C /run
C /run/apache2
A /run/apache2/apache2.pid
We will explain the diff command and how Docker knows what changed on the filesystem in more detail in chapter 3. For now, it’s sufficient to know that the output indicates that Apache created the /run/apache2 directory and added the apache2.pid file inside it.
Since this is an expected part of normal application operation, we will make an exception to the read-only filesystem. We will allow the container to write to /run/apache2 by using a writable volume mounted from the host. We will also supply a temporary, in-memory, filesystem to the container at /tmp since Apache requires a writable temporary directory, as well:
docker run -d --name wp2 \
  --read-only \                    1
  -v /run/apache2/ \               2
  --tmpfs /tmp \                   3
  wordpress:5.0.0-php7.2-apache
- 1 Makes container’s root filesystem read-only
- 2 Mounts a writable directory from the host
- 3 Provides container an in-memory temp filesystem
That command should log successful messages that look like this:
docker logs wp2 WordPress not found in /var/www/html - copying now... Complete! WordPress has been successfully copied to /var/www/html ... skip output ... [Wed Dec 12 16:25:40.776359 2018] [mpm_prefork:notice] [pid 1]
WordPress also has a dependency on a MySQL database. A database is a program that stores data in such a way that it’s retrievable and searchable later. The good news is that you can install MySQL by using Docker, just like WordPress:
docker run -d --name wpdb \
    -e MYSQL_ROOT_PASSWORD=ch2demo \
    mysql:5.7
Once that is started, create a different WordPress container that’s linked to this new database container:
docker run -d --name wp3 \         1
    --link wpdb:mysql \            2
    -p 8000:80 \                   3
    --read-only \
    -v /run/apache2/ \
    --tmpfs /tmp \
    wordpress:5.0.0-php7.2-apache
- 1 Uses a unique name
- 2 Creates a link to the database
- 3 Directs traffic from host port 8000 to container port 80
Check one more time that WordPress is running correctly:
docker inspect --format "{{.State.Running}}" wp3
The output should now be true. If you would like to use your new WordPress installation, you can point a web browser to http://127.0.0.1:8000.
An updated version of the script you’ve been working on should look like this:
#!/bin/sh

DB_CID=$(docker create -e MYSQL_ROOT_PASSWORD=ch2demo mysql:5.7)

docker start $DB_CID

MAILER_CID=$(docker create dockerinaction/ch2_mailer)
docker start $MAILER_CID

WP_CID=$(docker create --link $DB_CID:mysql -p 80 \
    --read-only -v /run/apache2/ --tmpfs /tmp \
    wordpress:5.0.0-php7.2-apache)

docker start $WP_CID

AGENT_CID=$(docker create --link $WP_CID:insideweb \
    --link $MAILER_CID:insidemailer \
    dockerinaction/ch2_agent)

docker start $AGENT_CID
Congratulations—at this point, you should have a running WordPress container! By using a read-only filesystem and linking WordPress to another container running a database, you can be sure that the container running the WordPress image will never change. This means that if there is ever something wrong with the computer running a client’s WordPress blog, you should be able to start up another copy of that container elsewhere with no problems.
But this design has two problems. First, the database is running in a container on the same computer as the WordPress container. Second, WordPress is using several default values for important settings such as database name, administrative user, administrative password, database salt, and so on.
To deal with this problem, you could create several versions of the WordPress software, each with a special configuration for the client. Doing so would turn your simple provisioning script into a monster that creates images and writes files. A better way to inject that configuration would be through the use of environment variables.
2.4.2. Environment variable injection
Environment variables are key/value pairs that are made available to programs through their execution context. They let you change a program’s configuration without modifying any files or changing the command used to start the program.
Docker uses environment variables to communicate information about dependent containers, the hostname of the container, and other convenient information for programs running in containers. Docker also provides a mechanism for a user to inject environment variables into a new container. Programs that know to expect important information through environment variables can be configured at container-creation time. Luckily for you and your client, WordPress is one such program.
Before diving into WordPress specifics, try injecting and viewing environment variables on your own. The UNIX command env displays all the environment variables in the current execution context (your terminal). To see environment variable injection in action, use the following command:
docker run --env MY_ENVIRONMENT_VAR="this is a test" \      1
    busybox:1.29 \
    env                                                     2
The --env flag, or -e for short, can be used to inject any environment variable. If the variable is already set by the image or Docker, the value will be overridden. This way, programs running inside containers can rely on the variables always being set. WordPress observes the following environment variables:
- WORDPRESS_DB_HOST
- WORDPRESS_DB_USER
- WORDPRESS_DB_PASSWORD
- WORDPRESS_DB_NAME
- WORDPRESS_AUTH_KEY
- WORDPRESS_SECURE_AUTH_KEY
- WORDPRESS_LOGGED_IN_KEY
- WORDPRESS_NONCE_KEY
- WORDPRESS_AUTH_SALT
- WORDPRESS_SECURE_AUTH_SALT
- WORDPRESS_LOGGED_IN_SALT
- WORDPRESS_NONCE_SALT
Tip
This example neglects the KEY and SALT variables, but any real production system should absolutely set these values.
To get started, you should address the problem that the database is running in a container on the same computer as the WordPress container. Rather than using linking to satisfy WordPress’s database dependency, inject a value for the WORDPRESS_DB_HOST variable:
docker create --env WORDPRESS_DB_HOST=<my database hostname> \
    wordpress: 5.0.0-php7.2-apache
This example would create (not start) a container for WordPress that will try to connect to a MySQL database at whatever you specify at <my database hostname>. Because the remote database isn’t likely using any default username or password, you’ll have to inject values for those settings as well. Suppose the database administrator is a cat lover and hates strong passwords:
docker create \
    --env WORDPRESS_DB_HOST=<my database hostname> \
    --env WORDPRESS_DB_USER=site_admin \
    --env WORDPRESS_DB_PASSWORD=MeowMix42 \
    wordpress:5.0.0-php7.2-apache
Using environment variable injection this way will help you separate the physical ties between a WordPress container and a MySQL container. Even when you want to host the database and your customer WordPress sites all on the same machine, you’ll still need to fix the second problem mentioned earlier. All the sites are using the same default database name, which means different clients will be sharing a single database. You’ll need to use environment variable injection to set the database name for each independent site by specifying the WORDPRESS_DB_NAME variable:
docker create --link wpdb:mysql \
    -e WORDPRESS_DB_NAME=client_a_wp \     1
    wordpress:5.0.0-php7.2-apache

docker create --link wpdb:mysql \
    -e WORDPRESS_DB_NAME=client_b_wp \     2
    wordpress:5.0.0-php7.2-apache
- 1 For client A
- 2 For client B
Now that you understand how to inject configuration into the WordPress application and connect it to collaborating processes, let’s adapt the provisioning script. First, let’s start database and mailer containers that will be shared by our clients and store the container IDs in environment variables:
export DB_CID=$(docker run -d -e MYSQL_ROOT_PASSWORD=ch2demo mysql:5.7)
export MAILER_CID=$(docker run -d dockerinaction/ch2_mailer)
Now update the client site provisioning script to read the database container ID, mailer container ID, and a new CLIENT_ID from environment variables:
#!/bin/sh

if [ ! -n "$CLIENT_ID" ]; then         1
    echo "Client ID not set"
    exit 1
fi

WP_CID=$(docker create \
    --link $DB_CID:mysql \             2
    --name wp_$CLIENT_ID \
    -p 80 \
    --read-only -v /run/apache2/ --tmpfs /tmp \
    -e WORDPRESS_DB_NAME=$CLIENT_ID \
    --read-only wordpress:5.0.0-php7.2-apache)

docker start $WP_CID

AGENT_CID=$(docker create \
        --name agent_$CLIENT_ID \
    --link $WP_CID:insideweb \
    --link $MAILER_CID:insidemailer \
    dockerinaction/ch2_agent)

docker start $AGENT_CID
If you save this script to a file named start-wp-for-client.sh, you can provision WordPress for the dockerinaction client by using a command like this:
CLIENT_ID=dockerinaction ./start-wp-multiple-clients.sh
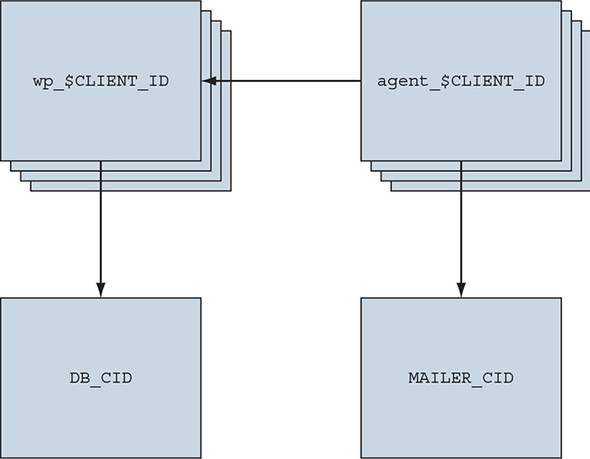
This new script will start an instance of WordPress and the monitoring agent for each customer and connect those containers to each other as well as a single mailer program and MySQL database. The WordPress containers can be destroyed, restarted, and upgraded without any worry about loss of data. Figure 2.4 shows this architecture.
Figure 2.4. Each WordPress and agent container uses the same database and mailer.
The client should be pleased with what is being delivered. But one thing might be bothering you. In earlier testing, you found that the monitoring agent correctly notified the mailer when the site was unavailable, but restarting the site and agent required manual work. It would be better if the system tried to automatically recover when a failure was detected. Docker provides restart policies to help deal with that, but you might want something more robust.
2.5. Building durable containers
Software may fail in rare conditions that are temporary in nature. Although it’s important to be made aware when these conditions arise, it’s usually at least as important to restore the service as quickly as possible. The monitoring system that you built in this chapter is a fine start for keeping system owners aware of problems with a system, but it does nothing to help restore service.
When all the processes in a container have exited, that container will enter the exited state. Remember, a Docker container can be in one of six states:
- Created
- Running
- Restarting
- Paused
- Removing
- Exited (also used if the container has never been started)
A basic strategy for recovering from temporary failures is automatically restarting a process when it exits or fails. Docker provides a few options for monitoring and restarting containers.
2.5.1. Automatically restarting containers
Docker provides this functionality with a restart policy. Using the --restart flag at container-creation time, you can tell Docker to do any of the following:
- Never restart (default)
- Attempt to restart when a failure is detected
- Attempt for some predetermined time to restart when a failure is detected
- Always restart the container regardless of the condition
Docker doesn’t always attempt to immediately restart a container. If it did, that would cause more problems than it solved. Imagine a container that does nothing but print the time and exit. If that container was configured to always restart, and Docker always immediately restarted it, the system would do nothing but restart that container. Instead, Docker uses an exponential backoff strategy for timing restart attempts.
A backoff strategy determines the amount of time that should pass between successive restart attempts. An exponential back-off strategy will do something like double the previous time spent waiting on each successive attempt. For example, if the first time the container needs to be restarted Docker waits 1 second, then on the second attempt it would wait 2 seconds, 4 seconds on the third attempt, 8 on the fourth, and so on. Exponential backoff strategies with low initial wait times are a common service-restoration technique. You can see Docker employ this strategy yourself by building a container that always restarts and simply prints the time:
docker run -d --name backoff-detector --restart always busybox:1.29 date
Then after a few seconds, use the trailing logs feature to watch it back off and restart:
docker logs -f backoff-detector
The logs will show all the times it has already been restarted and will wait until the next time it is restarted, print the current time, and then exit. Adding this single flag to the monitoring system and the WordPress containers you’ve been working on would solve the recovery issue.
The only reason you might not want to adopt this directly is that during backoff periods, the container isn’t running. Containers waiting to be restarted are in the restarting state. To demonstrate, try to run another process in the backoff-detector container:
docker exec backoff-detector echo Just a Test
Running that command should result in an error message:
Container <ID> is restarting, wait until the container is running
That means you can’t do anything that requires the container to be in a running state, such as execute additional commands in the container. That could be a problem if you need to run diagnostic programs in a broken container. A more complete strategy is to use containers that start lightweight init systems.
2.5.2. Using PID 1 and init systems
An init system is a program that’s used to launch and maintain the state of other programs. Any process with PID 1 is treated like an init process by the Linux kernel (even if it is not technically an init system). In addition to other critical functions, an init system starts other processes, restarts them in the event that they fail, transforms and forwards signals sent by the operating system, and prevents resource leaks. It is common practice to use real init systems inside containers when that container will run multiple processes or if the program being run uses child processes.
Several such init systems could be used inside a container. The most popular include runit, Yelp/dumb-init, tini, supervisord, and tianon/gosu. Publishing software that uses these programs is covered in chapter 8. For now, take a look at a container that uses supervisord.
Docker provides an image that contains a full LAMP (Linux, Apache, MySQL PHP) stack inside a single container. Containers created this way use supervisord to make sure that all the related processes are kept running. Start an example container:
docker run -d -p 80:80 --name lamp-test tutum/lamp
You can see which processes are running inside this container by using the docker top command:
docker top lamp-test
The top subcommand will show the host PID for each of the processes in the container. You’ll see supervisord, mysql, and apache included in the list of running programs. Now that the container is running, you can test the supervisord restart functionality by manually stopping one of the processes inside the container.
The problem is that to kill a process inside a container from within that container, you need to know the PID in the container’s PID namespace. To get that list, run the following exec subcommand:
docker exec lamp-test ps
The process list generated will list apache2 in the CMD column:
PID TTY          TIME CMD
  1 ?        00:00:00 supervisord
433 ?        00:00:00 mysqld_safe
835 ?        00:00:00 apache2
842 ?        00:00:00 ps
The values in the PID column will be different when you run the command. Find the PID on the row for apache2 and then insert that for <PID> in the following command:
docker exec lamp-test kill <PID>
Running this command will run the Linux kill program inside the lamp-test container and tell the apache2 process to shut down. When apache2 stops, the supervisord process will log the event and restart the process. The container logs will clearly show these events:
...
... exited: apache2 (exit status 0; expected)
... spawned: 'apache2' with pid 820
... success: apache2 entered RUNNING state, process has stayed up for >
      than 1 seconds (startsecs)
A common alternative to the use of init systems is using a startup script that at least checks the preconditions for successfully starting the contained software. These are sometimes used as the default command for the container. For example, the WordPress containers that you’ve created start by running a script to validate and set default environment variables before starting the WordPress process. You can view this script by overriding the default command with one to view the contents of the startup script:
docker run wordpress:5.0.0-php7.2-apache \
  cat /usr/local/bin/docker-entrypoint.sh
Docker containers run something called an entrypoint before executing the command. Entrypoints are perfect places to put code that validates the preconditions of a container. Although this is discussed in depth in part 2 of this book, you need to know how to override or specifically set the entrypoint of a container on the command line. Try running the last command again, but this time using the --entrypoint flag to specify the program to run and using the command section to pass arguments:
docker run --entrypoint="cat" \              1
    wordpress:5.0.0-php7.2-apache \
    /usr/local/bin/docker-entrypoint.sh      2
- 1 Uses “cat” as the entrypoint
- 2 Passes the full path of the default entrypoint script as an argument to cat
If you run through the displayed script, you’ll see how it validates the environment variables against the dependencies of the software and sets default values. Once the script has validated that WordPress can execute, it will start the requested or default command.
Startup scripts are an important part of building durable containers and can always be combined with Docker restart policies to take advantage of the strengths of each. Because both the MySQL and WordPress containers already use startup scripts, it’s appropriate to simply set the restart policy for each in an updated version of the example script.
Running startup scripts as PID 1 is problematic when the script fails to meet the expectations that Linux has for init systems. Depending on your use case, you might find that one approach or a hybrid works best.
With that final modification, you’ve built a complete WordPress site-provisioning system and learned the basics of container management with Docker. It has taken considerable experimentation. Your computer is likely littered with several containers that you no longer need. To reclaim the resources that those containers are using, you need to stop them and remove them from your system.
2.6. Cleaning up
Ease of cleanup is one of the strongest reasons to use containers and Docker. The isolation that containers provide simplifies any steps that you’d have to take to stop processes and remove files. With Docker, the whole cleanup process is reduced to one of a few simple commands. In any cleanup task, you must first identify the container that you want to stop and/or remove. Remember, to list all the containers on your computer, use the docker ps command:
docker ps -a
Because the containers you created for the examples in this chapter won’t be used again, you should be able to safely stop and remove all the listed containers. Make sure you pay attention to the containers you’re cleaning up if there are any that you created for your own activities.
All containers use hard drive space to store logs, container metadata, and files that have been written to the container filesystem. All containers also consume resources in the global namespace such as container names and host port mappings. In most cases, containers that will no longer be used should be removed.
To remove a container from your computer, use the docker rm command. For example, to delete the stopped container named wp, you’d run this:
docker rm wp
You should go through all the containers in the list you generated by running docker ps -a and remove all containers that are in the exited state. If you try to remove a container that’s running, paused, or restarting, Docker will display a message like the following:
Error response from daemon: Conflict, You cannot remove a running
container. Stop the container before attempting removal or use -f
FATA[0000] Error: failed to remove one or more containers
The processes running in a container should be stopped before the files in the container are removed. You can do this with the docker stop command or by using the -f flag on docker rm. The key difference is that when you stop a process by using the -f flag, Docker sends a SIG_KILL signal, which immediately terminates the receiving process. In contrast, using docker stop will send a SIG_HUP signal. Recipients of SIG_HUP have time to perform finalization and cleanup tasks. The SIG_KILL signal makes for no such allowances and can result in file corruption or poor network experiences. You can issue a SIG_KILL directly to a container by using the docker kill command. But you should use docker kill or docker rm -f only if you must stop the container in less than the standard 30-second maximum stop time.
In the future, if you’re experimenting with short-lived containers, you can avoid the cleanup burden by specifying --rm on the command. Doing so will automatically remove the container as soon as it enters the exited state. For example, the following command will write a message to the screen in a new BusyBox container, and the container will be removed as soon as it exits:
docker run --rm --name auto-exit-test busybox:1.29 echo Hello World
docker ps -a
In this case, you could use either docker stop or docker rm to properly clean up, or it would be appropriate to use the single-step docker rm -f command. You should also use the -v flag for reasons that will be covered in chapter 4. The docker CLI makes it is easy to compose a quick cleanup command:
docker rm -vf $(docker ps -a -q)
This concludes the basics of running software in containers. Each chapter in the remainder of part 1 will focus on a specific aspect of working with containers. The next chapter focuses on installing and uninstalling images, understanding how images relate to containers, and working with container filesystems.
Summary
The primary focus of the Docker project is to enable users to run software in containers. This chapter shows how you can use Docker for that purpose. The ideas and features covered include the following:
- Containers can be run with virtual terminals attached to the user’s shell or in detached mode.
- By default, every Docker container has its own PID namespace, isolating process information for each container.
- Docker identifies every container by its generated container ID, abbreviated container ID, or its human-friendly name.
- All containers are in any one of six distinct states: created, running, restarting, paused, removing, or exited.
- The docker exec command can be used to run additional processes inside a running container.
- A user can pass input or provide additional configuration to a process in a container by specifying environment variables at container-creation time.
- Using the --read-only flag at container-creation time will mount the container filesystem as read-only and prevent specialization of the container.
- A container restart policy, set with the --restart flag at container-creation time, will help your systems automatically recover in the event of a failure.
- Docker makes cleaning up containers with the docker rm command as simple as creating them.