Chapter 15 - Docker and Ansible
Docker is a highly optimized platform for building and running containers on local machines and servers in a highly efficient manner. You can think of Docker containers as sort-of lightweight virtual machines. This book won’t go into the details of how Docker and Linux containers work, but will provide an introduction to how Ansible can integrate with Docker to build, manage, and deploy containers.
A brief introduction to Docker containers
Starting with an extremely simple example, let’s build a Docker image from a Dockerfile. In this case, we want to show how Dockerfiles work and how we can use Ansible to build the image in the same way as if we were to use the command line with docker build.
Let’s start with a Dockerfile:
1 # Build an example Docker container image.
2 FROM busybox
3 LABEL maintainer="Jeff Geerling"
4
5 # Run a command when the container starts.
6 CMD ["/bin/true"]
This Docker container doesn’t do much, but that’s okay; we just want to build it and verify that it’s present and working—first with Docker, then with Ansible.
Save the above file as Dockerfile inside a new directory, and then on the command line, run the following command to build the container:
After a few seconds, the Docker image should be built, and if you list all local images with docker image, you should see your new test image (along with the busybox image, which was used as a base):
If you want to run the container image you just created, enter the following:
This creates a Docker container with the name test, and starts the container. Since the only thing our container does is calls /bin/true, the container will run the command, then exit. You can see the current status of all your containers (whether or not they’re actively running) with the docker ps -a command:
You can control the container using either the container ID (in this case, bae0972c26d4) or the name (test); start with docker start [container], stop with docker stop [container], delete/remove with docker rm [container].
If you delete the container (docker rm test) and the image you built (docker rmi test), you can experiment with the Dockerfile by changing it and rebuilding the image with docker build, then running the resulting image with docker run. For example, if you change the command from /bin/true to /bin/false, then run build and run the container, docker ps -a will show the container exited with the status code 1 instead of 0.
For our purposes, this is a good introduction to how Docker works. To summarize:
- Dockerfiles contain the instructions Docker uses to build containers.
-
docker buildbuilds Dockerfiles and generates container images. -
docker imageslists all images present on the system. -
docker runruns created images. -
docker ps -alists all containers, both running and stopped.
When developing Dockerfiles to containerize your own applications, you will likely want to get familiar with the Docker CLI and how the process works from a manual perspective. But when building the final images and running them on your servers, Ansible can help ease the process.
Using Ansible to build and manage containers
Ansible has built-in Docker modules that integrate nicely with Docker for container management. We’re going to use them to automate the building and running of the container (managed by the Dockerfile) we just created.
Move the Dockerfile you had into a subdirectory, and create a new Ansible playbook (call it main.yml) in the project root directory. The directory layout should look like:
Inside the new playbook, add the following:
 1 ---
 2 - hosts: localhost
 3   connection: local
 4
 5   tasks:
 6     - name: Ensure Docker image is built from the test Dockerfile.
 7       docker_image:
 8         name: test
 9         source: build
10         build:
11           path: test
12         state: present
The playbook uses the docker_image module to build an image. Provide a name for the image, tell Ansible the source for the image is a build, then provide the path to the Dockerfile in the build parameters (in this case, inside the test directory). Finally, tell Ansible via the state parameter the image should be present, to ensure it is built and available.
Run the playbook ($ ansible-playbook main.yml), and then list all the Docker images ($ docker images). If all was successful, you should see a fresh test image in the list.
Run docker ps -a again, though, and you’ll see the new test image was never run and is absent from the output. Let’s remedy that by adding another task to our Ansible playbook:
12     - name: Ensure the test container is running.
13       docker_container:
14         image: test:latest
15         name: test
16         state: started
If you run the playbook again, Ansible will start the Docker container. Check the list of containers with docker ps -a, and you’ll note the test container is again present.
You can remove the container and the image via ansible by changing the state parameter to absent for both tasks.
Building a Flask app with Ansible and Docker
Let’s build a more useful Docker-powered environment, with a container that runs our application (built with Flask, a lightweight Python web framework), and a container that runs a database (MySQL), along with a data container. We need a separate data container to persist the MySQL database, because data changed inside the MySQL container is lost every time the container stops.
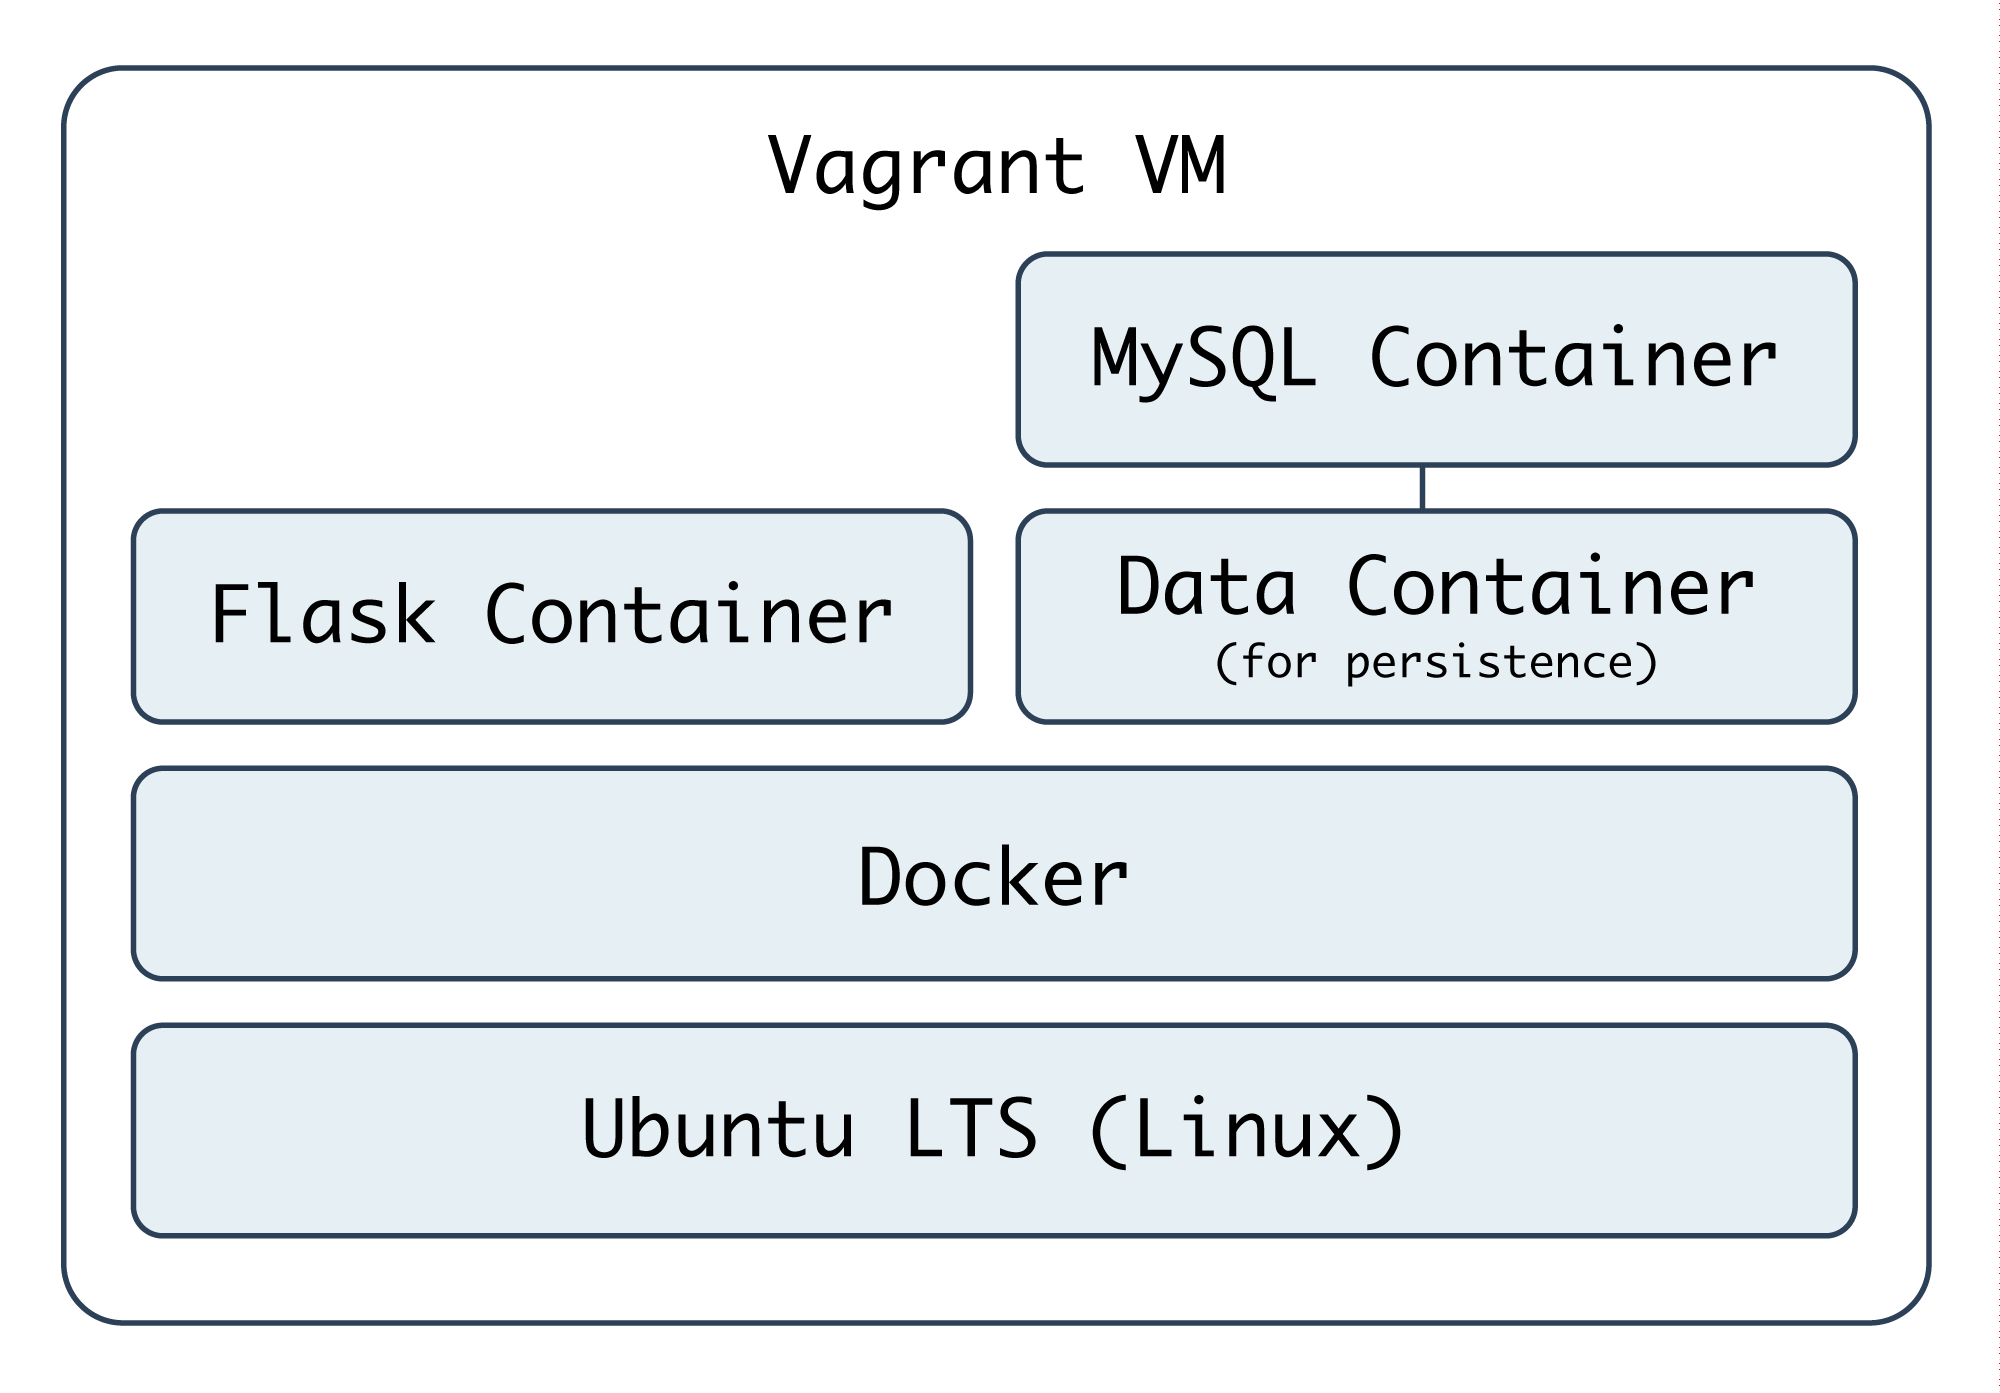
We’ll create a VM using Vagrant to run our Docker containers so the same Docker configuration can be tested on any machine capable of running Ansible and Vagrant. Create a docker folder, and inside it, the following Vagrantfile:
 1 # -*- mode: ruby -*-
 2 # vi: set ft=ruby :
 3
 4 VAGRANTFILE_API_VERSION = "2"
 5
 6 Vagrant.configure(VAGRANTFILE_API_VERSION) do |config|
 7   config.vm.box = "geerlingguy/ubuntu2004"
 8   config.vm.network :private_network, ip: "192.168.33.39"
 9   config.ssh.insert_key = false
10
11   config.vm.hostname = "docker-flask.test"
12   config.vm.provider :virtualbox do |v|
13     v.name = "docker-flask.test"
14     v.memory = 1024
15     v.cpus = 2
16     v.customize ["modifyvm", :id, "--natdnshostresolver1", "on"]
17     v.customize ["modifyvm", :id, "--ioapic", "on"]
18   end
19
20   # Enable provisioning with Ansible.
21   config.vm.provision "ansible" do |ansible|
22     ansible.playbook = "provisioning/main.yml"
23   end
24
25 end
We’ll use Ubuntu for this example, and we’ve specified an Ansible playbook (provisioning/main.yml) to set everything up. Inside provisioning/main.yml, we need to first install and configure Docker (which we’ll do using the Ansible Galaxy role geerlingguy.docker), then run some additional setup tasks, and finally build and start the required Docker containers:
 1 ---
 2 - hosts: all
 3   become: true
 4
 5   vars:
 6     build_root: /vagrant/provisioning
 7
 8   pre_tasks:
 9     - name: Update apt cache if needed.
10       apt: update_cache=yes cache_valid_time=3600
11
12   roles:
13     - role: geerlingguy.docker
14
15   tasks:
16     - import_tasks: setup.yml
17     - import_tasks: docker.yml
We’re using sudo for everything because Docker either requires root privileges, or requires the current user account to be in the docker group. It’s simplest for our purposes to set everything up with sudo by setting become: true.
We also set a build_root variable that we’ll use later on to tell Docker to build the containers inside the VM using the default shared Vagrant volume.
The geerlingguy.docker role requires no additional settings or configuration, but it does need to be installed with ansible-galaxy, so add a requirements.yml:
1 roles:
2   - name: geerlingguy.docker
And make sure the role is installed:
Next, create setup.yml in the same provisioning directory alongside main.yml:
1 ---
2 - name: Install Pip.
3   apt: name=python3-pip state=present
4
5 - name: Install Docker Python library.
6   pip: name=docker state=present
Ansible needs the docker Python library in order to control Docker via Python, so we install pip, then use it to install docker.
Next is the meat of the playbook: docker.yml (also in the provisioning directory). The first task is to build Docker images for our data, application, and database containers:
 1 ---
 2 - name: Build Docker images from Dockerfiles.
 3   docker_image:
 4     name: "{{ item.name }}"
 5     tag: "{{ item.tag }}"
 6     source: build
 7     build:
 8       path: "{{ build_root }}/{{ item.directory }}"
 9       pull: false
10     state: present
11   with_items:
12     - { name: data, tag: latest, directory: data }
13     - { name: flask, tag: latest, directory: www }
14     - { name: db, tag: latest, directory: db }
Don’t worry that we haven’t yet created the actual Dockerfiles required to create the Docker images; we’ll do that after we finish structuring everything with Ansible.
Like our earlier usage of docker_image, we supply a name, build.path, and source for each image. In this example, we’re also adding a tag, which behaves like a git tag, allowing future Docker commands to use the images we created at a specific version. We’ll be building three containers, data, flask, and db, and we’re pointing Docker to the path /vagrant/provisioning/[directory], where [directory] contains the Dockerfile and any other helpful files to be used to build the Docker image.
After building the images, we will need to start each of them (or at least make sure a container is present, in the case of the data container—since you can use data volumes from non-running containers). We’ll do that in three separate docker_container tasks:
16 # Data containers don't need to be running to be utilized.
17 - name: Run a Data container.
18   docker_container:
19     image: data:latest
20     name: data
21     state: present
22
23 - name: Run a Flask container.
24   docker_container:
25     image: www:latest
26     name: www
27     state: started
28     command: python /opt/www/index.py
29     ports: "80:80"
30
31 - name: Run a MySQL container.
32   docker_container:
33     image: db:latest
34     name: db
35     state: started
36     volumes_from: data
37     ports: "3306:3306"
38     env:
39       MYSQL_ROOT_PASSWORD: root
40       MYSQL_DATABASE: flask
41       MYSQL_USER: flask
42       MYSQL_PASSWORD: flask
Each of these containers’ configuration is a little more involved than the previous. In the case of the first container, it’s just present; Ansible will ensure a data container is present.
For the Flask container, we need to make sure our app is not only running, but continues to run. So, unlike our earlier usage of /bin/true to run a container briefly and exit, in this case we will provide an explicit command to run:
25 command: python /opt/www/index.py
Calling the script directly will launch the app in the foreground and log everything to stdout, making it easy to inspect what’s going on with docker logs [container] if needed.
Additionally, we want to map the container’s port 80 to the host’s port 80, so external users can load pages over HTTP. This is done using the ports option, passing data just as you would using Docker’s --publish syntax.
The Flask container will have a static web application running on it, and has no need for extra non-transient file storage, but the MySQL container will mount a data volume from the data container, so it has a place to store data that won’t vanish when the container dies and is restarted.
Thus, for the db container, we have two special options: the volumes_from option, which mounts volumes from the specified container (in this case, the data container), and the command, which calls a shell script to start MySQL. We’ll get to why we’re running a shell script and not launching a MySQL daemon directly in a bit.
Now that we have the playbook structured to build our Docker-based infrastructure, we’ll build out each of the three Dockerfiles and related configuration to support the data, www, and db containers.
At this point, we should have a directory structure like:
Data storage container
For the data storage container, we don’t need much; we just need to create a directory and set it as an exposed mount point using VOLUME:
1 # Build a simple MySQL data volume Docker container.
2 FROM busybox
3 MAINTAINER Jeff Geerling <geerlingguy@mac.com>
4
5 # Create data volume for MySQL.
6 RUN mkdir -p /var/lib/mysql
7 VOLUME /var/lib/mysql
We create a directory (line 6), and expose the directory as a volume (line 7) which can be mounted by the host or other containers. Save the above into a new file, docker/provisioning/data/Dockerfile.
Flask container
Flask is a lightweight Python web framework “based on Werkzeug, Jinja 2 and good intentions”. It’s a great web framework for small, fast, and robust websites and apps, or even an API. For our purposes, we need to build a Flask app that connects to a MySQL database and displays the status of the connection on a basic web page (very much like our PHP example, in the earlier Highly-Available Infrastructure example).
Here’s the code for the Flask app (save it as docker/provisioning/www/index.py.j2):
 1 # Infrastructure test page.
 2 from flask import Flask
 3 from flask import Markup
 4 from flask import render_template
 5 from flask_sqlalchemy import SQLAlchemy
 6 from sqlalchemy import text
 7
 8 app = Flask(__name__)
 9
10 # Configure MySQL connection.
11 db_uri = 'mysql://flask:flask@{{ host_ip_address }}/flask'
12 app.config['SQLALCHEMY_DATABASE_URI'] = db_uri
13 db = SQLAlchemy(app)
14
15 @app.route("/")
16 def test():
17     mysql_result = False
18     try:
19         query = text('SELECT 1')
20         result = db.engine.execute(query)
21         if [row[0] for row in result][0] == 1:
22             mysql_result = True
23     except:
24         pass
25
26     if mysql_result:
27         result = Markup('<span style="color: green;">PASS</span>')
28     else:
29         result = Markup('<span style="color: red;">FAIL</span>')
30
31     # Return the page with the result.
32     return render_template('index.html', result=result)
33
34 if __name__ == "__main__":
35     app.run(host="0.0.0.0", port=80)
This app defines one route (/), listens on every interface on port 80, and shows a MySQL connection status page rendered by the template index.html. There’s nothing particularly complicated in this application, but there is one Jinja variable ({{ host_ip_address }}) which an Ansible playbook will replace during deployment, and the app has a few dependencies (like flask-sqlalchemy) which will need to be installed via the Dockerfile.
Since we are using a Jinja template to render the page, let’s create that template in docker/provisioning/www/templates/index.html (Flask automatically picks up any templates inside a templates directory):
 1 <!DOCTYPE html>
 2 <html>
 3 <head>
 4   <title>Flask + MySQL Docker Example</title>
 5   <style>* { font-family: Helvetica, Arial, sans-serif }</style>
 6 </head>
 7 <body>
 8   <h1>Flask + MySQL Docker Example</h1>
 9   <p>MySQL Connection: {{ result }}</p>
10 </body>
11 </html>
In this case, the .html template contains a Jinja variable ({{ result }}), and Flask will fill in the variable with the status of the MySQL connection.
Now that we have the app defined, we need to build the container to run the app. Here is a Dockerfile that will install all the required dependencies, then copy an Ansible playbook and the app itself into place so we can do the more complicated configuration (like copying a template with variable replacement) through Ansible:
 1 # A simple Flask app container.
 2 FROM geerlingguy/docker-ubuntu2004-ansible
 3 MAINTAINER Jeff Geerling <geerlingguy@mac.com>
 4
 5 # Install Flask app dependencies.
 6 RUN apt-get update
 7 RUN apt-get install -y libmysqlclient-dev build-essential \
 8   python3-dev python3-pip
 9 RUN pip3 install flask flask-sqlalchemy mysqlclient
10
11 # Install playbook and run it.
12 COPY playbook.yml /etc/ansible/playbook.yml
13 COPY index.py.j2 /etc/ansible/index.py.j2
14 COPY templates /etc/ansible/templates
15 RUN mkdir -m 755 /opt/www
16 RUN ansible-playbook /etc/ansible/playbook.yml --connection=local
17
18 EXPOSE 80
Instead of installing apt and pip packages using Ansible, we’ll install them using RUN commands in the Dockerfile. This allows those commands to be cached by Docker. Generally, more complicated package installation and configuration is easier and more maintainable inside Ansible, but in the case of package installation, having Docker cache the steps so future docker build commands take seconds instead of minutes is worth the verbosity of the Dockerfile.
At the end of the Dockerfile, we run a playbook (which should be located in the same directory as the Dockerfile) and expose port 80 so the app can be accessed via HTTP by the outside world. Next we’ll create the app deployment playbook.
In order for the Flask app to function properly, we need to get the host_ip_address, then replace the variable in the index.py.j2 template. Create the Flask deployment playbook at docker/provisioning/www/playbook.yml:
 1 ---
 2 - hosts: localhost
 3   become: true
 4
 5   tasks:
 6     - name: Get host IP address.
 7       shell: "/sbin/ip route | awk '/default/ { print $3 }'"
 8       register: host_ip
 9       changed_when: false
10
11     - name: Set host_ip_address variable.
12       set_fact:
13         host_ip_address: "{{ host_ip.stdout }}"
14
15     - name: Copy Flask app into place.
16       template:
17         src: /etc/ansible/index.py.j2
18         dest: /opt/www/index.py
19         mode: 0755
20
21     - name: Copy Flask templates into place.
22       copy:
23         src: /etc/ansible/templates
24         dest: /opt/www
25         mode: 0755
The shell command that registers the host_ip is an easy way to retrieve the IP while still letting Docker do its own virtual network management.
The last two tasks copy the flask app and templates directory into place.
The docker/provisioning/www directory should now contain the following:
MySQL container
We’ve configured MySQL a few times throughout this book, so little time will be spent discussing how MySQL is set up. We’ll instead dive into how MySQL works inside a Docker container, with a persistent data volume from the previously-configured data container.
For MySQL, there is already a very well-maintained and flexible community MySQL Docker image we can rely on. To use it, we’ll wrap it in our own Dockerfile (in case we want to make further customizations in the future).
1 # A simple MySQL container.
2 FROM mysql:5.7
3 MAINTAINER Jeff Geerling <geerlingguy@mac.com>
4
5 EXPOSE 3306
This Dockerfile tells Docker to pull from the mysql image on Docker Hub, and then expose port 3306.
The docker/provisioning/db directory should now contain the following:
Ship it!
Now that everything’s in place, you should be able to cd into the main docker directory, and run vagrant up. After 10 minutes or so, Vagrant should show Ansible provisioning was successful, and if you visit http://192.168.33.39/ in your browser, you should see something like the following:

If you see “MySQL Connection: PASS”, congratulations, everything worked! If it shows ‘FAIL’, you might need to give the MySQL a little extra time to finish it’s initialization, since it has to build it’s environment on first launch. If the page doesn’t show up at all, you might want to compare your code with the Docker Flask example on GitHub.
The entire Docker Flask example is available on GitHub, if you’d like to clone it and try it locally.
Building containers with Ansible from the outside
In the previous example, an Ansible playbook was run inside a Docker container to build the Flask application image. While this approach works and is maintainable, it also makes for a lot of cruft. One major advantage of container-based app deployment is a nice tidy container image per service.
To use Ansible inside a container requires a lot of dependencies—Python, Ansible’s dependencies, and Ansible itself.
One solution to this problem is to use ansible-bender. One of the key features of ansible-bender is a container image build system which applies Ansible tasks to a Docker image. So instead of Ansible running inside the container being built, you use Ansible to build the container.
Build a Hubot Slack bot container with ansible_connection: docker
Most examples in this book use the default ansible_connection plugin, ssh, which connects to servers using SSH. A few examples also use the local plugin, which runs commands locally without SSH.
There are actually a few dozen connection plugins that ship with Ansible, including kubectl for interacting with Kubernetes pods, saltstack for piggybacking salt minions, winrm for connecting over Microsoft’s WinRM, and docker, which runs tasks in Docker containers.
This last connection plugin is helpful if you want to build Docker container images using Ansible without the overhead of installing Ansible inside the container.
To learn how the docker connection plugin works, we’ll build a Hubot Slack bot.
Hubot and Slack
To give a little background, Hubot is an open-source chat bot from GitHub, written in CoffeeScript, which can be connected to many different chat systems. Slack is an popular chat platform used by many businesses to communicate. Many teams benefit from a bot like Hubot, as they can store data in Hubot for quick retrieval, or even connect Hubot to other services (like CI tools) and kick off deployments, check infrastructure health, and do other helpful things.
Building a Docker container with Ansible
The first step in setting up our bot project is to create a new directory (e.g. docker-hubot) and an Ansible playbook, we’ll call it main.yml.
You’ll have to have Docker installed and running on the computer where you’ll run this playbook, and the first few setup steps will use connection: local to get the container build started:
 1 ---
 2 - hosts: localhost
 3   connection: local
 4   gather_facts: no
 5
 6   vars:
 7     base_image: node:8
 8     container_name: hubot_slack
 9     image_namespace: a4d
10     image_name: hubot-slack
There are also a few variables defined which we’ll use later in the playbook to define things like the Docker base image to be used, the name for the container we’re building, and the namespace and name for the final generated Docker image. We don’t need to gather_facts since we aren’t going to do much on the local connection.
12   pre_tasks:
13     - name: Make the latest version of the base image available locally.
14       docker_image:
15         name: '{{ base_image }}'
16         source: pull
17         force_source: true
18
19     - name: Create the Docker container.
20       docker_container:
21         image: '{{ base_image }}'
22         name: '{{ container_name }}'
23         command: sleep infinity
24
25     - name: Add the newly created container to the inventory.
26       add_host:
27         hostname: '{{ container_name }}'
28         ansible_connection: docker
In a pre_tasks area, we’ll set up the Docker container so we can get Hubot on it:
- The
docker_imagetask: Pull thebase_image(Ansible’s equivalent ofdocker pull), and make sure the latest version is always present when the playbook runs. - The
docker_containertask: Create a Docker container (Ansible’s equivalent ofdocker run) from thebase_image. - The
add_hosttask: Add the just-created container to the Ansible inventory.
Now that we have a container running and in the inventory, we can build inside of it, using the docker connection plugin. Following the best practices we established earlier in the book, we’ll put all the reusable logic inside an Ansible role, which we’ll create in a moment. For now, we can call the role about to be created in the playbook’s roles section:
30   roles:
31     - name: hubot-slack
32       delegate_to: '{{ container_name }}'
Note the delegate_to. Any task, playbook, or role we want Ansible to run inside the Docker container needs to be delegated to the container.
Before building the hubot-slack role, let’s finish off the container image build process and the rest of the main playbook:
34   post_tasks:
35     - name: Clean up the container.
36       shell: >
37         apt-get remove --purge -y python &&
38         rm -rf /var/lib/apt/lists/*
39       delegate_to: '{{ container_name }}'
40       args:
41         warn: false
42
43     - name: Commit the container.
44       command: >
45         docker commit
46         -c 'USER hubot'
47         -c 'WORKDIR "/home/hubot"'
48         -c 'CMD ["bin/hubot", "--adapter", "slack"]'
49         -c 'VOLUME ["/home/hubot/scripts"]'
50         {{ container_name }} {{ image_namespace }}/{{ image_name }}:lat\
51 est
52
53     - name: Remove the container.
54       docker_container:
55         name: '{{ container_name }}'
56         state: absent
The post-tasks clean up unnecessary cruft inside the container (trimming down the size of the committed image), commit the Docker container to an image (tagged a4d/hubot-slack:latest), and remove the running container.
When building from a Dockerfile, you can set things like the USER (the user used to run the CMD or ENTRYPOINT in the container) and CMD (the defaults for an executing container) directly. In our case, since we’re not building from a Dockerfile, we set these options using docker commit’s -c or --change option.
Now that we have the main scaffolding in place for building a Docker container, committing an image from that container, and tearing down the container, it’s time to add the ‘meat’ to our playbook—the role that installs Hubot and its Slack adapter.
Building the hubot-slack role
As with any role, the easiest way to scaffold the necessary files is using the ansible-galaxy command. Create a hubot-slack role in a roles subdirectory with:
You can delete some unneeded role directories, namely files, handlers, templates, tests, and vars. If you want, fill in the metadata fields inside meta/main.yml (this is only needed if you’re publishing the role on Ansible Galaxy or if you need to have other roles defined as dependencies, though).
Since Hubot isn’t too hard to install, we can do everything we need inside tasks/main.yml. The first thing we need to do is ensure all the required dependencies for generating our bot are present:
 1 ---
 2 - name: Install dependencies.
 3   package:
 4     name: sudo
 5     state: present
 6
 7 - name: Install required Node.js packages.
 8   npm:
 9     name: "{{ item }}"
10     state: present
11     global: yes
12   with_items:
13     - yo
14     - generator-hubot
Because we want to be able to run certain commands as a hubot user later, we’ll need sudo present so Ansible can become the hubot user. Then we’ll install some require dependencies—yo and generator-hubot, which are used to build the bot. Node.js is already present inside the container, since we chose to build the container based off the node:8 base image.
16 - name: Ensure hubot user exists.
17   user:
18     name: hubot
19     create_home: yes
20     home: "{{ hubot_home }}"
It’s best to run Hubot inside an isolated directory, using a dedicated user account, so we set up a hubot user account with its own home directory. To make the Hubot role easier to adapt, a variable is used for the hubot user’s home directory. We’ll define that later in defaults/main.yml.
22 - name: Generate hubot.
23   command: >
24     yo hubot
25     --owner="{{ hubot_owner }}"
26     --name="{{ hubot_name }}"
27     --description="{{ hubot_description }}"
28     --adapter=slack
29     --defaults
30     chdir={{ hubot_home }}
31   become: yes
32   become_user: hubot
The yo hubot command scaffolds all the code necessary to run Hubot, and all the options passed in tell the generator to run non-interactively. We will define the default role hubot_ vars in this command later in defaults/main.yml.
34 - name: Remove certain scripts from external-scripts.json.
35   lineinfile:
36     path: "{{ hubot_home }}/external-scripts.json"
37     regexp: "{{ item }}"
38     state: absent
39   with_items:
40     - 'redis-brain'
41     - 'heroku'
42   become: yes
43   become_user: hubot
44
45 - name: Remove the hubot-scripts.json file.
46   file:
47     path: "{{ hubot_home }}/hubot-scripts.json"
48     state: absent
There are a couple cleanup tasks which make sure Hubot runs properly in this isolated container. In the lineinfile task, the persistent Redis connection plugin and Heroku support are removed, since they are not needed. Also, the unused hubot-scripts.json file is removed to prevent errors during Hubot startup.
The final step in creating the hubot-slack role is to add default values for the variables we’re using in the role, so put the following inside defaults/main.yml:
1 ---
2 hubot_home: /home/hubot
3 hubot_owner: Ansible for DevOps
4 hubot_name: a4dbot
5 hubot_description: Ansible for DevOps test bot.
Building and running the Hubot Slack bot container
You should now have a directory containing the main.yml Ansible playbook and a hubot-slack role inside the roles directory. To build the container image, make sure Docker is running, and run:
Once the playbook completes, run docker images to verify the a4d/hubot-slack image was created:
Before you can run an instance of the new container image and have your bot in your Slack channels, you have to get an API token from Slack. Follow the instructions in Slack’s guide, Slack Developer Kit for Hubot, and get an API token.
Then run the following command to run an instance of Hubot attached to your Slack channel (replace TOKEN with your bot’s Slack API token):
The container should start, and you should see a new active member in your Slack team! In Slack, you can invite the bot to channels, converse directly, etc. (send a message with help to the bot to get all available commands).
If something went wrong, use docker logs hubot to find out what happened.
Once you’re finished playing around with Hubot, you can kill and remove the container with docker rm -f hubot.
Summary
You can use Ansible to build containers many different ways, depending on how you want to architect your container build pipeline. Using Ansible with the docker connection plugin allows you to treat a Docker container much like any other server in your fleet.
Some parts of an Ansible-based container build pipeline require a little more verbosity, but in the end, you can do things like use the exact same Ansible roles for VMs and bare metal servers as you do a Docker container, making your overall infrastructure maintenance easier. Instead of maintaining legacy servers using Ansible playbooks, and Docker containers using Dockerfiles, you can do everything with Ansible!
The entire Docker Hubot Slack bot example is available on GitHub, if you’d like to clone it and try it locally.
Summary
The examples shown here barely scratch the surface of what makes Docker (and container-based application deployment in general) a fascinating and useful application deployment tool. Docker and other container-based tools are still in their infancy, so there are dozens of ways manage the building, running, and linking of containers. Ansible is a solid contender for managing your entire container-based application lifecycle (and the infrastructure on which it runs).