Chapter 14 - Automating HTTPS and TLS Certificates
Today’s application environment almost always requires the use of HTTP (and HTTPS) for certain traffic—end users interacting with a website, microservices communicating with each other internally or via the public Internet, or external APIs interacting with your apps.
HTTPS was originally used only for sensitive transactions, like banking transactions or secure web forms. It also used to require extra server CPU to encrypt data. But today, when Google boosts search results for HTTPS-only sites, and when processors barely show a difference with encrypted or unencrypted traffic, it’s almost universally understood that all HTTP services should be served via https://.
Traditionally, one blocker to using HTTPS everywhere was certificates were difficult to acquire, manage, and renew. And they were also expensive!
Now, between Let’s Encrypt’s free certificates, more affordable wildcard certs, and universal Server Name Indication (SNI) support, there is almost never an excuse not to use HTTPS…
Except, that is, for the fact certificate management has been tricky to automate. This chapter will show how Ansible solves this last problem by managing certificates and securing all your HTTP traffic!
Generating Self-Signed Certificates with Ansible
Whenever I’m building and testing a new server configuration that requires TLS connections (typically HTTPS traffic over port 443), I need to use one or more valid certificates which can be accepted by a browser user, or by something like curl, so I can verify my TLS configuration is correct.
Ansible makes generating self-signed certificates easy. There are four openssl_* crypto-related modules useful in generating certificates:
-
openssl_certificate- Generate and/or check OpenSSL certificates -
openssl_csr- Generate OpenSSL Certificate Signing Request (CSR) -
openssl_privatekey- Generate OpenSSL private keys -
openssl_publickey- Generate an OpenSSL public key from its private key
In order to use these modules, you need OpenSSL installed, and also one extra Python dependency used by Ansible to interact with OpenSSL, the pyOpenSSL library.
Here’s a quick example of the tasks required to generate a self-signed cert:
- name: Ensure directory exists for local self-signed TLS certs.
  file:
    path: /etc/ssl/certs/example
    state: directory

- name: Generate an OpenSSL private key.
  openssl_privatekey:
    path: /etc/ssl/certs/example/privkey.pem

- name: Generate an OpenSSL CSR.
  openssl_csr:
    path: /etc/ssl/certs/example/example.csr
    privatekey_path: /etc/ssl/certs/example/privkey.pem
    common_name: "example.com"

- name: Generate a Self Signed OpenSSL certificate.
  openssl_certificate:
    path: /etc/ssl/certs/example/fullchain.pem
    privatekey_path: /etc/ssl/certs/example/privkey.pem
    csr_path: /etc/ssl/private/example/example.csr
    provider: selfsigned
These tasks ensure there’s a directory inside which the certificate will live, create a private key and Certificate Signing Request (CSR) in that directory, and use them to generate the final cert.
You can then use this certificate to serve HTTPS requests using a web server; for example, in an Nginx server configuration:
Let’s put together a full playbook using the openssl_* modules and Nginx, to build a server complete with a self-signed certificate and a secure Nginx TLS configuration.
Idempotent Nginx HTTPS playbook with a self-signed cert
For the sake of convenience, this example will target a Debian 9 server (though it would be mostly unchanged for any other distribution), and there’s a fully tested example included in this book’s GitHub repository: HTTPS Self-Signed Certificate Demo VM.
Create a new folder for the Self-Signed Certificate web server playbook, and add a main.yml playbook:
 1 ---
 2 - hosts: all
 3
 4   vars_files:
 5     - vars/main.yml
 6
 7   pre_tasks:
 8     - name: Ensure apt cache is updated.
 9       apt: update_cache=yes cache_valid_time=600
10
11     - name: Install dependency for pyopenssl.
12       apt: name=libssl-dev state=present
To keep the main playbook tidy, we will store any variables in an included variables file (go ahead and create an empty main.yml vars file in a vars directory). Next, on most Debian (and Debian-derived) distros, I add in a pre_task to make sure the Apt cache is up to date (this prevents errors when installing packages later). Finally, libssl-dev is a dependency we’ll need to have on the system to make sure pyopenssl can be installed by pip later, so we’ll do that too.
Next, to save some time, we can rely on some Ansible Galaxy roles to install and configure some required software on the server:
14   roles:
15     - geerlingguy.firewall
16     - geerlingguy.pip
17     - geerlingguy.nginx
We use the firewall role to configure iptables to only allow traffic to the server on certain ports, pip to install Python’s Pip package manager and the required pyOpenSSL library, and nginx to install and configure Nginx.
To get these roles installed, add a requirements.yml file to your playbook directory, with the contents:
1 ---
2 roles:
3   - name: geerlingguy.firewall
4   - name: geerlingguy.pip
5   - name: geerlingguy.nginx
Then run ansible-galaxy install -r requirements.yml to install the roles.
Now let’s define a few variables to make the firewall, pip, and nginx roles configure things how we want:
 1 # Firewall settings.
 2 firewall_allowed_tcp_ports:
 3   - "22"
 4   - "80"
 5   - "443"
 6
 7 # Python settings.
 8 pip_install_packages: ['pyopenssl']
 9
10 # Nginx settings.
11 nginx_vhosts: []
12 nginx_remove_default_vhost: True
13 nginx_ppa_version: stable
14 nginx_docroot: /var/www/html
For the firewall, you need port 22 open for remote SSH access, port 80 for HTTP requests (which we’ll redirect to HTTPS), and 443 for HTTPS.
For Pip, we need to make sure the right version of pip is installed (so python3-pip for Debian 9, which has Python 3 installed by default), and we tell it to install the latest version of the pyopenssl package.
For Nginx, we want the default virtual host (server) which comes with the distro package install to be removed, we want to set the role’s vhosts to an empty array (since we’ll manage Nginx server configuration ourselves), and finally we’ll use the docroot /var/www/html.
Now that we have all the base packages installed and configured, the next step is to generate the self-signed certificate. To keep our playbook clean, the required tasks can go into an imported task file, imported in the main.yml like so:
19   tasks:
20     - import_tasks: tasks/self-signed-cert.yml
Create a tasks folder, and create a self-signed-cert.yml task file inside. We’ll place the tasks that create the key, generate the CSR, and generate the cert into this file:
 1 ---
 2 - name: Ensure directory exists for local self-signed TLS certs.
 3   file:
 4     path: "{{ certificate_dir }}/{{ server_hostname }}"
 5     state: directory
 6
 7 - name: Generate an OpenSSL private key.
 8   openssl_privatekey:
 9     path: "{{ certificate_dir }}/{{ server_hostname }}/privkey.pem"
10
11 - name: Generate an OpenSSL CSR.
12   openssl_csr:
13     path: "{{ certificate_dir }}/{{ server_hostname }}.csr"
14     privatekey_path: "{{ certificate_dir }}/{{ server_hostname }}/privk\
15 ey.pem"
16     common_name: "{{ server_hostname }}"
17
18 - name: Generate a Self Signed OpenSSL certificate.
19   openssl_certificate:
20     path: "{{ certificate_dir }}/{{ server_hostname }}/fullchain.pem"
21     privatekey_path: "{{ certificate_dir }}/{{ server_hostname }}/privk\
22 ey.pem"
23     csr_path: "{{ certificate_dir }}/{{ server_hostname }}.csr"
24     provider: selfsigned
We added a two variables which we’ll now define in the vars/main.yml file (using variables makes it easier to change the site and/or refactor to allow multiple values in the future). Add these variables to the vars file:
19 # Self-signed certificate settings.
20 certificate_dir: /etc/ssl/private
21 server_hostname: https.test
Now that the playbook can generate a certificate (or on future runs, idempotently verify the certificate’s existence), we need to configure Nginx to use the cert to deliver traffic using TLS for a particular URL.
The geerlingguy.nginx role took care of the majority of Nginx configuration, but we disabled that role’s management of virtual hosts, in favor of managing a single virtual host (or server directive) ourselves. The following tasks copy an example landing page into a defined docroot, then our custom HTTPS server configuration to use the generated cert for the docroot:
22     - name: Ensure docroot exists.
23       file:
24         path: "{{ nginx_docroot }}"
25         state: directory
26
27     - name: Copy example index.html file in place.
28       copy:
29         src: files/index.html
30         dest: "{{ nginx_docroot }}/index.html"
31         mode: 0755
32
33     - name: Copy Nginx server configuration in place.
34       template:
35         src: templates/https.test.conf.j2
36         dest: /etc/nginx/sites-enabled/https.test.conf
37         mode: 0644
38       notify: restart nginx
Fairly straightforward, but we need to fill in a couple blanks. First, here’s a quick and easy index.html just to allow you to test things out:
 1 <!DOCTYPE html>
 2 <html>
 3 <head>
 4   <title>HTTPS Self-Signed Certificate Test</title>
 5   <style>* { font-family: Helvetica, Arial, sans-serif }</style>
 6 </head>
 7 <body>
 8   <h1>HTTPS Self-Signed Certificate Test</h1>
 9     <p>If you can see this message, it worked!</p>
10 </body>
11 </html>
Put that HTML into your playbook directory at files/index.html, then create another file, templates/https.test.conf.j2, with the following contents:
 1 # HTTPS Test server configuration.
 2
 3 # Redirect HTTP traffic to HTTPS.
 4 server {
 5     listen 80 default_server;
 6     server_name _;
 7     index index.html;
 8     return 301 https://$host$request_uri;
 9 }
10
11 # Serve HTTPS traffic using the self-signed certificate created by Ansi\
12 ble.
13 server {
14     listen 443 ssl default_server;
15     server_name {{ server_hostname }};
16     root {{ nginx_docroot }};
17
18     ssl_certificate {{ certificate_dir }}/{{ server_hostname }}/fullcha\
19 in.pem;
20     ssl_certificate_key {{ certificate_dir }}/{{ server_hostname }}/pri\
21 vkey.pem;
22 }
The most important parts of this server configuration instruct Nginx to use the SSL certificate we generated (at the path {{ certificate_dir }}/{{ server_hostname }}/fullchain.pem;) for requests over port 443 for the domain {{ server_hostname }} (in this case, requests to https://https.test/).
Notice the notify: restart nginx in the Copy Nginx server configuration in place. task; this will force Nginx to restart after any configuration changes are made (or during the first provision, when the template is copied).
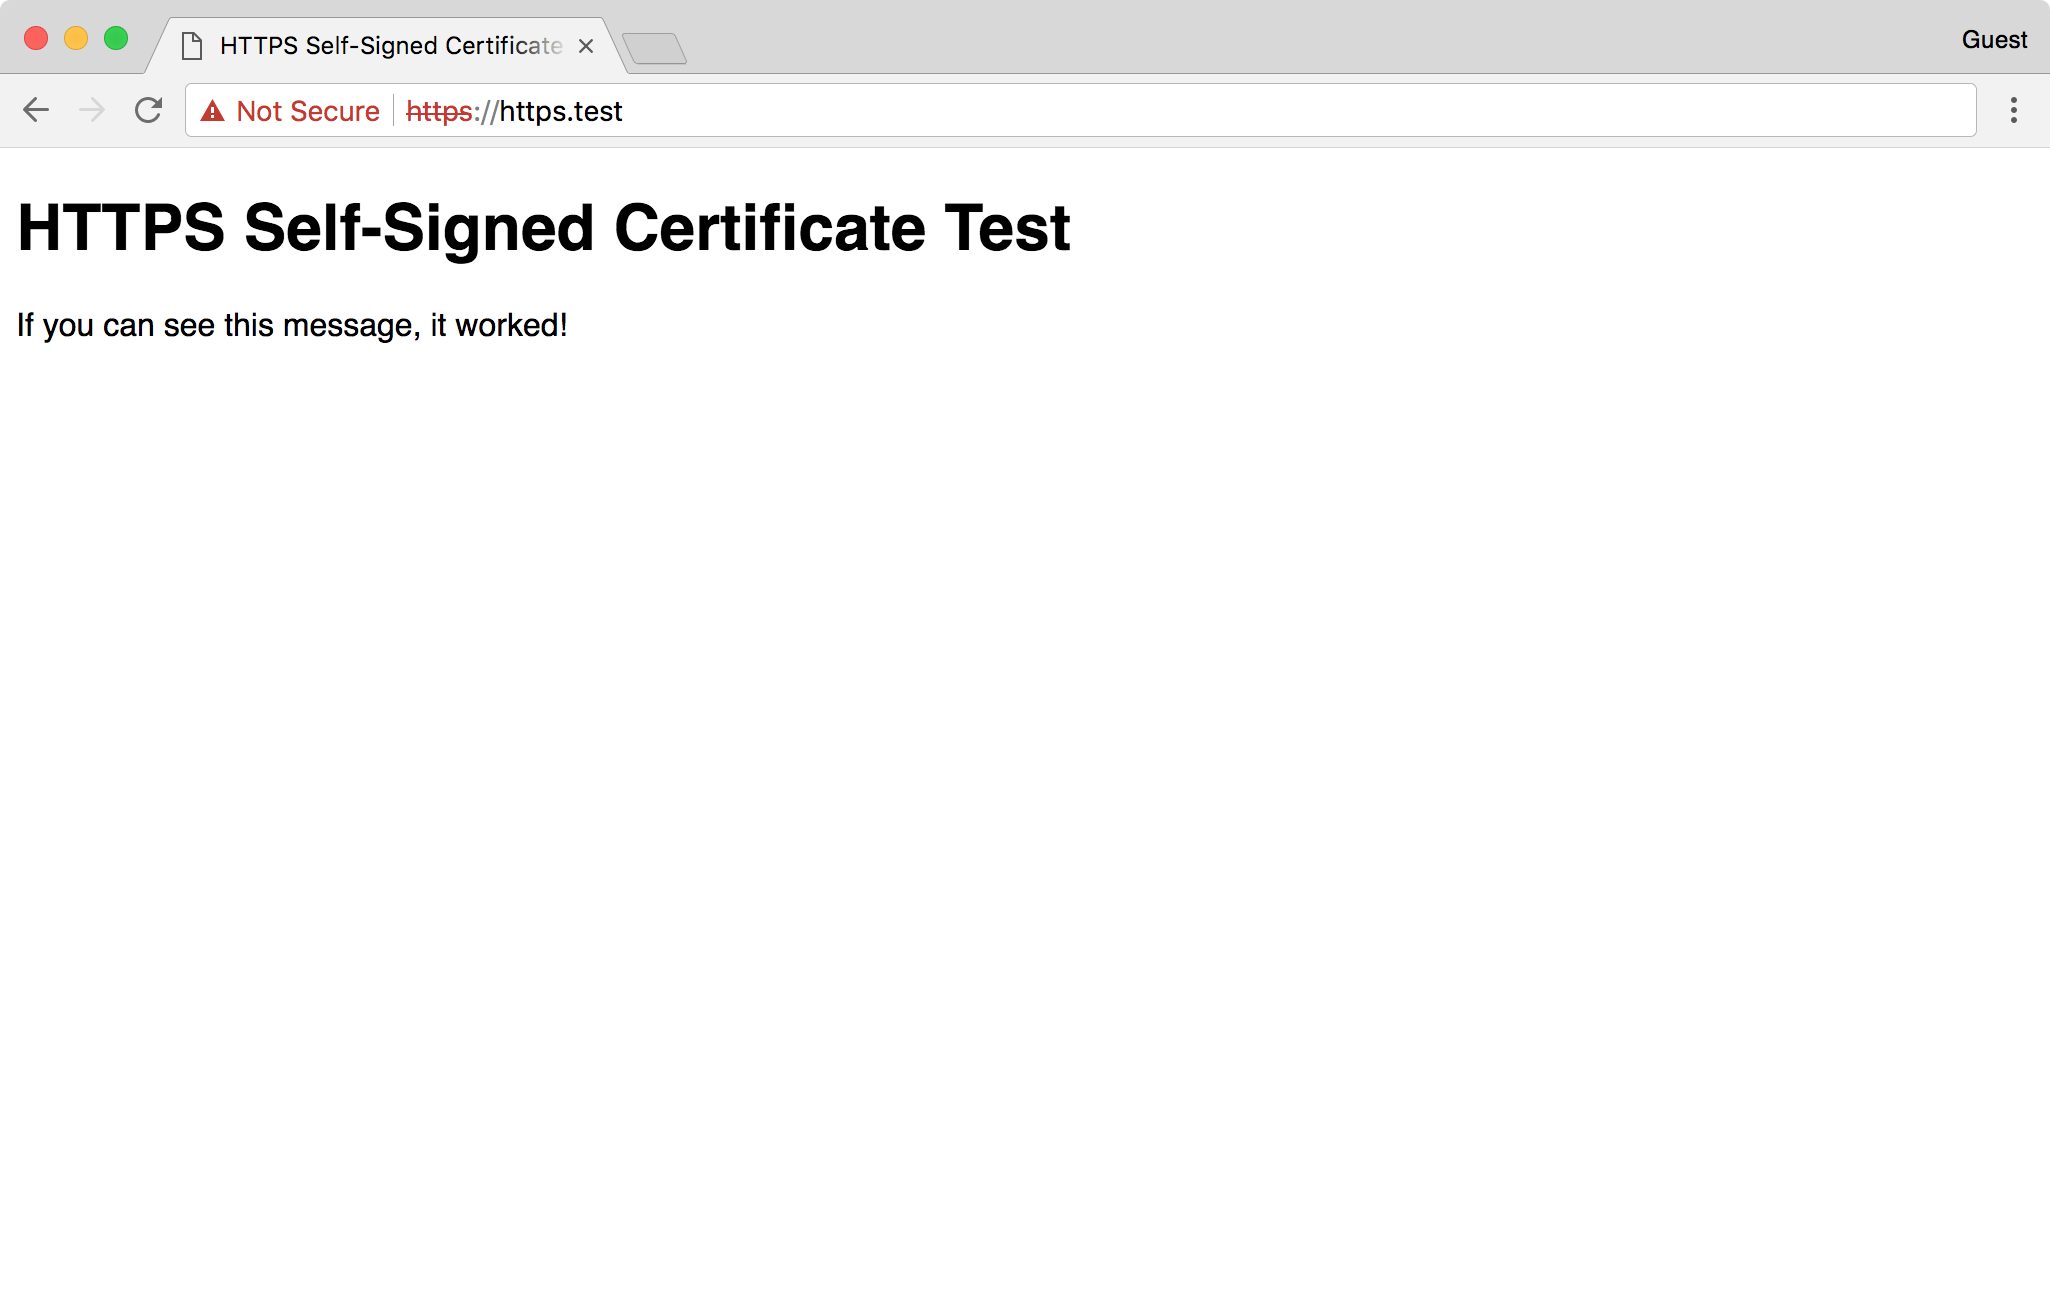
Once you run this playbook, if there were no errors, you should be able to securely access https://https.test/ (assuming you have a record for that domain in your hosts file pointing to your server’s IP address!). You might receive a security warning since it’s self-signed, but all modern browsers and HTTPS-enabled tools should now be able to load the site over an encrypted connection!
Automating Let’s Encrypt with Ansible for free Certs
Self-signed certs are helpful in making sure certain environments can be accessed via HTTPS, but they have a number of downsides, the major one being that every visitor has to confirm a security exception the first time they visit, and similarly command line tools like curl and HTTP libraries usually fail when they encounter a self-signed cert, unless you specifically ignore cert trust settings (which is a security risk).
It’s usually best to use a valid certificate from one of the trusted Certificate Authorities (CAs).
Traditionally, you had to give some money to a Certificate Authority (CA) and work through a mostly-manual process to acquire a certificate. You can still do this, and there are use cases where this is still the best option, but Let’s Encrypt took the world of HTTPS certificates by storm by offering free, easy-to-automate certificates to everyone, with the goal of creating “a more secure and privacy-respecting Web.”
In this example, we’ll acquire a certificate from Let’s Encrypt and set up auto-renewal (since Let’s Encrypt certs are only valid for 90 days) on an Ubuntu server. There’s a fully tested version of this example included in this book’s GitHub repository: HTTPS Let’s Encrypt Demo.
Use Galaxy roles to get things done faster
Instead of writing all the automation ourselves, we can rely on some roles from Ansible Galaxy to do the heavy lifting. Create a requirements.yml file in a new project directory, containing:
1 ---
2 roles:
3   - name: geerlingguy.firewall
4   - name: geerlingguy.certbot
5   - name: geerlingguy.nginx
We’ll use the geerlingguy.firewall role to secure unused ports on the server, geerlingguy.certbot to acquire and set up autorenewal of Let’s Encrypt certs, and nginx to configure a web server to serve content over HTTPS.
The geerlingguy.certbot role is the heart of the operation; here’s how it works:
- First, it either installs Certbot from the system packages or from source, depending on the value of
certbot_install_from_source. Source installs are usually more usable since Certbot sometimes adds helpful features that will never be backported into system packages. - Then it creates a certificate if configured via
certbot_create_if_missingand if the certificate(s) specified incertbot_certsdo not yet exist. It creates the certificates using thecertbot_create_commandand can also stop and start certain services while the certificates are being created. - Finally, if
certbot_auto_renewistrue, it sets up a cron job for certificate renewal, using thecertbot renewcommand along with the options passed in viacertbot_auto_renew_options. Auto renewal is one of the main benefits of Let’s Encrypt, because as long as your renewal process is working, you’ll never wake up to an outage due to an expired certificate again!
Once we have the requirements file set up, create an ansible.cfg file in the project directory to tell Ansible where to store and use the downloaded roles:
1 [defaults]
2 roles_path = ./roles
Install the required roles with: ansible-galaxy install -r requirements.yml.
Create the playbook
Add a main.yml playbook to the project directory. This playbook will target servers running Ubuntu’s minimal distribution (which may not include Python), so we need to do a couple special things to make sure Ansible can operate on the server in pre_tasks. Then we’ll run the three roles we downloaded from Ansible Galaxy, and configure Nginx to serve a simple web page using a Let’s Encrypt certificate.
First things first, start the play on all the letsencrypt hosts, and since we might have to install Python to gather facts about the server for Ansible to use, disable the initial gather_facts:
1 ---
2 - hosts: letsencrypt
3   become: true
4
5   vars_files:
6     - vars/main.yml
We will also need to perform most tasks using sudo (since we have to modify the system, configure Nginx, etc.), so become: true is necessary. Finally, to add the configuration for certificate generation, firewall configuration, and Nginx, we’ll put all the variables in a vars/main.yml file.
In pre_tasks in main.yml, update Apt’s caches since we want the freshest package data available when installing software:
 8   pre_tasks:
 9     - name: Ensure apt cache is updated.
10       apt: update_cache=true cache_valid_time=600
Now, it’s time for the meat of this playbook, the roles. Call each one:
12   roles:
13     - geerlingguy.firewall
14     - geerlingguy.nginx
15     - geerlingguy.certbot
Since the roles will be doing the heavy lifting (yay for easy-to-read playbooks!), we tell them what to do via variables in vars/main.yml:
 1 ---
 2 # Firewall settings.
 3 firewall_allowed_tcp_ports:
 4   - "22"
 5   - "80"
 6   - "443"
 7
 8 # Nginx settings.
 9 nginx_vhosts: []
10 nginx_remove_default_vhost: true
11 nginx_ppa_version: stable
12 nginx_docroot: /var/www/html
13
14 # Let's Encrypt certificate settings.
15 certbot_create_if_missing: true
16 certbot_admin_email: "{{ letsencrypt_email }}"
17 certbot_certs:
18   - domains:
19       - "{{ inventory_hostname }}"
By section:
- For a typical webserver, we need port
22for SSH access, port80for unencrypted HTTP access (Let’s Encrypt needs this to operate using it’s default verification mechanism), and port443for encrypted HTTPS access. - For Nginx, we will configure our own custom virtual host in a bit, so we make sure the default vhost is removed, and we’ll also install the latest version of Nginx from the Nginx Ubuntu PPA. We added an extra variable
nginx_docrootto tell our own automation code where to put a test web page and serve it via Nginx. - The Certbot role only requires a few variables to ensure a certificate is added:
-
certbot_create_if_missing: The role will check if the certificate exists, and if it doesn’t (e.g. on the first playbook run) it will create it. If it does exist, it will be idempotent and make no changes. -
certbot_admin_email: Let’s Encrypt lets you associate an email address with every certificate it generates, and uses this email address to notify the owner of any problems with the certificate, like impending expiration due to a server issue. -
certbot_certs: You can add one or more certificates using this list; and each certificate can cover one or more domains using Subject Alternative Name (SAN) certificates.
-
Two of the Jinja variables used in the vars file are not defined in vars—rather, they will come from the inventory. We’ll set that up soon.
Now that we have the playbook configuring an HTTP/S-ready firewall, a Let’s Encrypt certificate generated by Certbot, and a barebones Nginx web server, we need to configure Nginx to serve some content, and to serve it over HTTPS using the Let’s Encrypt certificate.
So for the last part of the playbook, we need to:
- Ensure the
nginx_docrootdirectory exists. - Create and copy over a sample
index.htmlfile to serve from that document root. - Create and copy over a Nginx server configuration which directs all traffic to HTTPS and serves the traffic using the generated Let’s Encrypt certificate.
To make sure the nginx_docroot exists, add a task to the tasks section of the playbook:
17   tasks:
18     - name: Ensure docroot exists.
19       file:
20         path: "{{ nginx_docroot }}"
21         state: directory
Now we need an HTML file inside the docroot so Nginx can serve it, otherwise Nginx will return a 404 Not Found. Create a simple HTML file named files/index.html in your project directory, with the following contents:
 1 <!DOCTYPE html>
 2 <html>
 3 <head>
 4   <title>HTTPS Let's Encrypt Test</title>
 5   <style>* { font-family: Helvetica, Arial, sans-serif }</style>
 6 </head>
 7 <body>
 8   <h1>HTTPS Let's Encrypt Test</h1>
 9     <p>If you can see this message, it worked!</p>
10 </body>
11 </html>
Then add a copy task in main.yml to copy the file into place after the docroot task:
23     - name: Copy example index.html file in place.
24       copy:
25         src: files/index.html
26         dest: "{{ nginx_docroot }}/index.html"
27         mode: 0755
Finally, we need to configure Nginx with two server blocks; one to redirect HTTP requests to HTTPS, and the other to serve HTTPS traffic using the Let’s Encrypt certificates. Create a Nginx configuration template in templates/https-letsencrypt.conf.j2 with the following:
 1 # HTTPS server configuration.
 2
 3 # Redirect HTTP traffic to HTTPS.
 4 server {
 5     listen 80 default_server;
 6     server_name _;
 7     index index.html;
 8     return 301 https://$host$request_uri;
 9 }
10
11 # Serve HTTPS traffic using the Let's Encrypt certificate.
12 server {
13     listen 443 ssl default_server;
14     server_name {{ inventory_hostname }};
15     root {{ nginx_docroot }};
16
17     ssl_certificate /etc/letsencrypt/live/{{ inventory_hostname }}/full\
18 chain.pem;
19     ssl_certificate_key /etc/letsencrypt/live/{{ inventory_hostname }}/\
20 privkey.pem;
21 }
The first server block configures a default port 80 server which redirects all traffic on port 80, for any incoming request, to the same URL, but with https://. This is a handy way to force all traffic to SSL by default if you’re using Nginx.
The second server block configures a default port 443 server which handles all HTTPS traffic.
It uses the inventory_hostname to tell Nginx what domain should be used to serve traffic, and it sets the document root to the nginx_docroot.
Finally, it tells Nginx to use the certificate and key inside the default Let’s Encrypt generated certificate path, which is always /etc/letsencrypt/live/[domain]/*.pem.
Add a task templating this Jinja template to a Nginx config file in main.yml, making sure to restart Nginx when the template is created or modified:
29     - name: Copy Nginx server configuration in place.
30       template:
31         src: templates/https-letsencrypt.conf.j2
32         dest: /etc/nginx/sites-enabled/https-letsencrypt.conf
33         mode: 0644
34       notify: restart nginx
At this point, we have a complete playbook. It should set up a firewall, create a certificate, and configure Nginx to serve a web page using the certificate. But we don’t have a server to run the playbook against!
Create a server and configure DNS
Let’s Encrypt generates certificates for domains only after verifying domain ownership. The Internet would be very insecure if Let’s Encrypt allowed any random person to generate valid certificates for a domain like apple.com or google.com!
The easiest way to verify domain ownership to Let’s Encrypt is to ensure your server is accessible over the public Internet. For internal servers, Let’s Encrypt might not be the best option (though in some cases it can be made to work).
In Chapter 9, an example was provided for how to provision servers automatically via Ansible. For your own project, you may want to automate the process of initial server provisioning using Ansible, Terraform, or some other automation tool. But for this example, you just need to make sure a server is running which is reachable via the public Internet. You also need to point a domain at it (e.g. subdomain.example.com).
Once you’ve done that, and can confirm you can SSH into the server at the actual domain name (e.g. ssh myuser@subdomain.example.com), then you’re ready to point the playbook at the server and configure everything via Ansible.
Point the playbook inventory at the server
Assuming your server is reachable at subdomain.example.com, and your SSH username is myuser, create an inventory file in the project directory with the following contents:
1 [letsencrypt]
2 subdomain.example.com
3
4 [letsencrypt:vars]
5 ansible_user=myuser
6 letsencrypt_email=webmaster@example.com
Now that the playbook knows how to connect to your public server, it’s time to try it out. First, make sure all the required Galaxy roles are installed:
Then run the playbook:
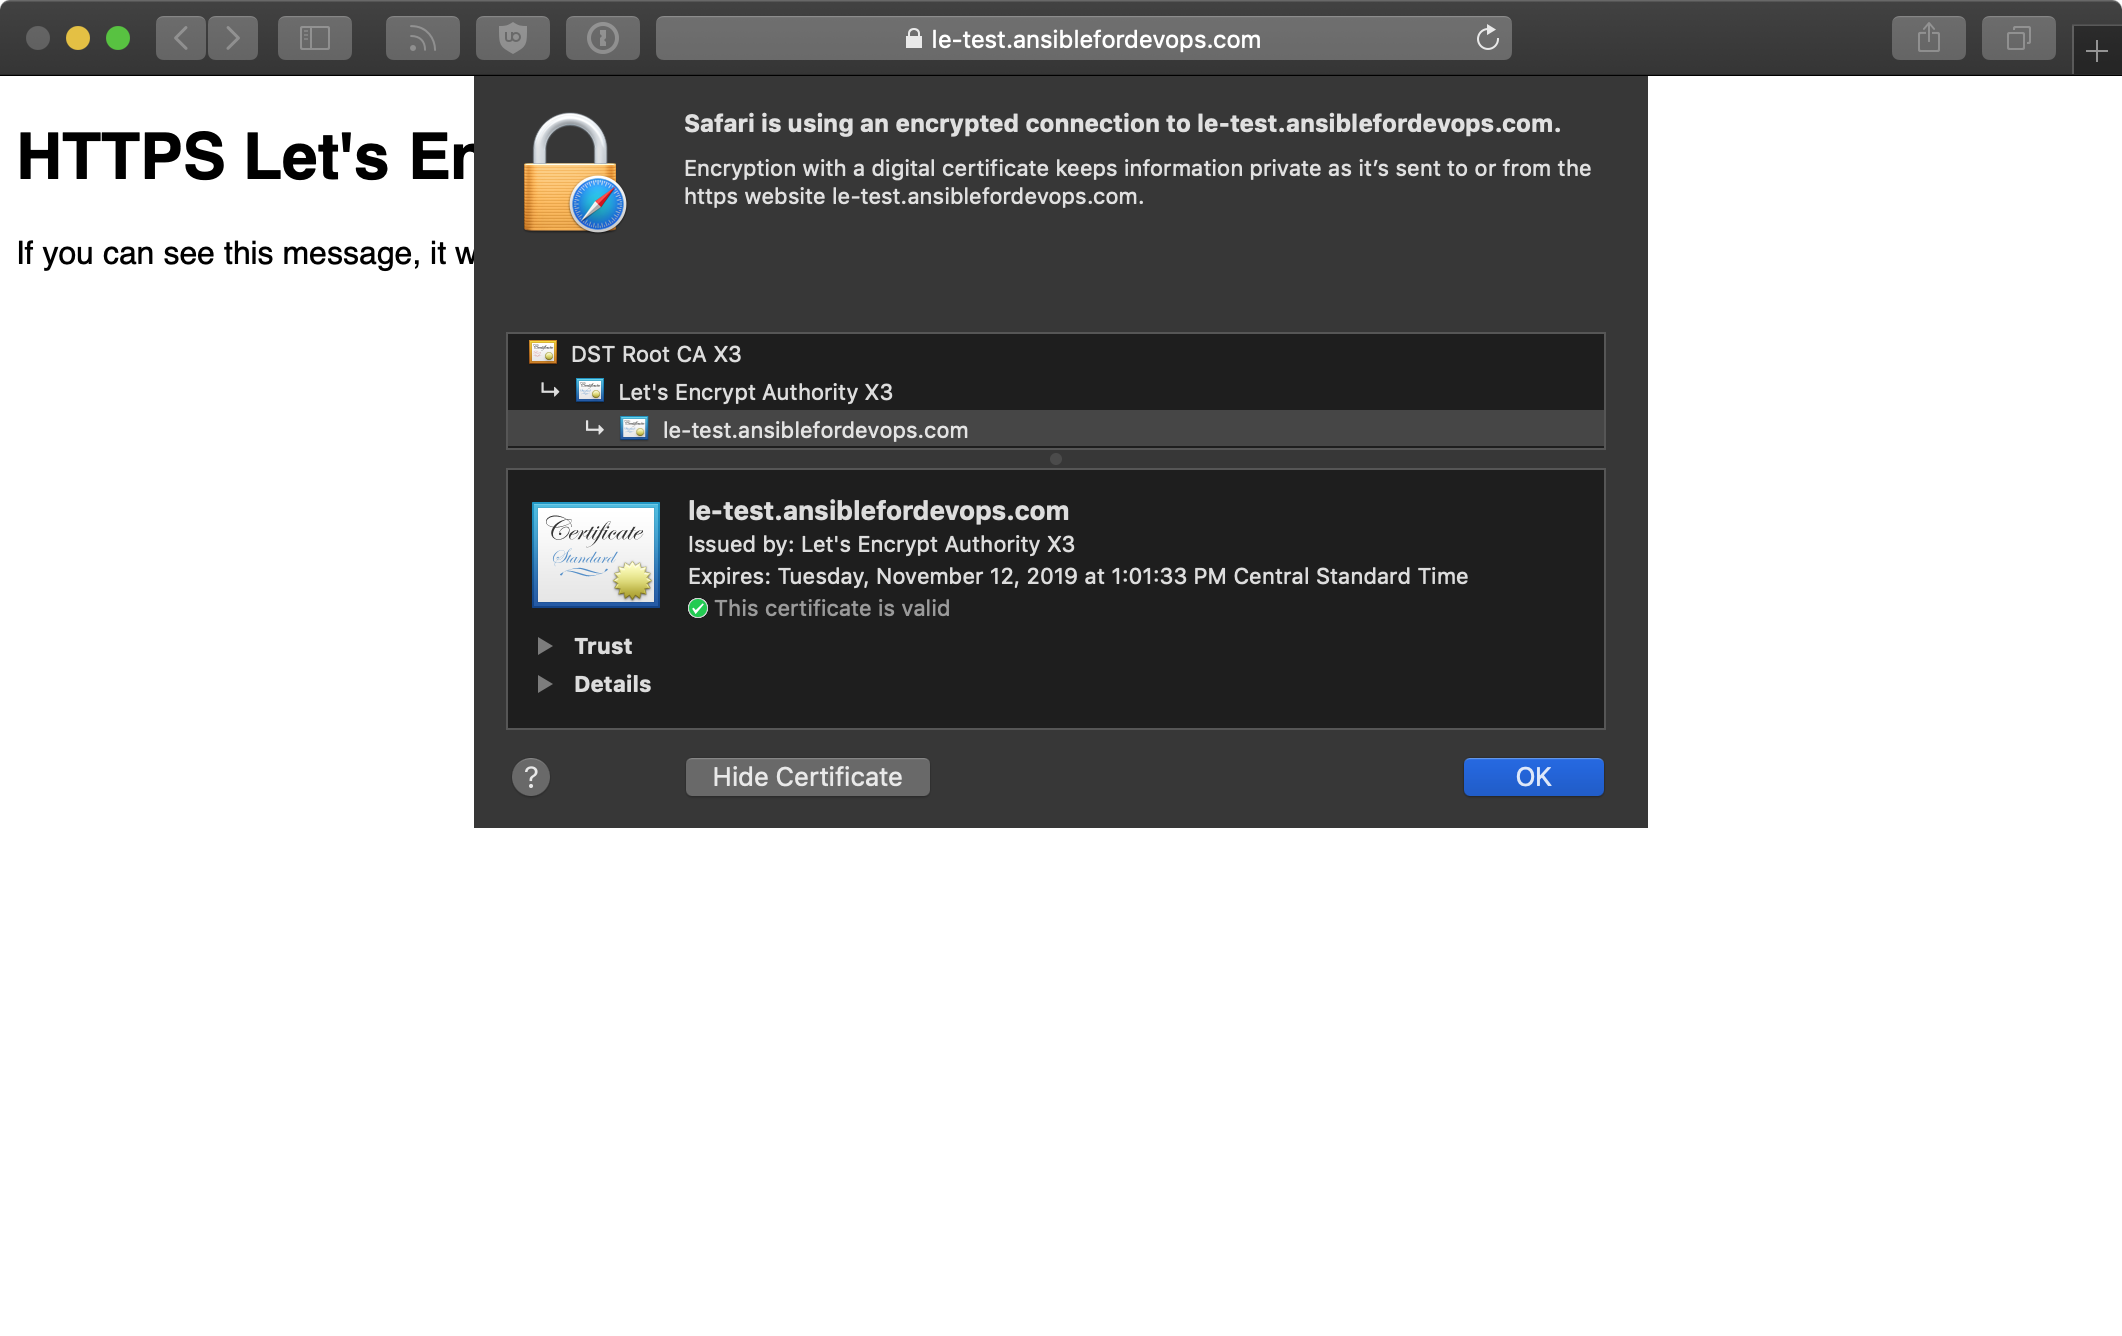
After a couple minutes, assuming Let’s Encrypt could reach your server at subdomain.example.com on port 80, you should be able to access the index.html webpage created earlier over HTTPS.
Access your server over HTTPS!
Visit https://subdomain.example.com/ and you should see something like:
Automating free certificates with Let’s Encrypt can be fun, but make sure you’re aware of Let’s Encrypt rate limits before you go ahead and automate certs for 3,000 of your subdomains at once!
Configuring Nginx to proxy HTTP traffic and serve it over HTTPS
One common problem you may encounter is an old web application or service which is no longer updated but must continue running, and the need for HTTPS encryption (whether for SEO or security compliance).
You could use a third party service like Cloudflare to proxy all traffic through HTTPS, but you’d still have a connection over the public Internet from Cloudflare’s network to your backend server that’s unencrypted. Even if you’re using a CDN, it’s best to encrypt the traffic all the way to as close to your application server as possible.
And that’s where Nginx comes in! There are other tools which can do the same thing, but Nginx is easy to configure as an HTTPS proxy server for HTTP backends.
Modify the Nginx configuration to proxy traffic
We’re going to use the exact same playbook and configuration from the self-signed certificate example earlier in this chapter, with two small modifications. The adjusted playbook is available in this book’s GitHub repository: HTTPS Nginx Proxy Demo VM. There are only two small changes needed to set up and test Nginx proxying HTTPS traffic to an HTTP backend application:
- Instead of serving traffic directly from Nginx, let Nginx proxy requests to a backend server running on port 8080.
- Run a backend HTTP server on port 8080 using Python.
First, configure the port 443 server block to proxy traffic to another service running locally on port 8080:
11 # Proxy HTTPS traffic using a self-signed certificate.
12 server {
13     listen 443 ssl default_server;
14     server_name {{ server_hostname }};
15
16     location / {
17         include /etc/nginx/proxy_params;
18         proxy_pass          http://localhost:8080;
19         proxy_read_timeout  90s;
20         proxy_redirect      http://localhost:8080 {{ server_hostname }};
21     }
22
23     ssl_certificate {{ certificate_dir }}/{{ server_hostname }}/fullcha\
24 in.pem;
25     ssl_certificate_key {{ certificate_dir }}/{{ server_hostname }}/pri\
26 vkey.pem;
27 }
All that’s been done is the removal of the root directive, which was replaced with the location directive. This particular location directive tells Nginx to proxy all requests to any path (/ includes everything) to the address http://localhost:8080, with a 90 second backend timeout.
This assumes there’s a backend HTTP service running on port 8080, though! So, the second step is to run something on port 8080. Luckily, since we already have Python and a web root, we can use Python to run an HTTP server with a very simple CLI command:
You can run that command interactively, or if you’re automating it in the Ansible playbook from earlier, you can add a task after the “Copy example index.html file in place.” task:
33     - name: Start simple python webserver on port 8080.
34       shell: >
35         python3 -m http.server 8080 --directory {{ nginx_docroot }} &
36       changed_when: false
37       async: 45
38       poll: 0
Note the use of &, async and poll to fire and forget the command, so it can run in the background forever. It is not a good idea to run applications like this in production, but for demonstration purposes it’s adequate to verify Nginx is proxying HTTPS requests correctly.
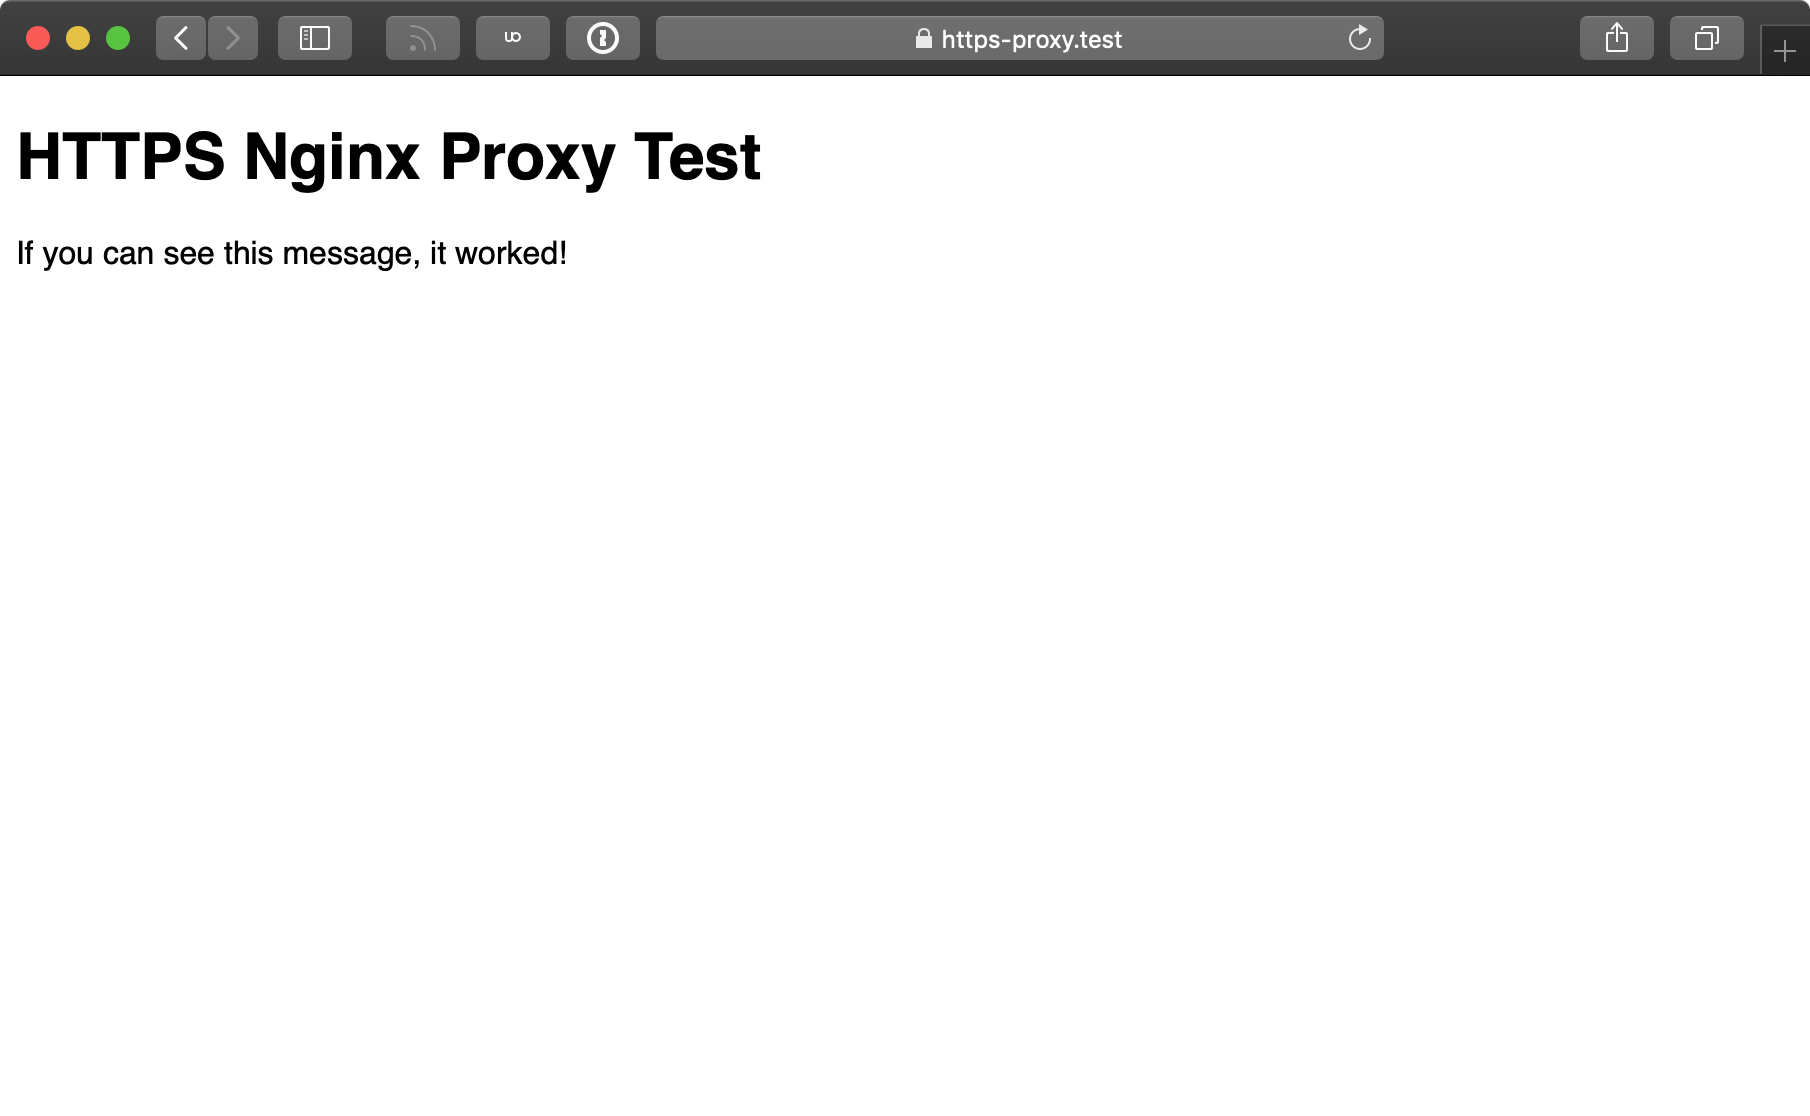
Now that a server is running on port 8080, you should see Nginx proxying requests successfully:
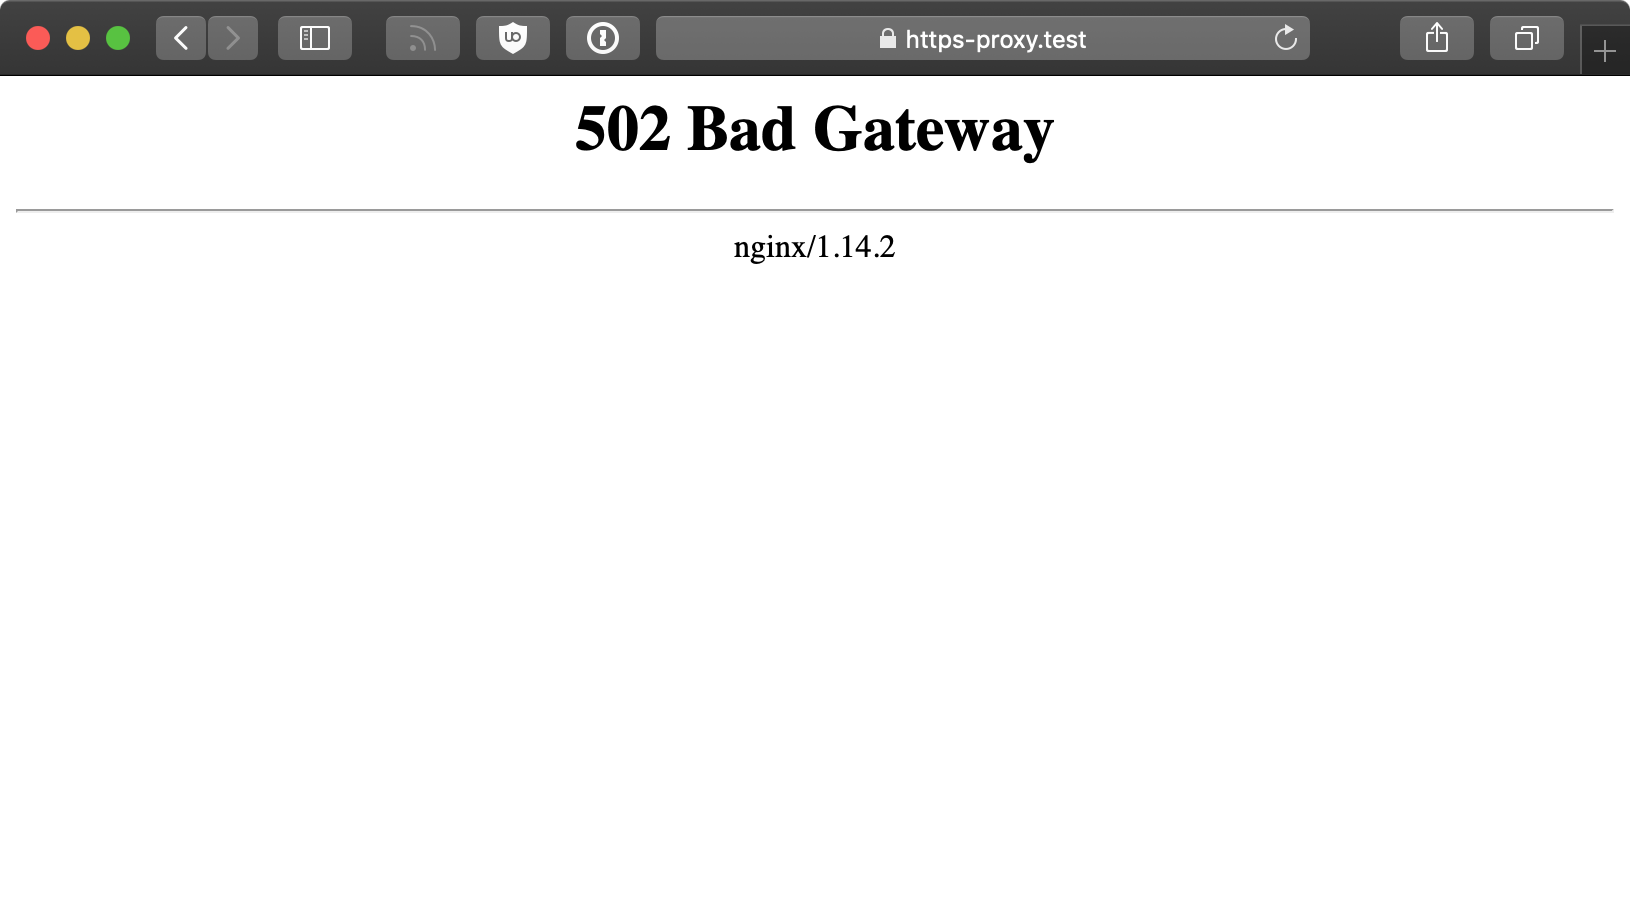
If you log into the server and kill the Python process serving HTTP traffic on port 8080, then Nginx will still attempt to proxy traffic, but will return a 502 Bad Gateway because the backend service is unavailable:
Once you learn to automate HTTPS certificates with Ansible and proxy backend services with Nginx (or another suitable HTTPS-aware proxy), it becomes possible to adopt HTTPS everywhere, no matter what kind of web applications you run.
Summary
HTTPS is now an essential feature of any public-facing website and application, and it’s fairly standard to use it on internal services too. Ansible automates the process of encrypting all your HTTP traffic with TLS certificates, no matter the certificate type or use case.