Chapter 13 - Testing and CI for Ansible Content
Before deploying any infrastructure changes, you should test the changes in a non-production environment (just like you would with application releases). At a minimum, you should have the ability to run a playbook in a local or development environment to make sure it does what you expect.
Since all your infrastructure is defined in code, you can automating unit, functional, and integration tests on your infrastructure, just like you do for your applications.
This chapter covers different levels of infrastructure testing, and highlights tools and techniques that help you test and develop Ansible content.
Unit, Integration, and Functional Testing
When determining how you should test your infrastructure, you need to understand the different kinds of testing, and then determine the kinds of testing on which you should focus more effort.
Unit testing, when applied to applications, is testing of the smallest units of code (usually functions or class methods). In Ansible, unit testing would typically apply to individual playbooks. You could run individual playbooks in an isolated environment, but it’s often not worth the effort. What is worth your effort is at least checking the playbook syntax, to make sure you didn’t just commit a YAML file that will break an entire deployment because of a missing quotation mark or whitespace issue!
Integration testing, which is definitely more valuable when it comes to Ansible, is the testing of small groupings of individual units of code, to make sure they work correctly together. Breaking your infrastructure definition into many task-specific roles and playbooks allows you to do this; if you’ve structured your playbooks so they have no or limited dependencies, you could test each role individually in a fresh virtual machine, before you use the role as part of a full infrastructure deployment.
Functional testing involves the whole shebang. Basically, you set up a complete infrastructure environment, and then run tests against it to make sure everything was successfully installed, deployed, and configured. Ansible’s own reporting is helpful in this kind of testing, and there are external tools available to test infrastructure even more deeply.
It is often possible to perform all the testing you need on your own local workstation, using Virtual Machines (as demonstrated in earlier chapters), using tools like VirtualBox or VMWare. And with most cloud services providing robust control APIs and hourly billing, it’s inexpensive and just as fast to test directly on cloud instances mirroring your production infrastructure!
I like to think of testing as a spectrum—just like most things in life, your project is unique, and might not need to integrate all the techniques discussed in this chapter. The following graphic is from a presentation I gave at AnsibleFest in 2018:
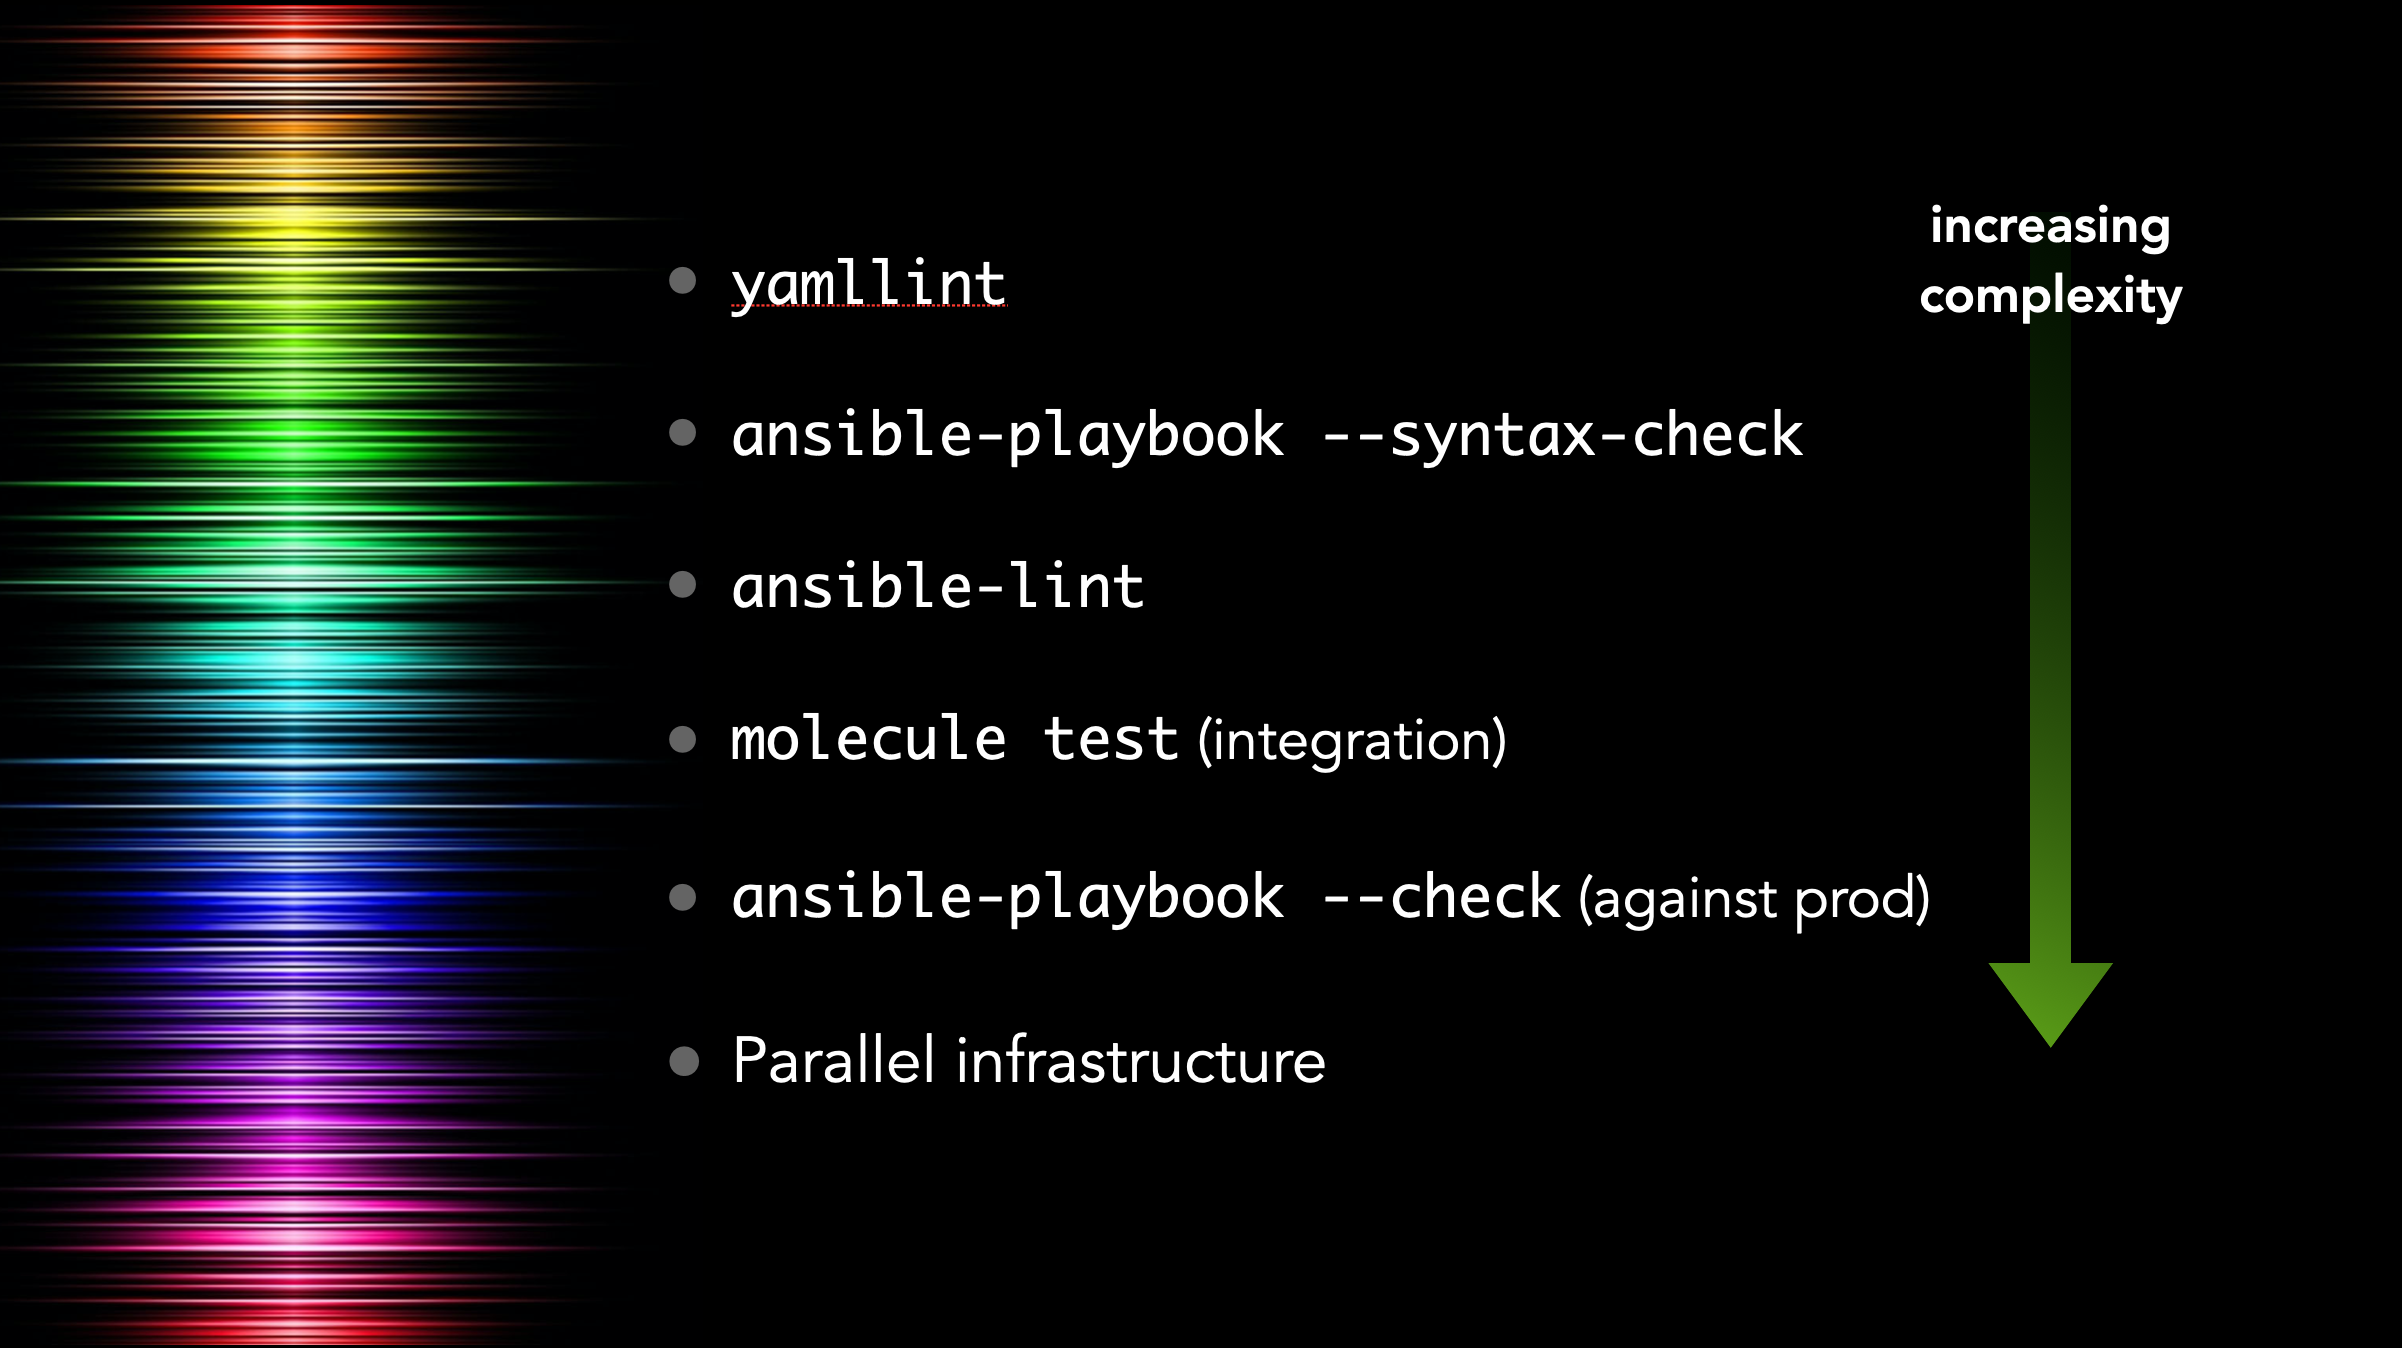
Each technique discussed in this chapter provides more value than the previous one, but is also more complex and might not be worth the additional setup and maintenance burden, depending on your playbook.
We’ll begin with the easiest and most basic tests, and progress to full-fledged functional testing methods and test automation.
Debugging and Asserting
For most playbooks, testing configuration changes and the result of commands being run as you go is all the testing you need. And having tests run during your playbook runs using some of Ansible’s built-in utility modules means you have immediate assurance the system is in the correct state.
If at all possible, you should try to bake all simple test cases (e.g. comparison and state checks) into your playbooks. Ansible has three modules that simplify this process.
The debug module
When actively developing an Ansible playbook, or even for historical logging purposes (e.g. if you’re running Ansible playbooks using Tower or another CI system), it’s often handy to print values of variables or output of certain commands during the playbook run.
For this purpose, Ansible has a debug module, which prints variables or messages during playbook execution.
As an extremely basic example, here are two of the ways I normally use debug while building a playbook:
 1 ---
 2 - hosts: 127.0.0.1
 3   gather_facts: no
 4   connection: local
 5
 6   tasks:
 7     - name: Register the output of the 'uptime' command.
 8       command: uptime
 9       register: system_uptime
10
11     - name: Print the registered output of the 'uptime' command.
12       debug:
13         var: system_uptime.stdout
14
15     - name: Print a message if a command resulted in a change.
16       debug:
17         msg: "Command resulted in a change!"
18       when: system_uptime is changed
Running this playbook gives the following output:
Debug messages are helpful when actively debugging a playbook or when you need extra verbosity in the playbook’s output, but if you need to perform an explicit test on some variable, or bail out of a playbook for some reason, Ansible provides the fail module, and its more terse cousin, assert.
The fail and assert modules
Both fail and assert, when triggered, will abort the playbook run, and the main difference is in the simplicity of their usage and what is output during a playbook run. To illustrate, let’s look at an example:
 1 ---
 2 - hosts: 127.0.0.1
 3   gather_facts: no
 4   connection: local
 5
 6   vars:
 7     should_fail_via_fail: true
 8     should_fail_via_assert: false
 9     should_fail_via_complex_assert: false
10
11   tasks:
12     - name: Fail if conditions warrant a failure.
13       fail:
14         msg: "There was an epic failure."
15       when: should_fail_via_fail
16
17     - name: Stop playbook if an assertion isn't validated.
18       assert:
19         that: "should_fail_via_assert != true"
20
21     - name: Assertions can have contain conditions.
22       assert:
23         that:
24           - should_fail_via_fail != true
25           - should_fail_via_assert != true
26           - should_fail_via_complex_assert != true
Switch the boolean values of should_fail_via_fail, should_fail_via_assert, and should_fail_via_complex_assert to trigger each of the three fail/assert tasks, to see how they work.
A fail task will be reported as skipped if a failure is not triggered, whereas an assert task which passes will show as an ok task with an inline message in Ansible’s default output:
For most test cases, debug, fail, and assert are all you need to ensure your infrastructure is in the correct state during a playbook run.
Linting YAML with yamllint
Once you have a playbook written, it’s a good idea to make sure the basic YAML syntax is correct. YAML parsers can be forgiving, but many of the most common errors in Ansible playbooks, especially for beginners, is whitespace issues.
yamllint is a simple YAML lint tool which can be installed via Pip:
Let’s build an example playbook, and lint it to see if there are any errors:
 1 - hosts: localhost
 2   gather_facts: no
 3   connection: local
 4
 5   tasks:
 6     - name: Register the output of the 'uptime' command.
 7       command: uptime
 8       register: system_uptime # comment
 9
10     - name: Print the registered output of the 'uptime' command.
11       debug:
12        var: system_uptime.stdout
If you have yamllint installed, you can run it on any YAML files in the current directory (and subdirectories, recursively), by passing the path . to the command. Let’s do that and see the output:
While it might seem nitpicky at first, over time you realize how important it is to use a specific style and stick with it. It looks better, and can help prevent mistakes from creeping in due to indentation, whitespace, or structural issues.
In this particular case, we can fix some of the errors quickly:
- Add a yaml document start indicator (
---) at the top of the playbook. - Delete the extra space on the
commandline. - Add an extra space before the
# comment. - Make sure the
varline is indented one more space.
But what about the ‘truthy value’ warning? In many Ansible examples, yes or no are used instead of true and false. We can allow that by customizing yamllint with a configuration file.
Create a file in the same directory named .yamllint, with the following contents:
 1 ---
 2 extends: default
 3
 4 rules:
 5   truthy:
 6     allowed-values:
 7       - 'true'
 8       - 'false'
 9       - 'yes'
10       - 'no'
Assuming you fixed the other errors in the playbook, and left gather_facts: no, running yamllint . again should yield no errors.
Performing a --syntax-check
Syntax checking is similarly straightforward, and only requires a few seconds for even larger, more complex playbooks with dozens or hundreds of includes.
When you run a playbook with --syntax-check, the plays are not run; instead, Ansible loads the entire playbook statically and ensures everything can be loaded without a fatal error. If you are missing an imported task file, misspelled a module name, or are supplying a module with invalid parameters, --syntax-check will quickly identify the problem.
Along with yamllint, it’s common to include an ansible-playbook my-playbook.yml --syntax-check in your basic CI tests, and it’s also good to add a syntax check in a pre-commit hook if your playbook is in a Git repository.
Linting Ansible content with ansible-lint
In addition to linting structural YAML issues with yamllint, Ansible tasks and playbooks can be linted using ansible-lint. Many Ansible best practices and a preferred task style can be enforced via linting.
Let’s take the following playbook, for example (called main.yml):
 1 ---
 2 - hosts: localhost
 3   gather_facts: false
 4   connection: local
 5
 6   tasks:
 7     - shell: uptime
 8       register: system_uptime
 9
10     - name: Print the registered output of the 'uptime' command.
11       debug:
12         var: system_uptime.stdout
It looks straightforward, and the YAML syntax passes yamllint without a problem.
But there are some aspects to this playbook which could be improved. Let’s see if ansible-lint can highlight them. Install it via Pip with:
Then run it on the playbook, and observe the output:
Each of the suggestions corresponds to a ‘rule’; all the default rules are listed in Ansible Lint’s documentation.
To fix these issues you would need to do the following:
- Add a
nameto theuptimetask, to resolve the502rule violation. - Use the
commandmodule instead ofshellfor theuptimetask, to resolve the305rule violation. You should only use theshellmodule when you need advanced capabilities like pipes or redirection. - Add
changed_when: falseto theuptimetask, to resolve the301rule violation. Since the task doesn’t change anything on the system, it should be marked as such, to avoid breaking idempotency.
Most of the rules are straightforward, but you might choose to ignore some, if you have good reason to do something in opposition to the default rules.
As with yamllint, you can add a file named .ansible-lint, providing configuration specific to your project. See the ansible-lint Configuration File documentation for available options.
Automated testing and development with Molecule
Everything to this point covers static testing. But the proof is in the pudding—that is, you can’t really verify a playbook works until you actually run it.
But it would be dangerous to run your playbook against your production infrastructure, especially when modifying it or adding new functionality.
I started out running one-off Virtual Machines running in VirtualBox or Amazon EC2 to test my playbooks, but this is tiresome. I would have to do the following every time I wanted to test a playbook:
- Build a new VM.
- Configure SSH so I can connect to it.
- Set up an inventory so the playbook connects to the VM (and not production!).
- Run my Ansible playbook against the VM.
- Test and validate my playbook does what it’s supposed to.
- Delete the VM.
Vagrant can help with this process somewhat, and it is well-suited to the task, but Vagrant can be a little slow, and it doesn’t work well in CI or lightweight environments.
So I started maintaining a shell script which did many of the above steps automatically, using Docker containers, and I could run playbooks and tests in CI or locally. But this was fragile, required a lot of work to maintain in different CI environments. I also realized I was maintaining complex shell scripts to test my simple Ansible automation playbooks—there had to be a simpler way!
And there was: Molecule.
Molecule is a lightweight, Ansible-based tool to help in the development and testing of Ansible playbooks, roles, and collections.
At its most basic level, Molecule does all the six steps identified above, and adds on extra functionality like multiple scenarios, multiple backends, and configurable verification methods.
And the best part? Everything in Molecule is controlled by Ansible playbooks!
Molecule is easy to install:
Testing a role with Molecule
Originally, Molecule was purpose-built for testing Ansible roles. As such, it has built-in role scaffold functionality, which sets up a role just like the ansible-galaxy role init command does, but with a Molecule configuration built-in.
Inside any directory, run the following command to create a new role:
If you cd into the new myrole directory, you’ll see the standard role structure generated by ansible-galaxy, but with one notable addition: the molecule directory.
This directory’s presence indicates there are one or more Molecule scenarios available for testing and development purposes. Let’s take a look at what’s inside the default scenario:
The INSTALL file provides instructions for setting up Molecule to run your tests correctly.
The molecule.yml file configures Molecule and tells it how to run the entire build and test process. We’ll cover the file in more depth later.
The converge.yml file is an Ansible playbook, and Molecule runs it on the test environment immediately after setup is complete. For basic role testing, the Converge playbook just includes the role (in this case, myrole), nothing more.
The verify.yml file is another Ansible playbook, which is run after Molecule runs the converge.yml playbook and tests idempotence. It is meant for verification tests, e.g. ensuring a web service your role installs responds properly, or a certain application is configured correctly.
Assuming you have Docker installed on your computer, you can run Molecule’s built-in tests on the default role immediately:
The test command runs through the full gamut of Molecule’s capabilities, including setting up a test environment, running any configured lint tools, installing any Ansible Galaxy requirements, running the converge playbook, running the verify playbook, and then tearing down the test environment (regardless of tests passing or failing).
You can perform a subset of Molecule’s tasks using other options, for example:
This will run through all the same steps as the test command, but will stop execution after the converge playbook runs, and leave the test environment running.
This is extremely useful for role development and debugging.
For automation development, I usually have a workflow like the following:
- Create a new role with a Molecule test environment.
- Start working on the tasks in the role.
- Add a
fail:task where I want to set a ‘breakpoint’, and runmolecule converge. - After the playbook runs and hits my
failtask, log into the environment withmolecule login. - Explore the environment, check my configuration files, do some extra sleuthing if needed.
- Go back to my role, work on the rest of the role’s automation tasks.
- Run
molecule convergeagain. - (If there are any issues or I get my environment in a broken state, run
molecule destroyto wipe away the environment thenmolecule convergeto bring it back again.) - Once I feel satisfied, run
molecule testto run the full test cycle and make sure my automation works flawlessly and with idempotence.
For debugging, I’ll often just run molecule converge, see where my automation breaks, log in with molecule login to figure out the problem (and then fix it), then run molecule converge again until it starts working.
When you’re finished with your development session, tell Molecule to tear down the environment using:
Testing a playbook with Molecule
Molecule’s useful for testing more than just roles. I regularly use Molecule to test playbooks, collections, and even Kubernetes Operators!
Let’s say I have a playbook that sets up an Apache server, with the following contents in main.yml:
---
- name: Install Apache.
  hosts: all
  become: true

  vars:
    apache_package: apache2
    apache_service: apache2

  handlers:
    - name: restart apache
      service:
        name: "{{ apache_service }}"
        state: restarted

  pre_tasks:
    - name: Override Apache vars for Red Hat.
      set_fact:
        apache_package: httpd
        apache_service: httpd
      when: ansible_os_family == 'RedHat'

  tasks:
    - name: Ensure Apache is installed.
      package:
        name: "{{ apache_package }}"
        state: present

    - name: Copy a web page.
      copy:
        content: |
          <html>
          <head><title>Hello world!</title></head>
          <body>Hello world!</body>
          </html>
        dest: "/var/www/html/index.html"
      notify: restart apache

    - name: Ensure Apache is running and starts at boot.
      service:
        name: "{{ apache_service }}"
        state: started
        enabled: true
Because I want to make sure this playbook works on both of the platforms I support—Debian and CentOS, in this case—I want to make sure my Molecule tests cover both platforms.
So first, run molecule init scenario to initialize a default Molecule scenario in the playbook’s folder:
Since we’re going to test a playbook and not a role, we need to clean up some files and make a few changes.
Go ahead and delete the INSTALL.rst file. Then open the converge.yml file, and delete the existing tasks: section. Make the Converge play prepare the environment in its tasks: section, then run the main.yml playbook by importing it:
 1 ---
 2 - name: Converge
 3   hosts: all
 4
 5   tasks:
 6     - name: Update apt cache (on Debian).
 7       apt:
 8         update_cache: true
 9         cache_valid_time: 3600
10       when: ansible_os_family == 'Debian'
11
12 - import_playbook: ../../main.yml
At this point, you can try testing the playbook with Molecule. As I mentioned earlier, I like to use molecule converge when developing, so I can see where something breaks, then fix it, then run molecule converge again to re-run the playbook.
Uh oh, something definitely went wrong if the Apache service can’t be found!
This playbook is pretty simple, though, and it doesn’t seem like there are any errors with it. We should debug this problem by logging into the test environment, and checking out what’s wrong with the httpd service:
[root@instance /]# systemctl status httpd
Failed to get D-Bus connection: Operation not permitted
Ah, it looks like systemd is not working properly. And, rather than lead you down a rabbit hole of trying to debug systemd inside a Docker container, and how to get everything working properly so you can test services running inside containers, I’ll skip to the end and show you how I test my playbooks correctly when they manage services like httpd.
First, clean up the existing environment by exiting the running instance and destroying it:
Adjusting Molecule to use more flexible test containers
Molecule allows almost infinite flexibility, when it comes to configuring the test environment. In our case, we need to be able to test services running in Docker containers, meaning the Docker containers need to be able to run an init system (in this case, systemd).
We also want to test Debian in addition to the default centos container Molecule uses by default, so open the molecule.yml file and edit the platforms section to use a slightly different Docker configuration:
1 platforms:
2   - name: instance
3     image: "geerlingguy/docker-${MOLECULE_DISTRO:-centos8}-ansible:late\
4 st"
5     command: ""
6     volumes:
7       - /sys/fs/cgroup:/sys/fs/cgroup:ro
8     privileged: true
9     pre_build_image: true
This configuration makes four changes to the default Molecule file: one change (the image), and three additions:
- Set the
imageto a dynamically-defined image that I maintain, which has Python and Ansible installed on it, as well as a properly configured systemd, so I can run services inside the container. Molecule allows bash-style variables and defaults, so I set${MOLECULE_DISTRO:-centos8}in the image name. This will allow substitution for other distros, like Debian, later. - Override the
commandMolecule sets for the Docker container, so the container image uses its own preconfiguredCOMMAND, which in this case starts the systemd init system and keeps the container running. - Add a necessary volume mount to allow processes to be managed inside the container.
- Set the
privilegedflag on the container, so systemd can initialize properly.
Now, if you run molecule converge or molecule test, the entire playbook should succeed, and idempotence should also pass.
The last step is to make sure the playbook also runs correctly on Debian-based systems. Since there exists a geerlingguy/docker-debian10-ansible container (see a full list of the Docker Ansible test containers I maintain), you can run the Molecule tests under that operating system as well:
$ MOLECULE_DISTRO=debian10 molecule test
...
    RUNNING HANDLER [restart apache] ******************************

    PLAY RECAP ****************************************************
    instance  : ok=7  changed=4  unreachable=0  failed=0  skipped=1
Verifying a playbook with Molecule
Let’s add one more thing: validation that Apache is actually serving web traffic! Open the verify.yml playbook, and add a task to check whether Apache serves web traffic:
1 ---
2 - name: Verify
3   hosts: all
4
5   tasks:
6   - name: Verify Apache is serving web requests.
7     uri:
8       url: http://localhost/
9       status_code: 200
Run molecule test again, and make sure the validation task succeeds:
test
...
TASK [Verify Apache is serving web requests.] *****************
ok: [instance]
PLAY RECAP ****************************************************
instance : ok=2 changed=0 unreachable=0 failed=0 skipped=0
When developing or debugging with Molecule, you can run only the verify step using molecule verify.
As I’ve stated earlier, you could put this test in the Ansible playbook itself, so the test is always run as part of your automation. But the structure of your tests may dictate adding extra validation into Molecule’s validate.yml playbook, like we did here.
Adding lint configuration to Molecule
As a final step, it’s good to make sure your code follows a consistent code style, so we can enforce it with Molecule by adding a lint configuration to the molecule.yml file:
6 lint: |
7   set -e
8   yamllint .
9   ansible-lint
You can add the lint configuration to any part of the Molecule configuration; you just need to make sure the lint key is one of the top-level keys.
Now you can run all configured lint tools with molecule lint, instead of running yamllint and ansible-lint separately. If you need to override any lint rules, you can add a .yamllint or .ansible-lint file alongside your playbook in the project’s root folder.
Molecule Summary
Molecule is a simple but flexible tool used for testing Ansible roles, playbooks, and collections. The options presented in these examples are only a small subset of what’s possible using Molecule. Later, we’ll configure Molecule to test a role using Continuous Integration, to help your playbooks always be tested and working.
You can find a complete example of this Molecule playbook configuration in this book’s GitHub repository: Molecule Example.
Running your playbook in check mode
One step beyond local integration testing is running your playbook with --check, which runs the entire playbook on your live infrastructure, but without performing any changes. Instead, Ansible highlights tasks that would’ve resulted in a change to show what will happen when you actually run the playbook later.
This is helpful for two purposes:
- To prevent ‘configuration drift’, where a server configuration may have drifted away from your coded configuration. This could happen due to human intervention or other factors. But it’s good to discover configuration drift without forcefully changing it.
- To make sure changes you make to a playbook that shouldn’t break idempotency don’t, in fact, break idempotency. For example, if you’re changing a configuration file’s structure, but with the goal of maintaining the same resulting file, running the playbook with
--checkalerts you when you might accidentally change the live file as a result of the playbook changes. Time to fix your playbook!
When using --check mode, certain tasks may need to be forced to run to ensure the playbook completes successfully: (e.g. a command task that registers variables used in later tasks). You can set check_mode: no to do this:
- name: A task that runs all the time, even in check mode.
  command: mytask --option1 --option2
  register: my_var
  check_mode: no
For even more detailed information about what changes would occur, add the --diff option, and Ansible will output changes that would’ve been made to your servers line-by-line. This option produces a lot of output if check mode makes a lot of changes, so use it conservatively unless you want to scroll through a lot of text!
Automated testing on GitHub using GitHub Actions
GitHub Actions is one of many Continuous Integration (CI) and Continuous Deployment (CD) tools. Others like it include Travis CI, Circle CI, Drone, Jenkins, and Zuul.
I often choose to use the CI tool with the least amount of friction when integrating with my source repository, and because much of my code is hosted on GitHub, GitHub Actions is the easiest to implement! But if, for example, you use GitLab, it would be easier to use GitLab CI.
Following GitHub Actions’ setup guide, the first step in setting up an Actions workflow is to create a workflow file in your repository.
In this book’s example, we’ll work from the same Molecule playbook example we created earlier. This example presumes you have a playbook like the one created earlier in the root directory of a code repository that is on GitHub.
Create a new .github directory alongside the playbook, and inside that directory, create a workflows directory. Finally, create a workflow file named ci.yml inside the workflows directory.
You should have a directory structure like the following:
As with most other operations tools these days, GitHub Actions uses YAML for its configuration syntax, so we’ll create a ‘CI’ (for ‘Continuous Integration’) workflow. Open the ci.yml file and add a name for the workflow:
1 ---
2 name: CI
The first thing you should do in a GitHub Actions workflow is define when the workflow should run. By default, it will run on every branch and pull request, but for most of my projects, I like to have it run only on pushes and merges to the master branch, as well as on any pull_request:
3 'on':
4   pull_request:
5   push:
6     branches:
7       - master
Next, you define a list of jobs to run in the workflow.
 9 jobs:
10
11   test:
12     name: Molecule
13     runs-on: ubuntu-latest
This is a job with the name Molecule (that’s the label that will show up in GitHub’s interface), and it will run on the latest version of GitHub Actions’ Ubuntu build environment. You can currently run jobs on a few different platforms, including Windows, macOS, and Ubuntu Linux.
We also want to define a matrix of Linux distributions to test against; earlier, we set up the playbook to be testable with either centos8 or debian10, so we can add a test matrix under the jobs.test.strategy.matrix key:
14     strategy:
15       matrix:
16         - distro: centos8
17         - distro: debian10
GitHub Actions will run a job once for each of the defined options in the build matrix—in our case, one time with a distro variable set to centos8, and one time with distro set to debian10.
Finally, we come to the meat of the workflow job, the steps that run once the environment is ready:
20     steps:
21       - name: Check out the codebase.
22         uses: actions/checkout@v2
23
24       - name: Set up Python 3.
25         uses: actions/setup-python@v2
26         with:
27           python-version: '3.x'
28
29       - name: Install test dependencies.
30         run: pip3 install molecule docker yamllint ansible-lint
31
32       - name: Run Molecule tests.
33         run: molecule test
34         env:
35           PY_COLORS: '1'
36           ANSIBLE_FORCE_COLOR: '1'
37           MOLECULE_DISTRO: ${{ matrix.distro }}
The first two steps set up the build environment using community-supported GitHub Actions to check out the repository code into the current directory, then set up Python.
The third step (these look a lot like Ansible tasks, don’t they?) runs a command, which installs all our test dependencies via pip3.
The final step runs molecule test, and passes in three environment variables:
-
PY_COLORS: '1': This forces Molecule to use colorized output in the CI environment. Without it, all the output would be white text on a black background. -
ANSIBLE_FORCE_COLOR: '1': This does the same thing asPY_COLORS, but for Ansible’s playbook output. -
MOLECULE_DISTRO: ${{ matrix.distro }}: This sets an environment variable with the currentdistrobeing run; so once forcentos8and another time fordebian10.
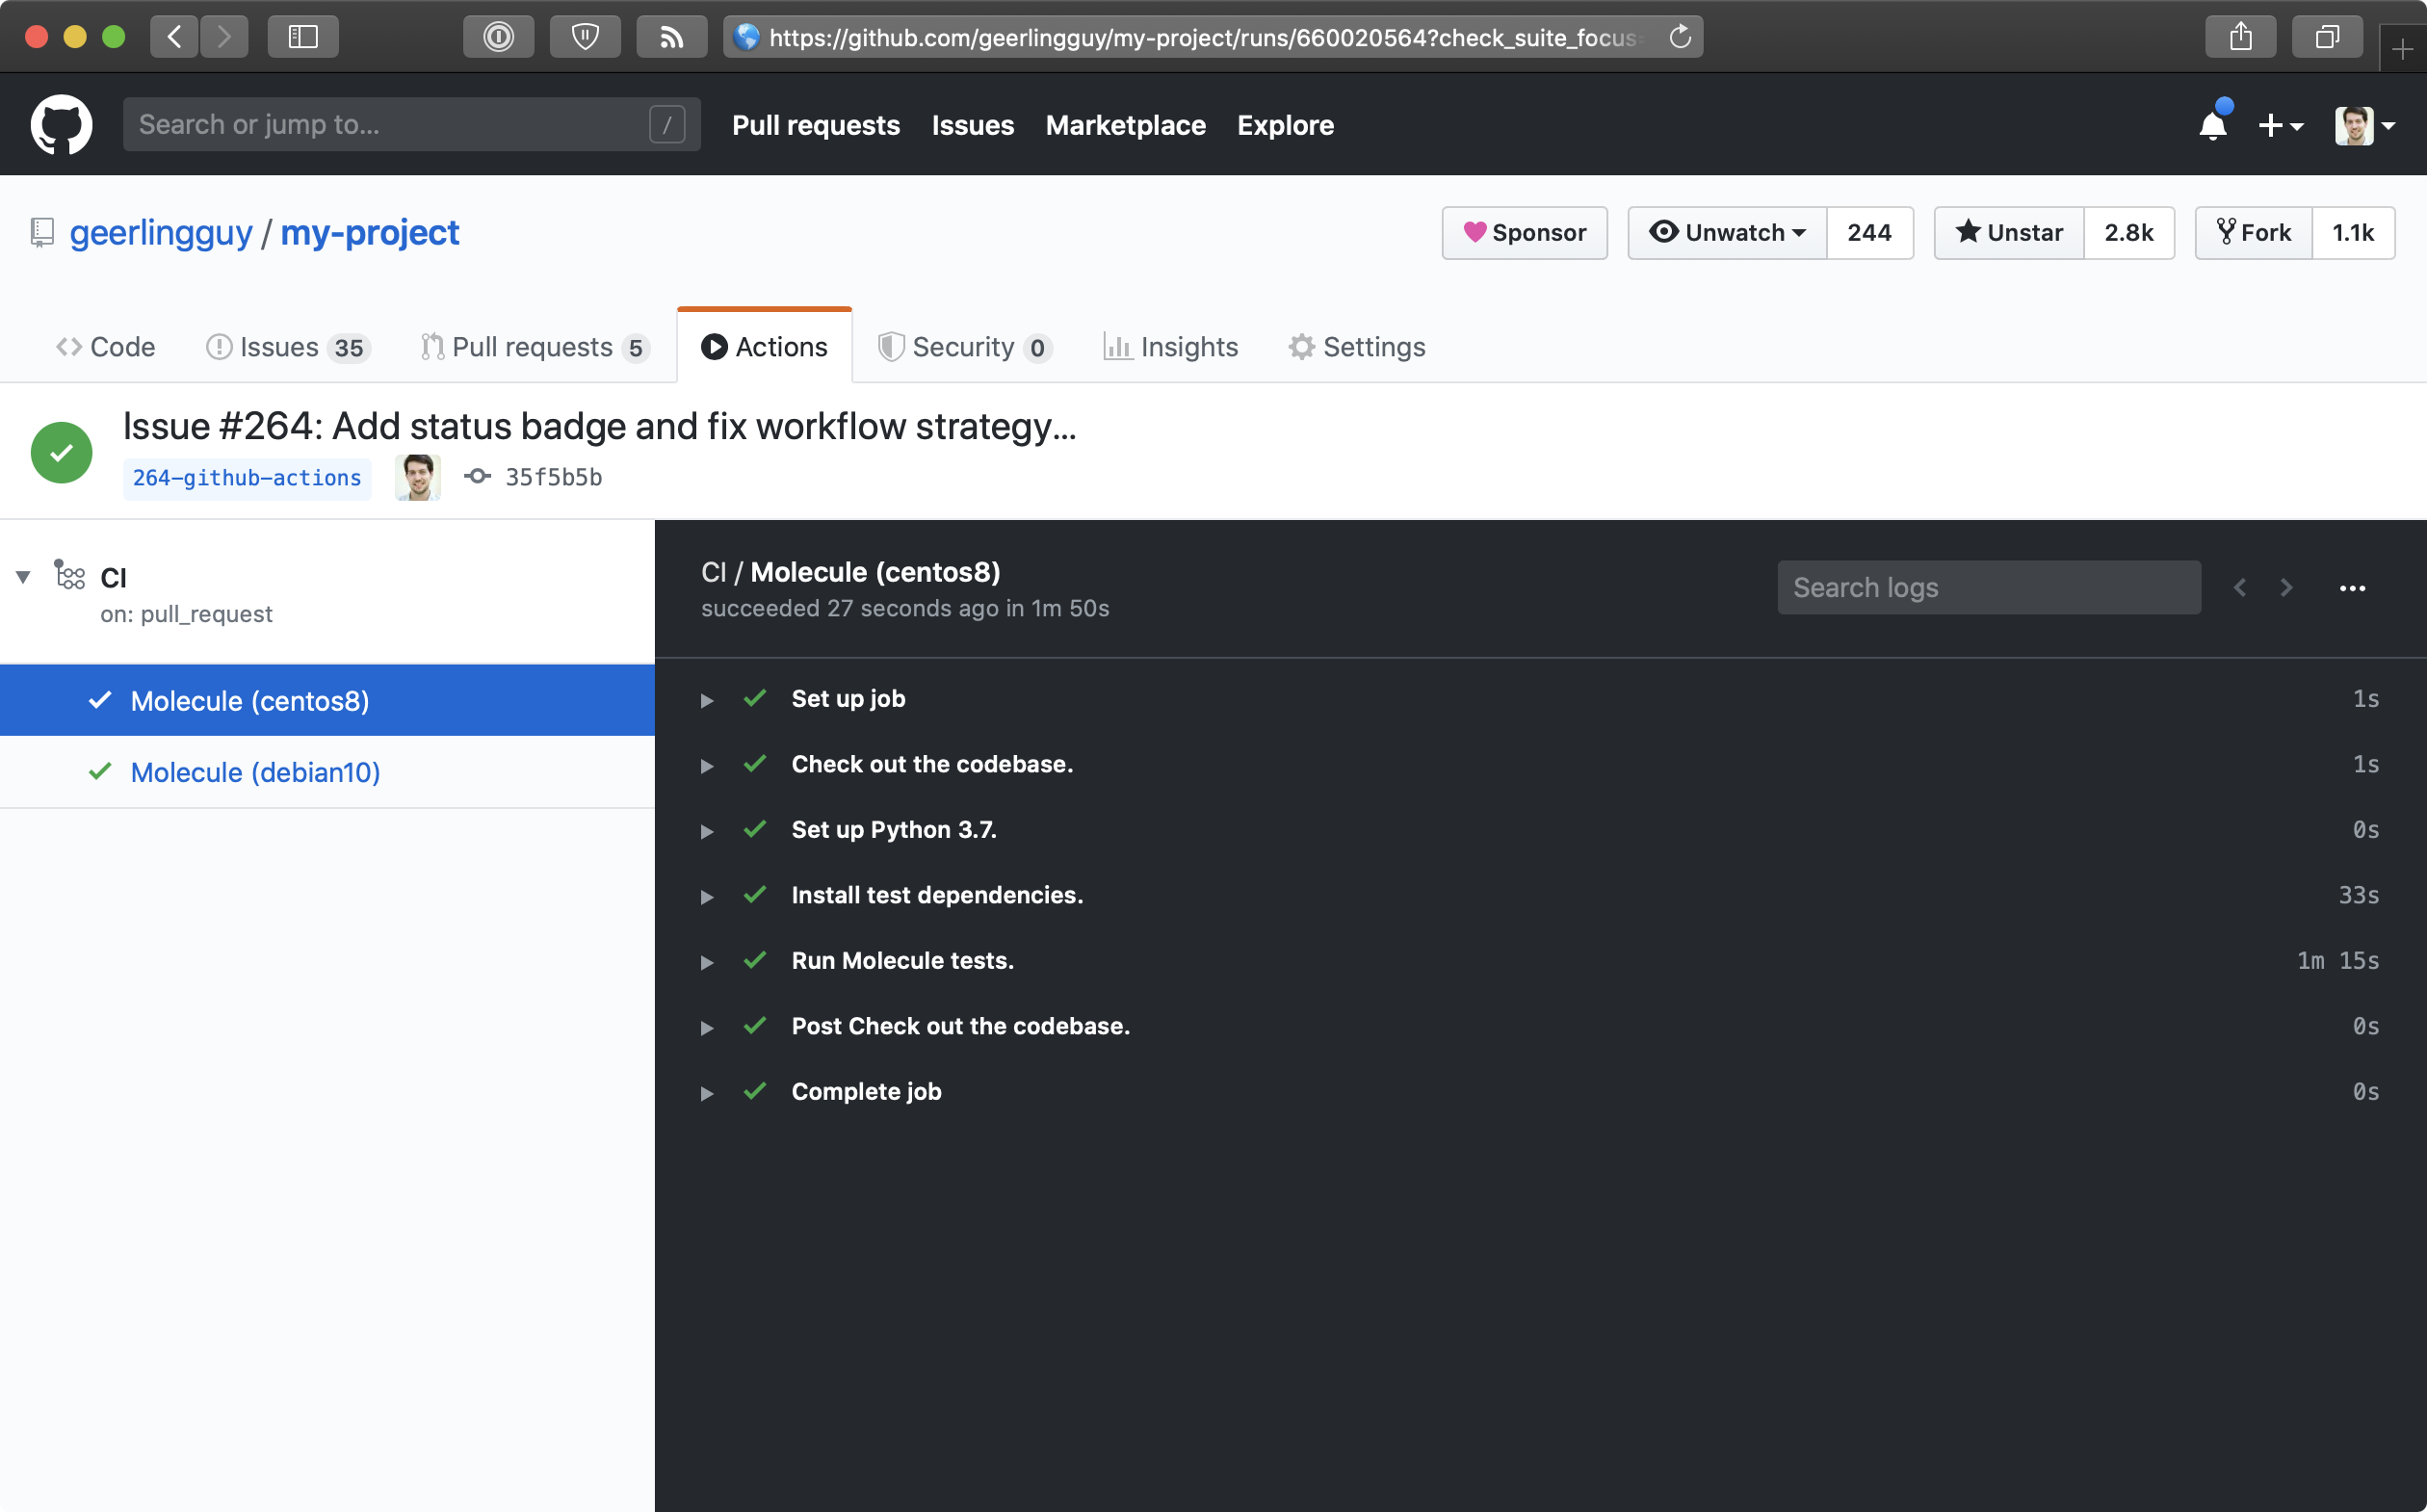
That’s all there is to a GitHub Actions workflow! You can add it to your GitHub repository, and assuming you have available build minutes, GitHub will run this workflow, once for each of the distros in the matrix, every time you create or update a PR, or merge or push to the master branch.
Here’s what it looks like when a build runs successfully:
You can also put a ‘CI status’ badge in your project’s README file (or anywhere else!) to see the current build status at a glance. To do so, go to the ‘Actions’ tab on GitHub, click on the workflow name (in this case, ‘CI’), and then click the ‘Create status badge’ button. It will allow you to choose options for a status badge you can place anywhere to quickly see the workflow’s current status.
The example in this chapter is actively in use in this book’s GitHub repository: Ansible for DevOps GitHub Actions CI workflow.
Automated testing in other CI environments
Molecule has extended documentation with examples for integration with many different CI environments, like Travis CI, GitLab CI, Jenkins, and Tox; see the Molecule Continuous Integration documentation for more examples.
Real-world examples
This style of testing is integrated into many of my Ansible projects; here are a few examples using Molecule in various CI environments:
- https://github.com/geerlingguy/ansible-role-java
- https://github.com/geerlingguy/ansible-collection-k8s
- https://github.com/ansible-collections/community.kubernetes
Functional testing using serverspec or testinfra
Serverspec is a tool to help automate server tests using RSpec tests, which use a Ruby-like DSL to ensure your server configuration matches your expectations. In a sense, it’s another way of building well-tested infrastructure.
Testinfra is a very similar tool, written in Python with a Python-based DSL.
Serverspec and Testinfra tests can be run locally, via SSH, through Docker’s APIs, or through other means, without the need for an agent installed on your servers, so they’re lightweight tools for testing your infrastructure (just like Ansible is a lightweight tool for managing your infrastructure).
There’s a lot of debate over whether well-written Ansible playbooks themselves (especially along with the dry-run --check mode, and Molecule for CI) are adequate for well-tested infrastructure, but many teams are more comfortable maintaining infrastructure tests separately (especially if the team is already familiar with another tool!).
Consider this: a truly idempotent Ansible playbook is already a great testing tool if it uses Ansible’s robust core modules and fail, assert, wait_for and other tests to ensure a specific state for your server. If you use Ansible’s user module to ensure a given user exists and is in a given group, and run the same playbook with --check and get ok for the same task, isn’t that a good enough test your server is configured correctly?
This book will not provide a detailed guide for using Serverspec or Testinfra, but here are a few resources in case you’d like to use one of them:
- A brief introduction to server testing with Serverspec
- Testing infrastructure with serverspec
- Molecule’s testinfra verifier configuration
Summary
Tools like Molecule help develop, test, and run playbooks regularly and easily, both locally and in CI environments. In addition the information contained in this chapter, read through the Testing Strategies documentation in Ansible’s documentation for a comprehensive overview of infrastructure testing and Ansible.