Chapter 12 - Automating Your Automation with Ansible Tower and CI/CD
At this point, you should be able to convert almost any bit of your infrastructure’s configuration into Ansible playbooks, roles, and inventories.
All the examples in this book use Ansible’s CLI to run playbooks and report back the results. For smaller teams, especially when everyone on the team is well-versed in how to use Ansible, YAML syntax, and security best practices, using the CLI is a sustainable approach.
But for many organizations, basic CLI use is inadequate:
- The business needs detailed reporting of infrastructure deployments and failures, especially for audit purposes.
- Team-based infrastructure management requires varying levels of involvement in playbook management, inventory management, and key and password access.
- A thorough visual overview of the current and historical playbook runs and server health helps identify potential issues before they affect the bottom line.
- Playbook scheduling ensures infrastructure remains in a known state.
Ansible Tower fulfills these requirements—and many more—and provides a great mechanism for team-based Ansible usage.
Ansible Tower is part of Red Hat’s Ansible Automation Platform, but it is built from an open source upstream project, AWX. AWX was open-sourced in 2017, shortly after Red Hat acquired Ansible.
While this book includes a brief overview of Tower, it is highly recommended you read through the extensive Tower User Guide, which includes details this book won’t be covering such as LDAP integration and multiple-team playbook management workflows.
Installing Ansible AWX
Because Ansible Tower requires a Red Hat Subscription, and you might want to get a feel for how it works before you fully commit to a subscription, it’s best to install a test instance of AWX to get a feel for how Tower works and operates.
The quickest way to get AWX running is to use the AWX Docker Compose installation method.
Make sure you have Ansible, Git, and Docker installed on your computer.
And to make sure the AWX installer can manage Docker containers, make sure you have both the Docker and Docker Compose python libraries installed:
Then install AWX by cloning the repository and running the install playbook:
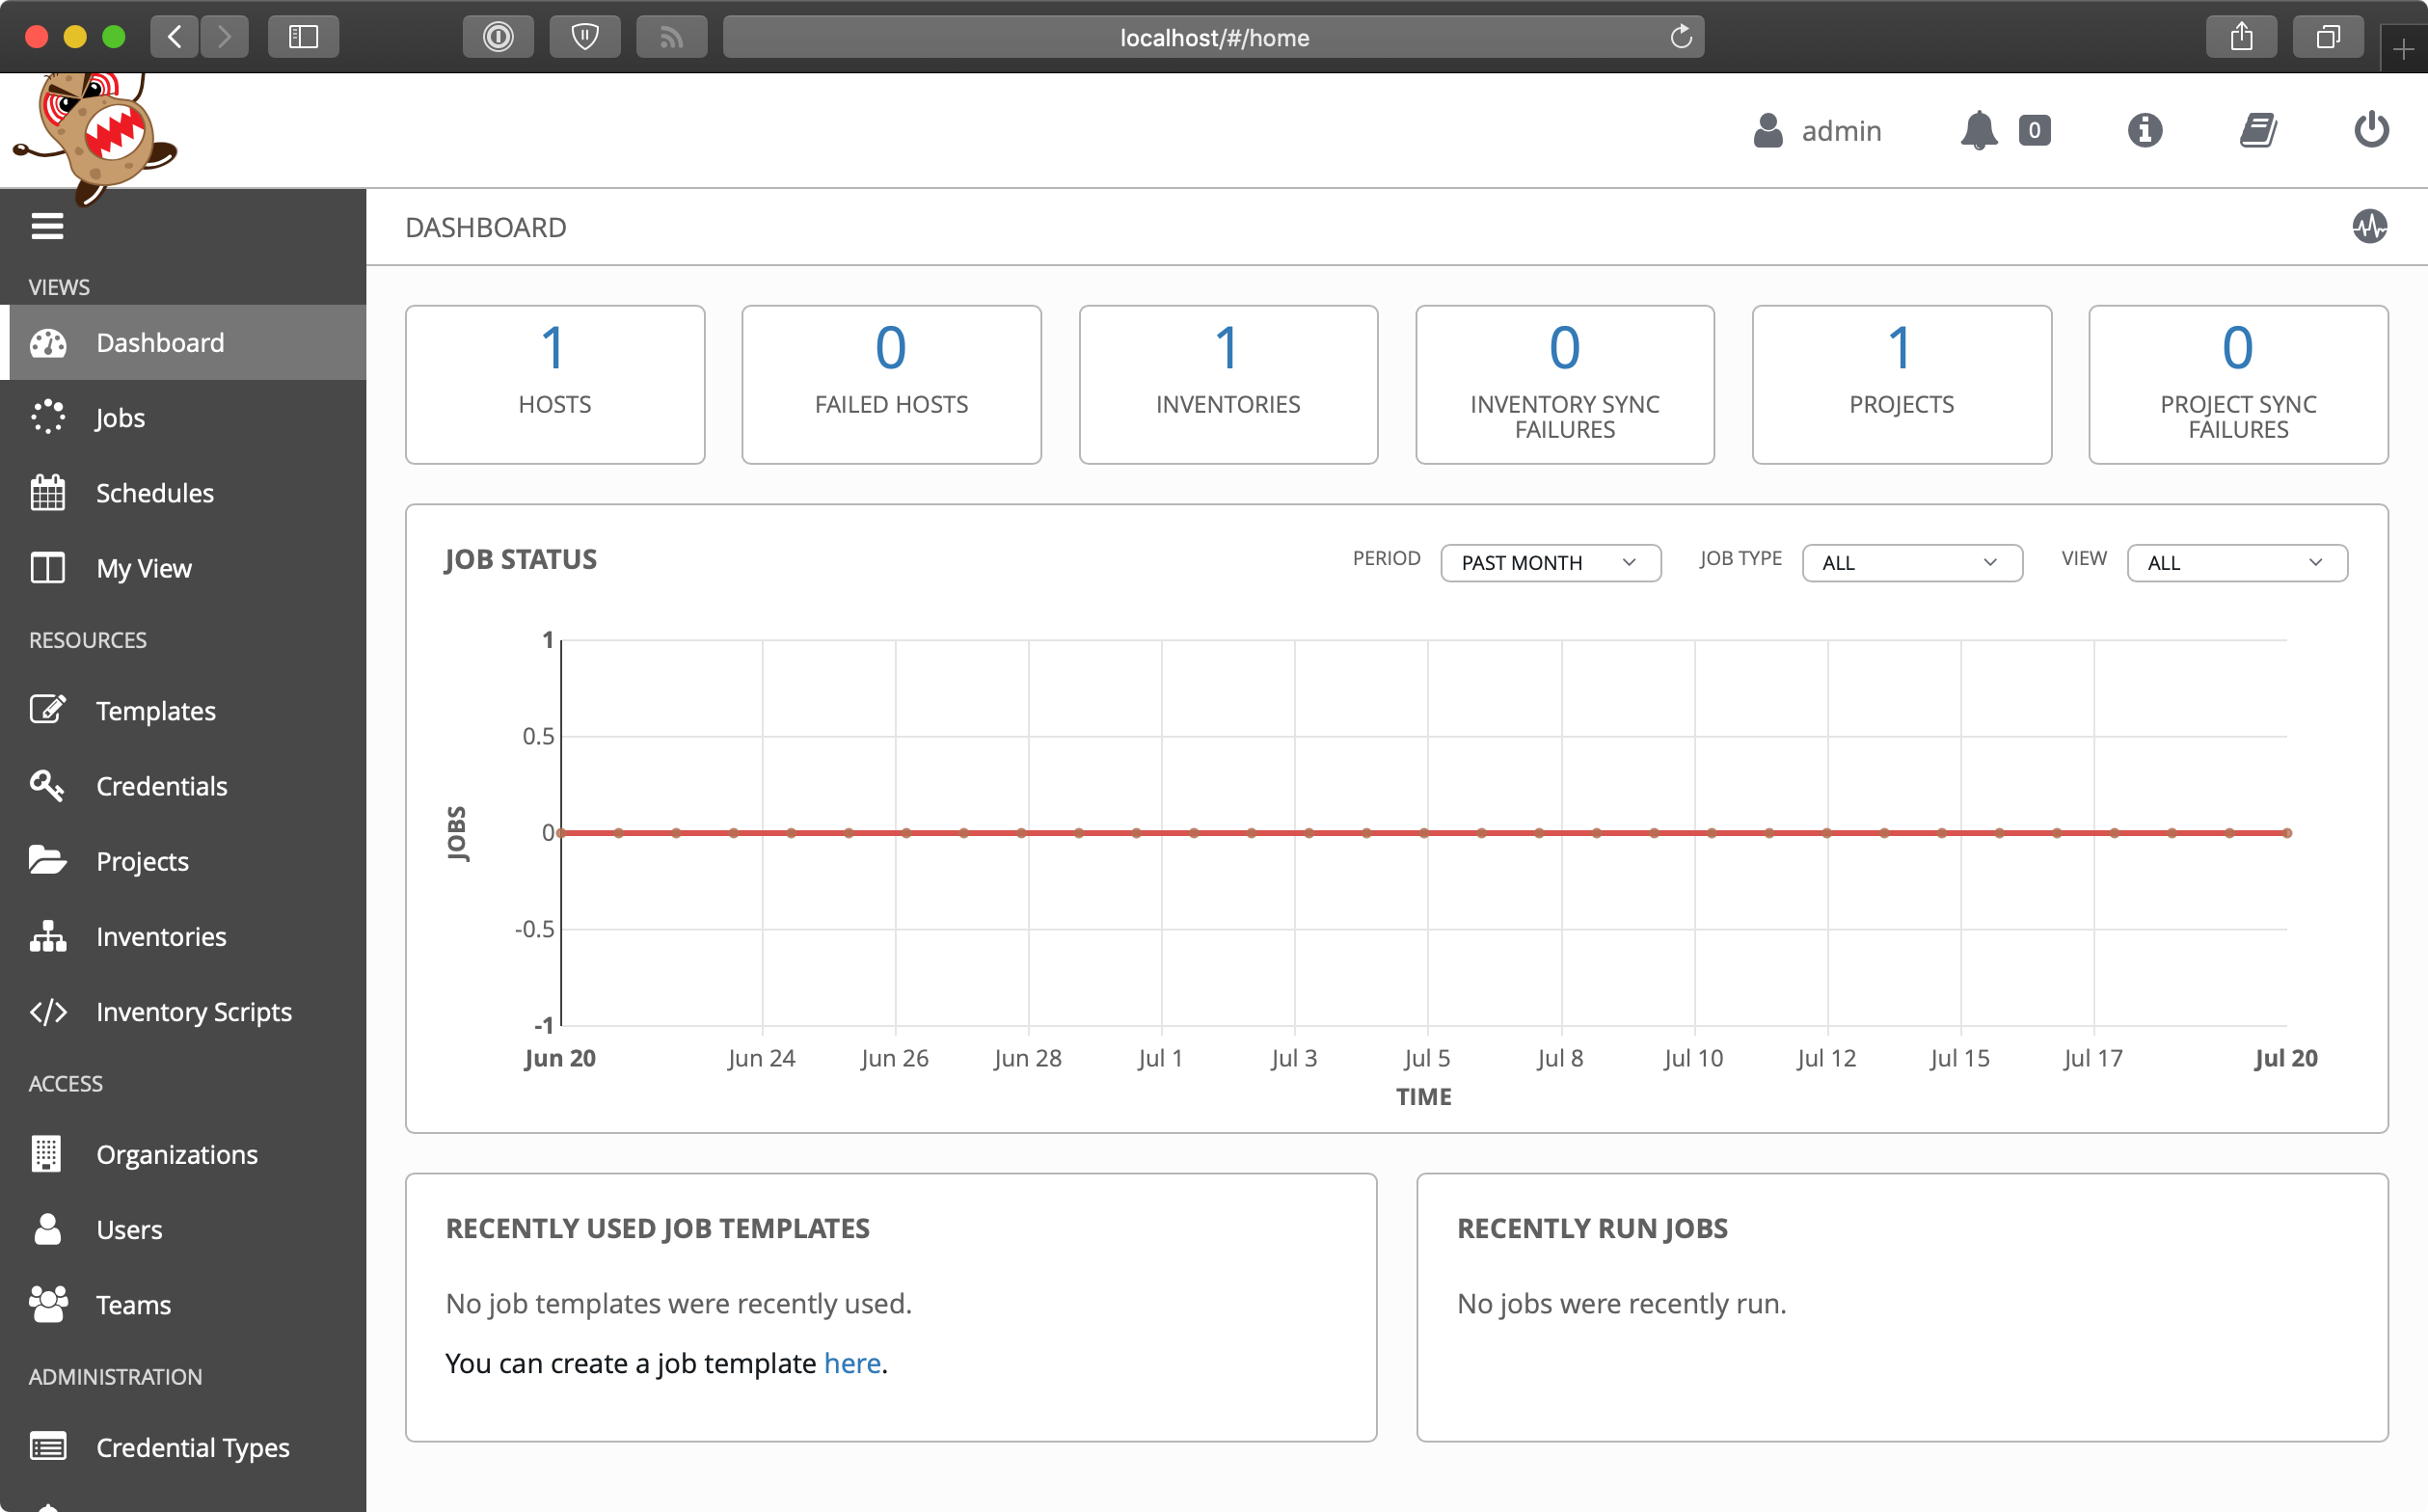
AWX takes a few minutes to initialize, but should be accessible at localhost. Until it’s initialized, you’ll see an ‘AWX is upgrading’ message.
Once AWX is initialized, you should be able to log in using the default credentials (username admin and password password) and get to the default dashboard page:
Using AWX
Tower and AWX are centered around the idea of organizing Projects (which run your playbooks via Jobs) and Inventories (which describe the servers on which your playbooks should be run) inside of Organizations. Organizations are then set up with different levels of access based on Users and Credentials grouped in different Teams. It’s a little overwhelming at first, but once the initial structure is configured, you’ll see the power and flexibility the workflow affords.
Let’s get started with our first project!
The first step is to make sure you have a test playbook you can run using AWX. Generally, your playbooks should be stored in a source code repository, with AWX configured to check out the latest version of the playbook from the repository and run it. For this example, however, we will create a playbook in AWX’s default projects directory located in /var/lib/awx/projects:
- Log into the AWX web container:
docker exec -it awx_web /bin/bash - Create the
projectsdirectory:mkdir /var/lib/awx/projects - Go into that directory:
cd /var/lib/awx/projects - Create a new project directory:
mkdir ansible-for-devops && cd ansible-for-devops - Create a new playbook file with
vi(vi main.yml) in the new directory, and put in the following:
1 ---
2 - hosts: all
3   gather_facts: no
4   connection: local
5
6   tasks:
7     - name: Check the date on the server.
8       command: date
Now, to reinforce my earlier statement about why it’s good to use a source repository instead of manually managing playbooks, you have to do all five of those steps again in the awx_task container. So go do that, starting by logging into the AWX task container: docker exec -it awx_web /bin/bash.
Switch back to your web browser and get everything set up to run the test playbook inside Ansible Tower’s web UI:
- Create a new Organization, called ‘Ansible for DevOps’.
- Add a new User to the Organization, named John Doe, with the email johndoe@example.com, username
johndoe, and passwordjohndoe1234. - Create a new Team, called ‘DevOps Engineers’, in the ‘Ansible for DevOps’ Organization.
- Add the
johndoeuser to the DevOps Engineers Team. - Under the Projects section, add a new Project. Set the ‘Name’ to
Ansible for DevOps Project, ‘Organization’ toAnsible for DevOps, ‘SCM Type’ toManual, and ‘Playbook Directory’ toansible-for-devops(AWX automatically detects all folders placed inside/var/lib/awx/projects, but you could also use an alternate Project Base Path if you want to store projects elsewhere). - Under the Inventories section, add an Inventory. Set the ‘Name’ to
AWX Local, and ‘Organization’ set toAnsible for DevOps. Once the inventory is saved: 1. Add a ‘Group’ with the Namelocalhost. Click on the group once it’s saved. 2. Add a ‘Host’ with the Host Name127.0.0.1.
Now that we have all the structure for running playbooks configured, we need only create a Template to run the playbook on the localhost and see whether we’ve succeeded. Click on ‘Templates’, and create a new Job Template with the following configuration:
- Name:
Ansible for DevOps Job - Job Type:
Run - Inventory:
AWX Local - Project:
Ansible for DevOps Project - Playbook:
main.yml
Save the Job Template, then go back to the main AWX ‘Templates’ section.
Click the small Rocket ship button for the ‘Ansible for DevOps Job’ to start a job using the template. You’ll be redirected to a Job status page, which provides live updates of the job status, and then a summary of the playbook run when complete:
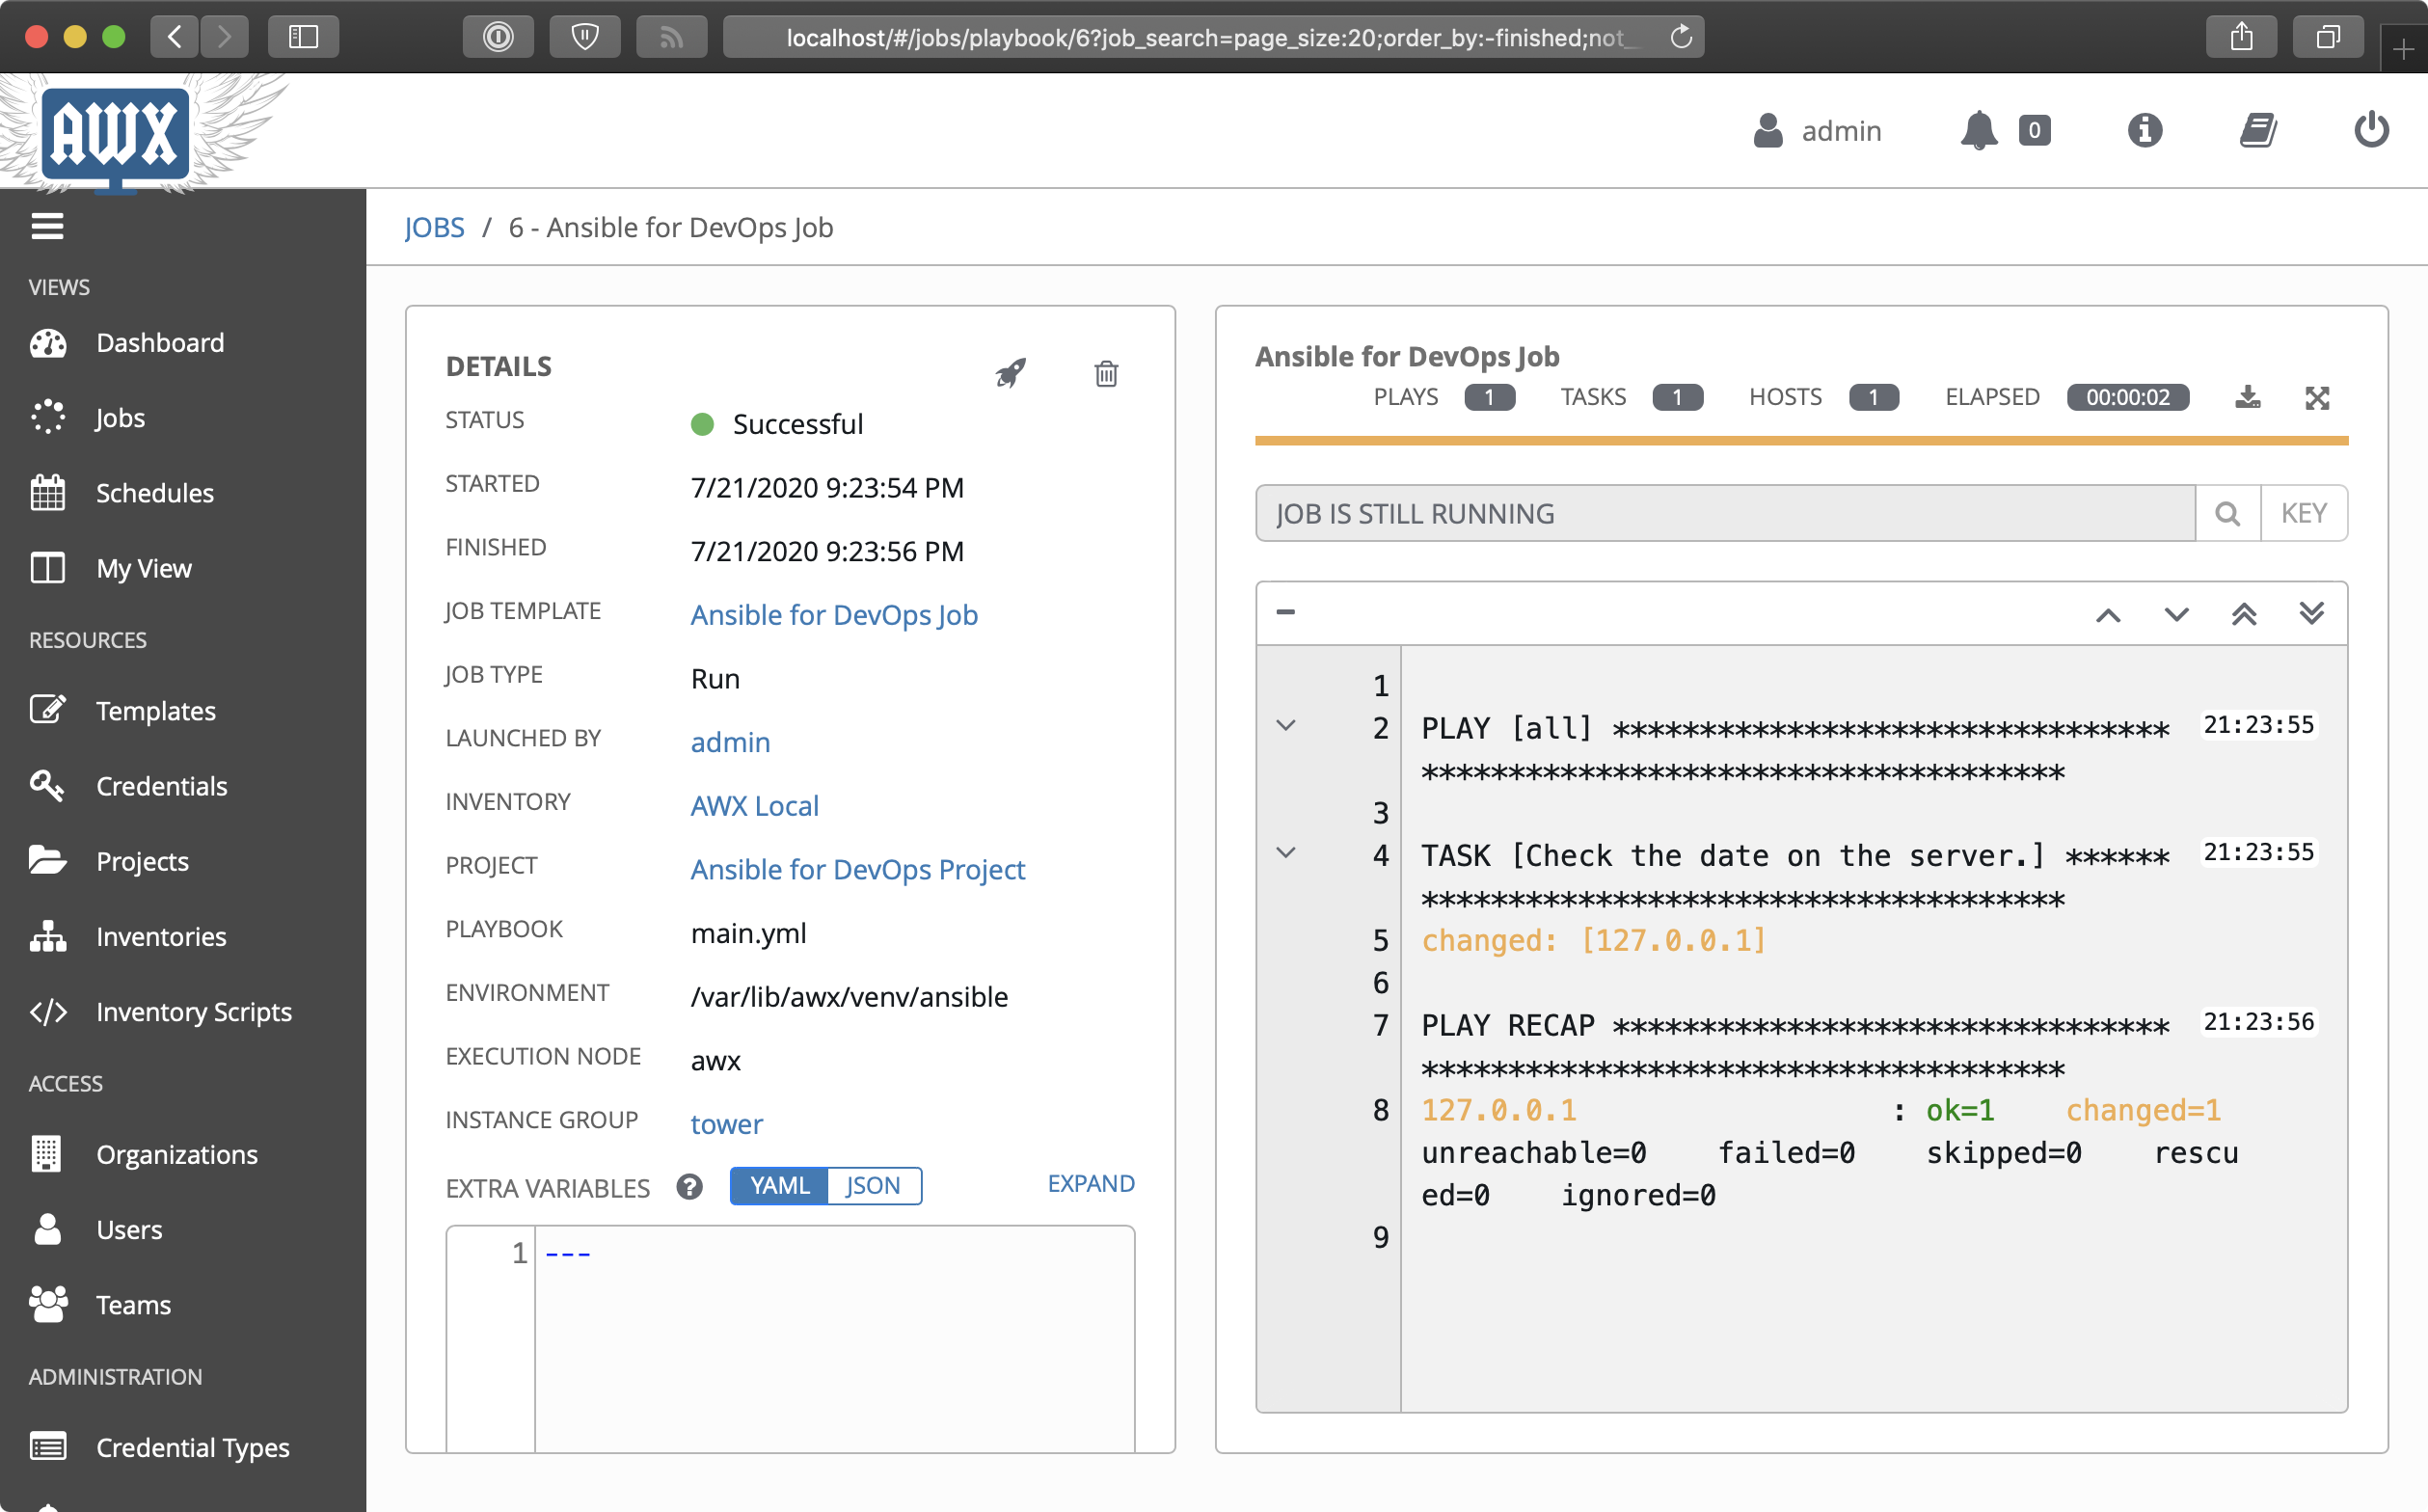
The playbook’s output is logged to the web page in real-time. You can also stop a running job, delete a job’s record, or relaunch a job with the same parameters using the respective buttons on the job’s page.
The job’s dashboard page is very useful for giving an overview of how many hosts were successful, how many tasks resulted in changes, and the timing of the different parts of the playbook run.
Uninstalling AWX
After you’re finished trying out AWX, you can uninstall it using the following process:
- Go into the directory where the AWX installer created a Docker Compose configuration:
cd ~/.awx/awxcompose - Shut down the Docker Compose environment:
docker-compose down -v - Delete the entire AWX directory:
rm -rf ~/.awx
Other Tower Features of Note
In our walkthrough above, we used AWX to run a playbook on the local server; setting up AWX or Tower to run playbooks on real-world infrastructure or other local VMs is just as easy, and the tools Ansible Tower provides are very handy, especially when working in larger team environments.
This book won’t walk through the entirety of Ansible Tower’s documentation, but a few other features you should try out include:
- Setting up scheduled Job runs (especially with the ‘Check’ option instead of ‘Run’) for CI/CD.
- Configuring webhooks for Job Templates so you can trigger Job runs from your SCM (e.g. ‘GitOps’).
- Integrating user accounts and Teams with LDAP users and groups for automatic team-based project management.
- Setting different levels of permissions for Users and Teams so certain users can only edit, run, or view certain jobs within an Organization.
- Configuring Ansible Vault credentials to easily and automatically use Vault-protected variables in your playbooks.
- Surveys, which allow users to add extra information based on a ‘Survey’ of questions per job run.
- Smart Inventories and dynamic inventory integrations.
- Monitoring Tower with Prometheus and Grafana.
Ansible Tower continues to improve rapidly, and is one of the best ways to run Ansible Playbooks from a central instance with team-based access and extremely detailed live and historical status reporting.
Tower Alternatives
Ansible Tower is purpose-built for use with Ansible playbooks, but there are many other ways to run playbooks on your servers with a solid workflow. If price is a major concern, and you don’t need all the bells and whistles Tower provides, you can use other popular tools like Jenkins, Rundeck, or Go CI.
All these tools provide flexibility and security for running Ansible Playbooks, and each one requires a different amount of setup and configuration before it will work well for common usage scenarios. One of the most popular and long-standing CI tools is Jenkins, so we’ll explore how to configure a similar Playbook run in Jenkins next.
Jenkins CI
Jenkins is a Java-based open source continuous integration tool. It was forked from the Hudson project in 2011, but has a long history as a robust build tool for almost any software project.
Jenkins is easy to install and configure, with the Java SDK as its only requirement. Jenkins runs on any modern OS, but for the purposes of this demonstration, we’ll build a local VM using Vagrant, install Jenkins inside the VM using Ansible, then use Jenkins to run an Ansible playbook.
Build a local Jenkins server with Ansible
Create a new directory for the Jenkins VM named jenkins. Inside the directory, create a Vagrantfile to describe the machine and the Ansible provisioning to Vagrant, with the following contents:
 1 VAGRANTFILE_API_VERSION = "2"
 2
 3 Vagrant.configure(VAGRANTFILE_API_VERSION) do |config|
 4   config.vm.box = "geerlingguy/ubuntu2004"
 5   config.vm.hostname = "jenkins.test"
 6   config.vm.network :private_network, ip: "192.168.76.76"
 7   config.ssh.insert_key = false
 8
 9   config.vm.provider :virtualbox do |v|
10     v.memory = 512
11   end
12
13   # Ansible provisioning.
14   config.vm.provision "ansible" do |ansible|
15     ansible.playbook = "provision.yml"
16     ansible.become = true
17   end
18 end
This Vagrantfile will create a new VM running Ubuntu, with the IP address 192.168.76.76 and the hostname jenkins.test. Go ahead and add an entry for 192.168.76.76 jenkins.test to your hosts file, and then create a new provision.yml playbook so Vagrant can run it with Ansible (as described in the config.vm.provision block in the Vagrantfile). Put the following in the provision.yml file:
 1 ---
 2 - hosts: all
 3
 4   vars:
 5     ansible_install_method: pip
 6     firewall_allowed_tcp_ports:
 7       - "22"
 8       - "8080"
 9     jenkins_plugins:
10       - ansicolor
11
12   roles:
13     - geerlingguy.firewall
14     - geerlingguy.pip
15     - geerlingguy.ansible
16     - geerlingguy.java
17     - geerlingguy.jenkins
This playbook uses a set of roles from Ansible Galaxy to install all the required components for our Jenkins CI server. To make sure you have all the required roles installed on your host machine, add a requirements.yml file in the jenkins folder, containing all the roles being used in the playbook:
1 ---
2 roles:
3   - name: geerlingguy.firewall
4   - name: geerlingguy.pip
5   - name: geerlingguy.ansible
6   - name: geerlingguy.java
7   - name: geerlingguy.jenkins
The geerlingguy.ansible role installs Ansible on the VM, so Jenkins can run Ansible playbooks and ad-hoc commands. The geerlingguy.java role is a dependency of geerlingguy.jenkins, and the geerlingguy.firewall role configures a firewall to limit access on ports besides 22 (for SSH) and 8080 (Jenkins’ default port).
Finally, we tell the geerlingguy.jenkins role a set of plugins to install through the jenkins_plugins variable; in this case, we just want the ansicolor plugin, which gives us full color display in Jenkins’ console logs (so our Ansible playbook output is easier to read).
To build the VM and run the playbook, do the following (inside the jenkins folder):
- Run
ansible-galaxy install -r requirements.ymlto install the required roles. - Run
vagrant upto build the VM and install and configure Jenkins.
After a few minutes, the provisioning should complete, and you should be able to access Jenkins at http://jenkins.test:8080/ (if you configured the hostname in your hosts file).
Create an Ansible playbook on the Jenkins server
It’s preferred to keep your playbooks and server configuration in a code repository (e.g. Git or SVN), but for simplicity’s sake, this example requires a playbook stored locally on the Jenkins server, similar to the earlier Ansible Tower example.
- Log into the Jenkins VM:
vagrant ssh - Go to the
/optdirectory:cd /opt - Create a new project directory:
sudo mkdir ansible-for-devops && cd ansible-for-devops - Create a new playbook file,
main.yml, within the new directory, with the following contents (use sudo to create the file, e.g.sudo vi main.yml):
1 ---
2 - hosts: 127.0.0.1
3   gather_facts: no
4   connection: local
5
6   tasks:
7     - name: Check the date on the server.
8       command: date
If you want, test the playbook while you’re logged in: ansible-playbook main.yml.
Create a Jenkins job to run an Ansible Playbook
With Jenkins running, configure a Jenkins job to run a playbook on the local server with Ansible. Visit http://jenkins.test:8080/ and log in with username admin and password admin (these are the defaults from the geerlingguy.jenkins role—you should override these for anything besides local test environments!).
Once the page loads, click the ‘New Item’ link to create a new ‘Freestyle project’ with a title ‘ansible-local-test’. Click ‘OK’ and when configuring the job, and set the following configuration:
- Under ‘Build Environment’, check the ‘Color ANSI Console Output’ option. This allows Ansible’s helpful colored output to pass through the Jenkins console, so it is easier to read during and after the run.
- Under ‘Build’, click ‘Add Build Step’, then choose ‘Execute shell’. In the ‘Command’ field, add the following code, which will run the local Ansible playbook:
1# Force Ansible to output jobs with color.2export ANSIBLE_FORCE_COLOR=true34# Run the local test playbook.5ansible-playbook /opt/ansible-for-devops/main.yml
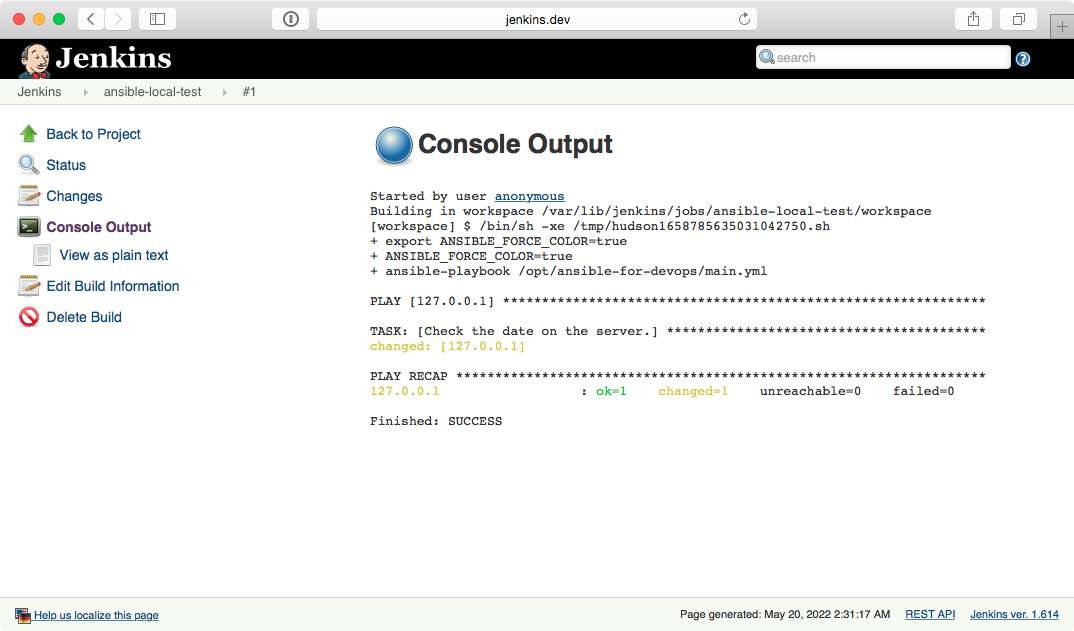
Click ‘Save’ to save the ‘Ansible Local Test’ job, and on the project’s page, click the ‘Build Now’ link to start a build. After a few seconds, you should see a new item in the ‘Build History’ block. Click on the (hopefully) blue circle to the left of ‘#1’, and it will take you to the console output of the job. It should look something like this:
This is a basic example, but hopefully it’s enough to show you how easy it is to get at least some of your baseline CI/CD automation done using a free and open source tool. Most of the more difficult aspects of managing infrastructure through Jenkins surrounds the ability to manage SSH keys, certificates, and other credentials through Jenkins, but there is already plenty of documentation surrounding these things elsewhere online and in Jenkins documentation, so this will be left as an exercise for the reader.
Summary
Tools like Ansible Tower provide a robust, repeatable, and accessible environment in which to run your Ansible playbooks.
In a team-based environment, it’s especially important to have reliable ways to run your Ansible playbooks that aren’t dependent on individual developers’ laptops!