Chapter 9 - Ansible Cookbooks
Until now, most of this book has demonstrated individual aspects of Ansible—inventory, playbooks, ad-hoc tasks, etc. But this chapter synthesizes everything we’ve gone over in the previous chapters and shows how Ansible is applied to real-world infrastructure management scenarios.
Highly-Available Infrastructure with Ansible
Real-world web applications require redundancy and horizontal scalability with multi-server infrastructure. In the following example, we’ll use Ansible to configure a complex infrastructure on servers provisioned either locally (via Vagrant and VirtualBox) or on a set of automatically-provisioned instances (running on either DigitalOcean or Amazon Web Services):

Varnish acts as a load balancer and reverse proxy, fronting web requests and routing them to the application servers. We could just as easily use something like Nginx or HAProxy, or even a proprietary cloud-based solution like an Amazon’s Elastic Load Balancer or Linode’s NodeBalancer, but for simplicity’s sake and for flexibility in deployment, we’ll use Varnish.
Apache and mod_php run a PHP-based application that displays the entire stack’s current status and outputs the current server’s IP address for load balancing verification.
A Memcached server provides a caching layer that can be used to store and retrieve frequently-accessed objects in lieu of slower database storage.
Two MySQL servers, configured as a master and slave, offer redundant and performant database access; all data will be replicated from the master to the slave, and in addition, the slave can be used as a secondary server for read-only queries to take some load off the master.
Directory Structure
In order to keep our configuration organized, we’ll use the following structure for our playbooks and configuration:
Organizing things this way allows us to focus on each server configuration individually, then build playbooks for provisioning and configuring instances on different hosting providers later. This organization also keeps server playbooks completely independent, so we can modularize and reuse individual server configurations.
Individual Server Playbooks
Let’s start building our individual server playbooks (in the playbooks directory). To make our playbooks more efficient, we’ll use some contributed Ansible roles on Ansible Galaxy rather than install and configure everything step-by-step. We’re going to target CentOS 7.x servers in these playbooks, but only minimal changes would be required to use the playbooks with Ubuntu, Debian, or later versions of CentOS.
Varnish
Create a main.yml file within the playbooks/varnish directory, with the following contents:
 1 ---
 2 - hosts: lamp_varnish
 3   become: yes
 4
 5   vars_files:
 6     - vars.yml
 7
 8   roles:
 9     - geerlingguy.firewall
10     - geerlingguy.repo-epel
11     - geerlingguy.varnish
12
13   tasks:
14     - name: Copy Varnish default.vcl.
15       template:
16         src: "templates/default.vcl.j2"
17         dest: "/etc/varnish/default.vcl"
18       notify: restart varnish
We’re going to run this playbook on all hosts in the lamp_varnish inventory group (we’ll create this later), and we’ll run a few simple roles to configure the server:
-
geerlingguy.firewallconfigures a simple iptables-based firewall using a couple variables defined invars.yml. -
geerlingguy.repo-epeladds the EPEL repository (a prerequisite for varnish). -
geerlingguy.varnishinstalls and configures Varnish.
Finally, a task copies over a custom default.vcl that configures Varnish, telling it where to find our web servers and how to load balance requests between the servers.
Let’s create the two files referenced in the above playbook. First, vars.yml, in the same directory as main.yml:
1 ---
2 firewall_allowed_tcp_ports:
3   - "22"
4   - "80"
5
6 varnish_use_default_vcl: false
The first variable tells the geerlingguy.firewall role to open TCP ports 22 and 80 for incoming traffic. The second variable tells the geerlingguy.varnish we will supply a custom default.vcl for Varnish configuration.
Create a templates directory inside the playbooks/varnish directory, and inside, create a default.vcl.j2 file. This file will use Jinja syntax to build Varnish’s custom default.vcl file:
 1 vcl 4.0;
 2
 3 import directors;
 4
 5 {% for host in groups['lamp_www'] %}
 6 backend www{{ loop.index }} {
 7   .host = "{{ host }}";
 8   .port = "80";
 9 }
10 {% endfor %}
11
12 sub vcl_init {
13   new vdir = directors.random();
14 {% for host in groups['lamp_www'] %}
15   vdir.add_backend(www{{ loop.index }}, 1);
16 {% endfor %}
17 }
18
19 sub vcl_recv {
20   set req.backend_hint = vdir.backend();
21
22   # For testing ONLY; makes sure load balancing is working correctly.
23   return (pass);
24 }
We won’t study Varnish’s VCL syntax in depth but we’ll run through default.vcl and highlight what is being configured:
- (1-3) Indicate that we’re using the 4.0 version of the VCL syntax and import the
directorsvarnish module (which is used to configure load balancing). - (5-10) Define each web server as a new backend; give a host and a port through which varnish can contact each host.
- (12-17)
vcl_initis called when Varnish boots and initializes any required varnish modules. In this case, we’re configuring a load balancervdir, and adding each of thewww[#]backends we defined earlier as backends to which the load balancer will distribute requests. We use arandomdirector so we can easily demonstrate Varnish’s ability to distribute requests to both app backends, but other load balancing strategies are also available. - (19-24)
vcl_recvis called for each request, and routes the request through Varnish. In this case, we route the request to thevdirbackend defined invcl_init, and indicate that Varnish should not cache the result.
According to #4, we’re actually bypassing Varnish’s caching layer, which is not helpful in a typical production environment. If you only need a load balancer without any reverse proxy or caching capabilities, there are better options. However, we need to verify our infrastructure is working as it should. If we used Varnish’s caching, Varnish would only ever hit one of our two web servers during normal testing.
In terms of our caching/load balancing layer, this should suffice. For a true production environment, you should remove the final return (pass) and customize default.vcl according to your application’s needs.
Apache / PHP
Create a main.yml file within the playbooks/www directory, with the following contents:
 1 ---
 2 - hosts: lamp_www
 3   become: yes
 4
 5   vars_files:
 6     - vars.yml
 7
 8   roles:
 9     - geerlingguy.firewall
10     - geerlingguy.repo-epel
11     - geerlingguy.apache
12     - geerlingguy.php
13     - geerlingguy.php-mysql
14     - geerlingguy.php-memcached
15
16   tasks:
17     - name: Remove the Apache test page.
18       file:
19         path: /var/www/html/index.html
20         state: absent
21
22     - name: Copy our fancy server-specific home page.
23       template:
24         src: templates/index.php.j2
25         dest: /var/www/html/index.php
26
27     - name: Ensure required SELinux dependency is installed.
28       package:
29         name: libsemanage-python
30         state: present
31
32     - name: Configure SELinux to allow HTTPD connections.
33       seboolean:
34         name: "{{ item }}"
35         state: true
36         persistent: true
37       with_items:
38         - httpd_can_network_connect_db
39         - httpd_can_network_memcache
40       when: ansible_selinux.status == 'enabled'
As with Varnish’s configuration, we’ll configure a firewall and add the EPEL repository (required for PHP’s memcached integration), and we’ll also add the following roles:
-
geerlingguy.apacheinstalls and configures the latest available version of the Apache web server. -
geerlingguy.phpinstalls and configures PHP to run through Apache. -
geerlingguy.php-mysqladds MySQL support to PHP. -
geerlingguy.php-memcachedadds Memcached support to PHP.
Two first two tasks remove the default index.html home page included with Apache, and replace it with our PHP app.
The last two tasks ensure SELinux is configured to allow Apache to communicate with the database and memcached servers over the network. For more discussion on how to configure SELinux, please see chapter 11.
As in the Varnish example, create the two files referenced in the above playbook. First, vars.yml, alongside main.yml:
1 ---
2 firewall_allowed_tcp_ports:
3   - "22"
4   - "80"
Create a templates directory inside the playbooks/www directory, and inside, create an index.php.j2 file. This file will use Jinja syntax to build a (relatively) simple PHP script to display the health and status of all the servers in our infrastructure:
1 <?php
2 /**
3 * @file
4 * Infrastructure test page.
5 *
6 * DO NOT use this in production. It is simply a PoC.
7 */
8
9 $mysql_servers = array(
10 {% for host in groups['lamp_db'] %}
11 '{{ host }}',
12 {% endfor %}
13 );
14 $mysql_results = array();
15 foreach ($mysql_servers as $host) {
16 if ($result = mysql_test_connection($host)) {
17 $mysql_results[$host] = '<span style="color: green;">PASS\
18 </span>';
19 $mysql_results[$host] .= ' (' . $result['status'] . ')';
20 }
21 else {
22 $mysql_results[$host] = '<span style="color: red;">FAIL</span>';
23 }
24 }
25
26 // Connect to Memcached.
27 $memcached_result = '<span style="color: red;">FAIL</span>';
28 if (class_exists('Memcached')) {
29 $memcached = new Memcached;
30 $memcached->addServer('{{ groups['lamp_memcached'][0] }}', 11211);
31
32 // Test adding a value to memcached.
33 if ($memcached->add('test', 'success', 1)) {
34 $result = $memcached->get('test');
35 if ($result == 'success') {
36 $memcached_result = '<span style="color: green;">PASS</span>';
37 $memcached->delete('test');
38 }
39 }
40 }
41
42 /**
43 * Connect to a MySQL server and test the connection.
44 *
45 * @param string $host
46 * IP Address or hostname of the server.
47 *
48 * @return array
49 * Array with 'success' (bool) and 'status' ('slave' or 'master').
50 * Empty if connection failure.
51 */
52 function mysql_test_connection($host) {
53 $username = 'mycompany_user';
54 $password = 'secret';
55 try {
56 $db = new PDO(
57 'mysql:host=' . $host . ';dbname=mycompany_database',
58 $username,
59 $password,
60 array(PDO::ATTR_ERRMODE => PDO::ERRMODE_EXCEPTION));
61
62 // Query to see if the server is configured as a master or slave.
63 $statement = $db->prepare("SELECT variable_value
64 FROM information_schema.global_variables
65 WHERE variable_name = 'LOG_BIN';");
66 $statement->execute();
67 $result = $statement->fetch();
68
69 return array(
70 'success' => TRUE,
71 'status' => ($result[0] == 'ON') ? 'master' : 'slave',
72 );
73 }
74 catch (PDOException $e) {
75 return array();
76 }
77 }
78 ?>79 <!DOCTYPE html>
80 <html>
81 <head>
82 <title>Host {{ inventory_hostname }}</title>
83 <style>* { font-family: Helvetica, Arial, sans-serif }</style>
84 </head>
85 <body>
86 <h1>Host {{ inventory_hostname }}</h1>
87 <?php foreach ($mysql_results as $host => $result): ?>88 <p>MySQL Connection (<?php print $host; ?>):
89 <?php print $result; ?></p>
90 <?php endforeach; ?>91 <p>Memcached Connection: <?php print $memcached_result; ?></p>
92 </body>
93 </html>
This application is a bit more complex than most examples in the book, but here’s a quick run through:
- (9-23) Iterate through all the
lamp_dbMySQL hosts defined in the playbook inventory and test the ability to connect to them—as well as whether they are configured as master or slave, using themysql_test_connection()function defined later (40-73). - (25-39) Check the first defined
lamp_memcachedMemcached host defined in the playbook inventory, confirming the ability to connect with the cache and to create, retrieve, or delete a cached value. - (41-76) Define the
mysql_test_connection()function, which tests the ability to connect to a MySQL server and also returns its replication status. - (78-91) Print the results of all the MySQL and Memcached tests, along with
{{ inventory_hostname }}as the page title, so we can easily see which web server is serving the viewed page.
At this point, the heart of our infrastructure—the application that will test and display the status of all our servers—is ready to go.
Memcached
Compared to the earlier playbooks, the Memcached playbook is quite simple. Create playbooks/memcached/main.yml with the following contents:
 1 ---
 2 - hosts: lamp_memcached
 3   become: yes
 4
 5   vars_files:
 6     - vars.yml
 7
 8   roles:
 9     - geerlingguy.firewall
10     - geerlingguy.memcached
As with the other servers, we need to ensure only the required TCP ports are open using the simple geerlingguy.firewall role. Next we install Memcached using the geerlingguy.memcached role.
In our vars.yml file (again, alongside main.yml), add the following:
 1 ---
 2 firewall_allowed_tcp_ports:
 3   - "22"
 4 firewall_additional_rules:
 5   - "iptables -A INPUT -p tcp --dport 11211 -s \
 6   {{ groups['lamp_www'][0] }} -j ACCEPT"
 7   - "iptables -A INPUT -p tcp --dport 11211 -s \
 8   {{ groups['lamp_www'][1] }} -j ACCEPT"
 9
10 memcached_listen_ip: "0.0.0.0"
We need port 22 open for remote access, and for Memcached, we’re adding manual iptables rules to allow access on port 11211 for the web servers only. We add one rule per lamp_www server by drilling down into each item in the generated groups variable that Ansible uses to track all inventory groups currently available. We also bind Memcached to all interfaces so it will accept connections through the server’s network interface.
MySQL
The MySQL configuration is more complex than the other servers because we need to configure MySQL users per-host and configure replication. Because we want to maintain an independent and flexible playbook, we also need to dynamically create some variables so MySQL will get the right server addresses in any potential environment.
Let’s first create the main playbook, playbooks/db/main.yml:
 1 ---
 2 - hosts: lamp_db
 3   become: yes
 4
 5   vars_files:
 6     - vars.yml
 7
 8   pre_tasks:
 9     - name: Create dynamic MySQL variables.
10       set_fact:
11         mysql_users:
12           - name: mycompany_user
13             host: "{{ groups['lamp_www'][0] }}"
14             password: secret
15             priv: "*.*:SELECT"
16           - name: mycompany_user
17             host: "{{ groups['lamp_www'][1] }}"
18             password: secret
19             priv: "*.*:SELECT"
20         mysql_replication_master: "{{ groups['a4d.lamp.db.1'][0] }}"
21
22   roles:
23     - geerlingguy.firewall
24     - geerlingguy.mysql
Most of the playbook is straightforward, but in this instance, we’re using set_fact as a pre_task (to be run before the geerlingguy.firewall and geerlingguy.mysql roles) to dynamically create variables for MySQL configuration.
set_fact allows us to define variables at runtime, so we can have all server IP addresses available, even if the servers were freshly provisioned at the beginning of the playbook’s run. We’ll create two variables:
-
mysql_usersis a list of users thegeerlingguy.mysqlrole will create when it runs. This variable will be used on all database servers so both of the twolamp_wwwservers getSELECTprivileges on all databases. -
mysql_replication_masteris used to indicate to thegeerlingguy.mysqlrole which database server is the master; it will perform certain steps differently depending on whether the server being configured is a master or slave, and ensure that all the slaves are configured to replicate data from the master.
We’ll need a few other normal variables to configure MySQL, so we’ll add them alongside the firewall variable in playbooks/db/vars.yml:
 1 ---
 2 firewall_allowed_tcp_ports:
 3   - "22"
 4   - "3306"
 5
 6 mysql_replication_user:
 7   name: replication
 8   password: secret
 9
10 mysql_databases:
11   - name: mycompany_database
12     collation: utf8_general_ci
13     encoding: utf8
We’re opening port 3306 to anyone, but according to the principle of least privilege discussed earlier, you would be justified in restricting this port to only the servers and users that need access to MySQL (similar to the memcached server configuration). In this case, the attack vector is mitigated because MySQL’s own authentication layer is used through the mysql_user variable generated in main.yml.
We are defining two MySQL variables: mysql_replication_user to be used for master and slave replication, and mysql_databases to define a list of databases that will be created (if they don’t already exist) on the database servers.
With the configuration of the database servers complete, the server-specific playbooks are ready to go.
Main Playbook for Configuring All Servers
A simple playbook including each of the group-specific playbooks is all we need for the overall configuration to take place. Create configure.yml in the project’s root directory, with the following contents:
1 ---
2 - import_playbook: playbooks/varnish/main.yml
3 - import_playbook: playbooks/www/main.yml
4 - import_playbook: playbooks/db/main.yml
5 - import_playbook: playbooks/memcached/main.yml
At this point, if you had some already-booted servers and statically defined inventory groups like lamp_www, lamp_db, etc., you could run ansible-playbook configure.yml and have a full HA infrastructure at the ready!
But we’re going to continue to make our playbooks more flexible and useful.
Getting the required roles
As mentioned in the Chapter 6, Ansible allows you to define all the required Ansible Galaxy roles for a given project in a requirements.yml file. Instead of having to remember to run ansible-galaxy role install -y [role1] [role2] [role3] for each of the roles we’re using, we can create requirements.yml in the root of our project, with the following contents:
 1 ---
 2 roles:
 3   - name: geerlingguy.firewall
 4   - name: geerlingguy.repo-epel
 5   - name: geerlingguy.varnish
 6   - name: geerlingguy.apache
 7   - name: geerlingguy.php
 8   - name: geerlingguy.php-mysql
 9   - name: geerlingguy.php-memcached
10   - name: geerlingguy.mysql
11   - name: geerlingguy.memcached
To make sure all the required dependencies are installed, run ansible-galaxy install -r requirements.yml from within the project’s root.
Vagrantfile for Local Infrastructure via VirtualBox
As with many other examples in this book, we can use Vagrant and VirtualBox to build and configure the infrastructure locally. This lets us test things as much as we want with zero cost, and usually results in faster testing cycles, since everything is orchestrated over a local private network on a (hopefully) beefy workstation.
Our basic Vagrantfile layout will be something like the following:
- Define a base box (in this case, CentOS 7.x) and VM hardware defaults.
- Define all the VMs to be built, with VM-specific IP addresses and hostname configurations.
- Define the Ansible provisioner along with the last VM, so Ansible can run once at the end of Vagrant’s build cycle.
Here’s the Vagrantfile in all its glory:
 1 # -*- mode: ruby -*-
 2 # vi: set ft=ruby :
 3
 4 Vagrant.configure("2") do |config|
 5   # Base VM OS configuration.
 6   config.vm.box = "geerlingguy/centos7"
 7   config.ssh.insert_key = false
 8   config.vm.synced_folder '.', '/vagrant', disabled: true
 9
10   # General VirtualBox VM configuration.
11   config.vm.provider :virtualbox do |v|
12     v.memory = 512
13     v.cpus = 1
14     v.linked_clone = true
15     v.customize ["modifyvm", :id, "--natdnshostresolver1", "on"]
16     v.customize ["modifyvm", :id, "--ioapic", "on"]
17   end
18
19   # Varnish.
20   config.vm.define "varnish" do |varnish|
21     varnish.vm.hostname = "varnish.test"
22     varnish.vm.network :private_network, ip: "192.168.2.2"
23   end
24
25   # Apache.
26   config.vm.define "www1" do |www1|
27     www1.vm.hostname = "www1.test"
28     www1.vm.network :private_network, ip: "192.168.2.3"
29
30     www1.vm.provision "shell",
31       inline: "sudo yum update -y"
32
33     www1.vm.provider :virtualbox do |v|
34       v.customize ["modifyvm", :id, "--memory", 256]
35     end
36   end
37
38   # Apache.
39   config.vm.define "www2" do |www2|
40     www2.vm.hostname = "www2.test"
41     www2.vm.network :private_network, ip: "192.168.2.4"
42
43     www2.vm.provision "shell",
44       inline: "sudo yum update -y"
45
46     www2.vm.provider :virtualbox do |v|
47       v.customize ["modifyvm", :id, "--memory", 256]
48     end
49   end
50
51   # MySQL.
52   config.vm.define "db1" do |db1|
53     db1.vm.hostname = "db1.test"
54     db1.vm.network :private_network, ip: "192.168.2.5"
55   end
56
57   # MySQL.
58   config.vm.define "db2" do |db2|
59     db2.vm.hostname = "db2.test"
60     db2.vm.network :private_network, ip: "192.168.2.6"
61   end
62
63   # Memcached.
64   config.vm.define "memcached" do |memcached|
65     memcached.vm.hostname = "memcached.test"
66     memcached.vm.network :private_network, ip: "192.168.2.7"
67
68     # Run Ansible provisioner once for all VMs at the end.
69     memcached.vm.provision "ansible" do |ansible|
70       ansible.playbook = "configure.yml"
71       ansible.inventory_path = "inventories/vagrant/inventory"
72       ansible.limit = "all"
73       ansible.extra_vars = {
74         ansible_user: 'vagrant',
75         ansible_ssh_private_key_file: \
76 "~/.vagrant.d/insecure_private_key"
77       }
78     end
79   end
80 end
Most of the Vagrantfile is straightforward, and similar to other examples used in this book. The last block of code, which defines the ansible provisioner configuration, contains three extra values that are important for our purposes:
1 ansible.inventory_path = "inventories/vagrant/inventory"
2 ansible.limit = "all"
3 ansible.extra_vars = {
4   ansible_user: 'vagrant',
5   ansible_ssh_private_key_file: "~/.vagrant.d/insecure_private_key"
6 }
-
ansible.inventory_pathdefines the inventory file for theansible.playbook. You could certainly create a dynamic inventory script for use with Vagrant, but because we know the IP addresses ahead of time, and are expecting a few specially-crafted inventory group names, it’s simpler to build the inventory file for Vagrant provisioning by hand (we’ll do this next). -
ansible.limitis set toallso Vagrant knows it should run the Ansible playbook connected to all VMs, and not just the current VM. You could technically useansible.limitwith a provisioner configuration for each of the individual VMs, and just run the VM-specific playbook through Vagrant, but our live production infrastructure will be using one playbook to configure all the servers, so we’ll do the same locally. -
ansible.extra_varscontains the vagrant SSH user configuration for Ansible. It’s more standard to include these settings in a static inventory file or use Vagrant’s automatically-generated inventory file, but it’s easiest to set them once for all servers here.
Before running vagrant up to see the fruits of our labor, we need to create an inventory file for Vagrant at inventories/vagrant/inventory:
 1 [lamp_varnish]
 2 192.168.2.2
 3
 4 [lamp_www]
 5 192.168.2.3
 6 192.168.2.4
 7
 8 [a4d.lamp.db.1]
 9 192.168.2.5
10
11 [lamp_db]
12 192.168.2.5
13 192.168.2.6
14
15 [lamp_memcached]
16 192.168.2.7
Now cd into the project’s root directory, run vagrant up, and after ten or fifteen minutes, load http://192.168.2.2/ in your browser. Voila!
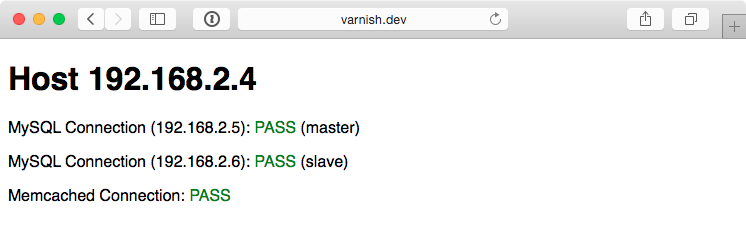
You should see something like the above screenshot. The PHP app displays the current app server’s IP address, the individual MySQL servers’ status, and the Memcached server status. Refresh the page a few times to verify Varnish is distributing requests randomly between the two app servers.
We now have local infrastructure development covered, and Ansible makes it easy to use the exact same configuration to build our infrastructure in the cloud.
Provisioner Configuration: DigitalOcean
In Chapter 8, we learned provisioning and configuring DigitalOcean droplets in an Ansible playbook is fairly simple. But we need to take provisioning a step further by provisioning multiple droplets (one for each server in our infrastructure) and dynamically grouping them so we can configure them after they are booted and online.
For the sake of flexibility, let’s create a playbook for our DigitalOcean droplets in provisioners/digitalocean.yml. This will allow us to add other provisioner configurations later, alongside the digitalocean.yml playbook. As with our example in Chapter 7, we will use a local connection to provision cloud instances. Begin the playbook with:
1 ---
2 - hosts: localhost
3   connection: local
4   gather_facts: false
Next we need to define some metadata to describe each of our droplets. For simplicity’s sake, we’ll inline the droplets variable in this playbook:
 6   vars:
 7     droplets:
 8       - { name: a4d.lamp.varnish, group: "lamp_varnish" }
 9       - { name: a4d.lamp.www.1, group: "lamp_www" }
10       - { name: a4d.lamp.www.2, group: "lamp_www" }
11       - { name: a4d.lamp.db.1, group: "lamp_db" }
12       - { name: a4d.lamp.db.2, group: "lamp_db" }
13       - { name: a4d.lamp.memcached, group: "lamp_memcached" }
Each droplet is an object with two keys:
-
name: The name of the Droplet for DigitalOcean’s listings and Ansible’s host inventory. -
group: The Ansible inventory group for the droplet.
Next we need to add a task to create the droplets, using the droplets list as a guide, and as part of the same task, register each droplet’s information in a separate dictionary, created_droplets:
15   tasks:
16     - name: Provision DigitalOcean droplets.
17       digital_ocean_droplet:
18         state: "{{ item.state | default('present') }}"
19         name: "{{ item.name }}"
20         private_networking: yes
21         size: "{{ item.size | default('1gb') }}"
22         image: "{{ item.image | default('centos-7-x64') }}"
23         region: "{{ item.region | default('nyc3') }}"
24         # Customize this default for your account.
25         ssh_keys:
26           - "{{ item.ssh_key | default('138954') }}"
27         unique_name: yes
28       register: created_droplets
29       with_items: "{{ droplets }}"
Many of the options (e.g. size) are defined as {{ item.property | default('default_value') }}, which allows us to use optional variables per droplet. For any of the defined droplets, we could add size: 2gb (or another valid value), and it would override the default value set in the task.
We loop through all the defined droplets using with_items: droplets, and after each droplet is created, we add the droplet’s metadata (name, IP address, etc.) to the created_droplets variable. Next, we’ll loop through that variable to build our inventory on-the-fly so our configuration applies to the correct servers:
31     - name: Add DigitalOcean hosts to inventory groups.
32       add_host:
33         name: "{{ item.1.data.ip_address }}"
34         groups: "do,{{ droplets[item.0].group }},{{ item.1.data.droplet\
35 .name }}"
36         # You can dynamically add inventory variables per-host.
37         ansible_user: root
38         mysql_replication_role: >-
39           {{ 'master' if (item.1.data.droplet.name == 'a4d.lamp.db.1')
40           else 'slave' }}
41         mysql_server_id: "{{ item.0 }}"
42       when: item.1.data is defined
43       with_indexed_items: "{{ created_droplets.results }}"
You’ll notice a few interesting things happening in this task:
- This is the first time we’ve used
with_indexed_items. Though less common, this is a valuable loop feature because it adds a sequential and uniquemysql_server_id. Though only the MySQL servers need a server ID set, it’s more simple to dynamically create the variable for every server so each is available when needed.with_indexed_itemssetsitem.0to the key of the item anditem.1to the value of the item. - In addition to helping us create server IDs,
with_indexed_itemsalso helps us to reliably set each droplet’s group. We could also consider using tags for groups, but this example configures groups manually. By using thedropletsvariable we manually created earlier, we can set the proper group for a particular droplet. - Finally, we add inventory variables per-host in
add_host. To do this, we add the variable name as a key and the variable value as that key’s value. Simple, but powerful!
The final step in our provisioning is to make sure all the droplets are booted and can be reached via SSH. So at the end of the digitalocean.yml playbook, add another play to be run on hosts in the do group we just defined:
44 - hosts: do
45   remote_user: root
46   gather_facts: false
47
48   tasks:
49     - name: Wait for hosts to become reachable.
50       wait_for_connection:
Once the server can be reached by Ansible (using the wait_for_connection module), we know the droplet is up and ready for configuration.
We’re now almost ready to provision and configure our entire infrastructure on DigitalOcean, but first we need to create one last playbook to tie everything together. Create provision.yml in the project root with the following contents:
1 ---
2 - import_playbook: provisioners/digitalocean.yml
3 - import_playbook: configure.yml
That’s it! Now, assuming you set the environment variable DO_API_TOKEN, you can run $ ansible-playbook provision.yml to provision and configure the infrastructure on DigitalOcean.
The entire process should take about 15 minutes; once it’s complete, you should see something like this:
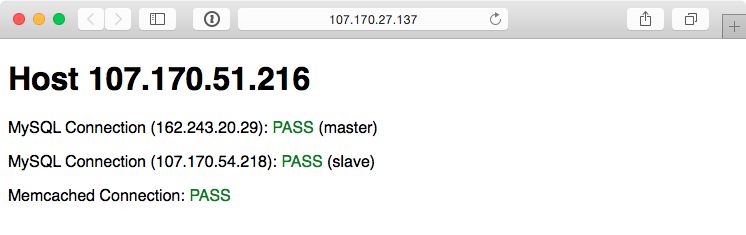
Visit the IP address of the varnish server, and you will be greeted with a status page similar to the one generated by the Vagrant-based infrastructure:
Because everything in this playbook is idempotent, running $ ansible-playbook provision.yml again should report no changes, and this will help you verify that everything is running correctly.
Ansible will also rebuild and reconfigure any droplets that might be missing from your infrastructure. If you’re daring and would like to test this feature, just log into your DigitalOcean account, delete one of the droplets just created by this playbook (perhaps one of the two app servers), and then run the playbook again.
Now that we’ve tested our infrastructure on DigitalOcean, we can destroy the droplets just as easily as we can create them. To do this, change the state parameter in provisioners/digitalocean.yml to default to 'absent' and run $ ansible-playbook provision.yml once more.
Next up, we’ll build the infrastructure a third time—on Amazon’s infrastructure.
Provisioner Configuration: Amazon Web Services (EC2)
For Amazon Web Services, provisioning is slightly different. Amazon has a broader ecosystem of services surrounding EC2 instances, so for our particular example we will need to configure security groups prior to provisioning instances.
To begin, create aws.yml inside the provisioners directory and begin the playbook the same way as for DigitalOcean:
1 ---
2 - hosts: localhost
3   connection: local
4   gather_facts: false
First, we’ll define three variables to describe what AWS resources and region to use for provisioning.
6   vars:
7     aws_profile: default
8     aws_region: us-east-1 # North Virginia
9     aws_ec2_ami: ami-06cf02a98a61f9f5e # CentOS 7
EC2 instances use security groups as an AWS-level firewall (which operates outside the individual instance’s OS). We will need to define a list of security_groups alongside our EC2 instances. First, the instances:
11     instances:
12       - name: a4d.lamp.varnish
13         group: "lamp_varnish"
14         security_group: ["default", "a4d_lamp_http"]
15       - name: a4d.lamp.www.1
16         group: "lamp_www"
17         security_group: ["default", "a4d_lamp_http"]
18       - name: a4d.lamp.www.2
19         group: "lamp_www"
20         security_group: ["default", "a4d_lamp_http"]
21       - name: a4d.lamp.db.1
22         group: "lamp_db"
23         security_group: ["default", "a4d_lamp_db"]
24       - name: a4d.lamp.db.2
25         group: "lamp_db"
26         security_group: ["default", "a4d_lamp_db"]
27       - name: a4d.lamp.memcached
28         group: "lamp_memcached"
29         security_group: ["default", "a4d_lamp_memcached"]
Inside the instances variable, each instance is an object with three keys:
-
name: The name of the instance, which we’ll use to tag the instance and ensure only one instance is created per name. -
group: The Ansible inventory group in which the instance should belong. -
security_group: A list of security groups into which the instance will be placed. Thedefaultsecurity group is added to your AWS account upon creation, and has one rule to allow outgoing traffic on any port to any IP address.
With our instances defined, we’ll next define a security_groups variable containing all the required security group configuration for each server:
31     security_groups:
32       - name: a4d_lamp_http
33         rules:
34           - proto: tcp
35             from_port: 80
36             to_port: 80
37             cidr_ip: 0.0.0.0/0
38           - proto: tcp
39             from_port: 22
40             to_port: 22
41             cidr_ip: 0.0.0.0/0
42         rules_egress: []
43
44       - name: a4d_lamp_db
45         rules:
46           - proto: tcp
47             from_port: 3306
48             to_port: 3306
49             cidr_ip: 0.0.0.0/0
50           - proto: tcp
51             from_port: 22
52             to_port: 22
53             cidr_ip: 0.0.0.0/0
54         rules_egress: []
55
56       - name: a4d_lamp_memcached
57         rules:
58           - proto: tcp
59             from_port: 11211
60             to_port: 11211
61             cidr_ip: 0.0.0.0/0
62           - proto: tcp
63             from_port: 22
64             to_port: 22
65             cidr_ip: 0.0.0.0/0
66         rules_egress: []
Each security group has a name (which was used to identify the security group in the instances list), rules (a list of firewall rules—like protocol, ports, and IP ranges—to limit incoming traffic), and rules_egress (a list of firewall rules to limit outgoing traffic).
We need three security groups: a4d_lamp_http to open port 80, a4d_lamp_db to open port 3306, and a4d_lamp_memcached to open port 11211.
Now that we have all the data we need to set up security groups and instances, our first task is to create or verify the existence of the security groups:
68   tasks:
69     - name: Configure EC2 Security Groups.
70       ec2_group:
71         name: "{{ item.name }}"
72         description: Example EC2 security group for A4D.
73         state: present
74         rules: "{{ item.rules }}"
75         rules_egress: "{{ item.rules_egress }}"
76         profile: "{{ aws_profile }}"
77         region: "{{ aws_region }}"
78       with_items: "{{ security_groups }}"
The ec2_group requires a name, region, and rules for each security group. Security groups will be created if they don’t exist, modified to match the supplied values if they do exist, or verified if they both exist and match the given values.
With the security groups configured, we can provision the defined EC2 instances by looping through instances with the ec2 module:
75     - name: Provision EC2 instances.
76       ec2:
77         key_name: "{{ item.ssh_key | default('lamp_aws') }}"
78         instance_tags:
79           Name: "{{ item.name | default('') }}"
80           Application: lamp_aws
81           inventory_group: "{{ item.group | default('') }}"
82           inventory_host: "{{ item.name | default('') }}"
83         group: "{{ item.security_group | default('') }}"
84         instance_type: "{{ item.type | default('t2.micro')}}"
85         image: "{{ aws_ec2_ami }}"
86         wait: yes
87         wait_timeout: 500
88         exact_count: 1
89         count_tag:
90           inventory_host: "{{ item.name | default('') }}"
91         profile: "{{ aws_profile }}"
92         region: "{{ aws_region }}"
93       register: created_instances
94       with_items: "{{ instances }}"
This example is slightly more complex than the DigitalOcean example, and a few parts warrant a deeper look:
- EC2 allows SSH keys to be defined by name—in my case, I have a key
lamp_awsin my AWS account. You should set thekey_namedefault to a key that you have in your account. - Instance tags are tags that AWS will attach to your instance, for categorization purposes. Besides the
Nametag (which is used for display purposes in the AWS Console), you can add whatever tags you want, to help categorize instances. -
t2.microwas used as the default instance type, since it falls within EC2’s free tier usage. If you just set up an account and keep all AWS resource usage within free tier limits, you won’t be billed anything. -
exact_countandcount_tagwork together to ensure AWS provisions only one of each of the instances we defined. Thecount_tagtells theec2module to match on theinventory_hostvalue, andexact_counttells the module to only provision1instance. If you wanted to remove all your instances, you could setexact_countto 0 and run the playbook again.
Each provisioned instance will have its metadata added to the registered created_instances variable, which we will use to build Ansible inventory groups for the server configuration playbooks.
100     - name: Add EC2 instances to inventory groups.
101       add_host:
102         name: "{{ item.1.tagged_instances.0.public_ip }}"
103         groups: "aws,{{ item.1.item.group }},{{ item.1.item.name }}"
104         # You can dynamically add inventory variables per-host.
105         ansible_user: centos
106         host_key_checking: false
107         mysql_replication_role: >-
108           {{ 'master' if (item.1.item.name == 'a4d.lamp.db.1')
109           else 'slave' }}
110         mysql_server_id: "{{ item.0 }}"
111       when: item.1.instances is defined
112       with_indexed_items: "{{ created_instances.results }}"
This add_host example is slightly simpler than the one for DigitalOcean, because AWS attaches metadata to EC2 instances which we can re-use when building groups or hostnames (e.g. item.1.item.group). We don’t have to use list indexes to fetch group names from the original instances variable.
We still use with_indexed_items so we can use the index to generate a unique ID per server for use in building the MySQL master-slave replication.
The final step in provisioning the EC2 instances is to ensure they are booted and able to accept connections.
114 - hosts: aws
115   gather_facts: false
116
117   tasks:
118     - name: Wait for hosts to become available.
119       wait_for_connection:
Now, modify the provision.yml file in the root of the project folder and change the provisioners import to look like the following:
1 ---
2 - import_playbook: provisioners/aws.yml
3 - import_playbook: configure.yml
Assuming the environment variables AWS_ACCESS_KEY_ID and AWS_SECRET_ACCESS_KEY are set in your current terminal session, you can run $ ansible-playbook provision.yml to provision and configure the infrastructure on AWS.
The entire process should take about 15 minutes, and once it’s complete, you should see something like this:
Visit the IP address of the Varnish server, and you will be greeted with a status page similar to the one generated by the Vagrant and DigitalOcean-based infrastructure:

As with the earlier examples, running ansible-playbook provision.yml again should produce no changes, because everything in this playbook is idempotent. If one of your instances was somehow terminated, running the playbook again would recreate and reconfigure the instance in a few minutes.
To terminate all the provisioned instances, you can change the exact_count in the ec2 task to 0, and run $ ansible-playbook provision.yml again.
AWS EC2 Dynamic inventory plugin
If you’d like to connect to the EC2 servers provisioned in AWS in another playbook, you don’t need to get the information in a play and use add_hosts to build the inventory inside a playbook.
Like the DigitalOcean example in the previous chapter, you can use the aws_ec2 dynamic inventory plugin to work with the servers in an AWS account.
Create an aws_ec2.yml inventory configuration file in an inventories/aws directory under the main playbook directory, and add the following:
 1 ---
 2 plugin: aws_ec2
 3
 4 regions:
 5   - us-east-1
 6
 7 hostnames:
 8   - ip-address
 9
10 keyed_groups:
11   - key: tags.inventory_group
To verify the inventory source works correctly, use the ansible-inventory command:
You can then use these dynamic inventory groups in other playbooks to run tasks on all the LAMP servers (e.g. lamp_aws), or just one subset (e.g. lamp_db or lamp_www).
Summary
We defined an entire highly-available PHP application infrastructure in a series of short Ansible playbooks, and then created provisioning configuration to build the infrastructure on either local VMs, DigitalOcean droplets, or AWS EC2 instances.
Once you start working on building infrastructure this way—by abstracting individual servers, then abstracting cloud provisioning—you’ll start to see some of Ansible’s true power of being more than just a configuration management tool. Imagine being able to create your own multi-datacenter, multi-provider infrastructure with Ansible and some basic configuration.
Amazon, DigitalOcean, Rackspace and other hosting providers have their own tooling and unique infrastructure merits. However, building infrastructure in a provider-agnostic fashion provides the agility and flexibility that allow you to treat hosting providers as commodities, and gives you the freedom to build more reliable and more performant application infrastructure.
Even if you plan on running everything within one hosting provider’s network (or in a private cloud, or even on a few bare metal servers), Ansible provides deep stack-specific integration so you can do whatever you need to do and manage the provider’s services within your playbooks.
ELK Logging with Ansible
Though application, database, and backup servers may be some of the most mission-critical components of a well-rounded infrastructure, one area that is equally important is a decent logging system.
In the old days when one or two servers could handle an entire website or application, you could work with built-in logfiles and rsyslog to troubleshoot issues or check trends in performance, errors, or overall traffic. With a typical modern infrastructure—like the example above, with six separate servers—it pays dividends to find a better solution for application, server, and firewall/authentication logging. Plain text files, logrotate, and grep don’t cut it anymore.
Among various modern logging and reporting toolsets, the ‘ELK’ stack (Elasticsearch, Logstash, and Kibana) has come to the fore as one of the best-performing and easiest-to-configure open source centralized logging solutions.
In our example, we’ll configure a single ELK server to handle aggregation, searching, and graphical display of logged data from a variety of other servers, and give a configuration example to aggregate common system and web server logs.
ELK Playbook
Just like our previous example, we’re going to let a few roles from Ansible Galaxy do the heavy lifting of actually installing and configuring Elasticsearch, Logstash, Filebeat, and Kibana. If you’re interested in reading through the roles that do this work, feel free to peruse them after they’ve been downloaded.
In this example, I’m going to highlight the important parts rather than walk through each role and variable in detail. Then I’ll show how you can use this base server to aggregate logs, then how to point other servers’ log files to the central server using Filebeat.
Here’s our main playbook, saved as provisioning/elk/main.yml:
 1 ---
 2 - hosts: logs
 3   gather_facts: yes
 4
 5   vars_files:
 6     - vars/main.yml
 7
 8   pre_tasks:
 9     - name: Update apt cache if needed.
10       apt: update_cache=yes cache_valid_time=86400
11
12   roles:
13     - geerlingguy.java
14     - geerlingguy.nginx
15     - geerlingguy.pip
16     - geerlingguy.elasticsearch
17     - geerlingguy.elasticsearch-curator
18     - geerlingguy.kibana
19     - geerlingguy.logstash
20     - geerlingguy.filebeat
This assumes you have a logs group in your inventory with at least one server listed. It also assumes you have all of those roles installed via Galaxy, using the following requirements.yml:
 1 ---
 2 roles:
 3 - name: geerlingguy.java
 4 - name: geerlingguy.nginx
 5 - name: geerlingguy.pip
 6 - name: geerlingguy.elasticsearch
 7   version: 4.1.1
 8 - name: geerlingguy.elasticsearch-curator
 9   version: 2.1.0
10 - name: geerlingguy.kibana
11   version: 4.0.0
12 - name: geerlingguy.logstash
13   version: 5.1.0
14 - name: geerlingguy.filebeat
15   version: 3.0.1
The playbook includes a vars file located in provisioning/elk/vars/main.yml, so create that file and put the following inside:
 1 ---
 2 java_packages:
 3   - openjdk-11-jdk
 4
 5 nginx_user: www-data
 6 nginx_remove_default_vhost: true
 7 nginx_vhosts:
 8   # Kibana proxy.
 9   - listen: "80 default_server"
10     filename: kibana.conf
11     server_name: logs.test
12     extra_parameters: |
13       location / {
14           include /etc/nginx/proxy_params;
15           proxy_pass          http://localhost:5601;
16           proxy_set_header   Authorization "";
17           proxy_read_timeout  90s;
18       }
19
20 elasticsearch_curator_pip_package: python3-pip
21
22 logstash_ssl_key_file: elk-example.p8
23 logstash_ssl_certificate_file: elk-example.crt
24
25 filebeat_output_logstash_enabled: true
26 filebeat_output_logstash_hosts:
27   - "logs.test:5044"
28
29 filebeat_ssl_key_file: elk-example.p8
30 filebeat_ssl_certificate_file: elk-example.crt
31 filebeat_ssl_insecure: "true"
32
33 filebeat_inputs:
34   - type: log
35     paths:
36       - /var/log/auth.log
The Nginx variables define one server directive, which proxies requests on port 80 to the Kibana instance running on port 5601 (Kibana’s default port).
The Logstash SSL variables give the name of a local file which will be copied into place and used by Logstash to encrypt log traffic to and from Logstash. You can generate the certificate using the command:
Set the CN value to the hostname of your ELK server (in our example, logs.test. Then convert the key format to pkcs8 (the format required by Logstash) using the command:
The Filebeat variables tell Filebeat to connect to the Logstash server (in this case, the hostname logs.test on the default Logstash port 5044), and supply the certificate and key Filebeat should use to encrypt log traffic. The filebeat_ssl_insecure variable tells Logstash to accept a self-signed certificate like the one we generated with openssl.
The last variable, filebeat_inputs, supplies a list of inputs Filebeat will pick up and stream to Logstash. In this case, it’s just one input, the auth.log file which logs all authentication-related events on a Debian-based server.
If you want to get this ELK server up and running quickly, you can create a local VM using Vagrant like you have in most other examples in the book. Create a Vagrantfile in the same directory as the provisioning folder, with the following contents:
 1 # -*- mode: ruby -*-
 2 # vi: set ft=ruby :
 3
 4 VAGRANTFILE_API_VERSION = "2"
 5
 6 Vagrant.configure(VAGRANTFILE_API_VERSION) do |config|
 7   config.vm.box = "geerlingguy/ubuntu2004"
 8   config.vm.synced_folder '.', '/vagrant', disabled: true
 9   config.ssh.insert_key = false
10
11   config.vm.provider :virtualbox do |v|
12     v.memory = 4096
13     v.cpus = 2
14     v.customize ["modifyvm", :id, "--natdnshostresolver1", "on"]
15     v.customize ["modifyvm", :id, "--ioapic", "on"]
16   end
17
18   # ELK server.
19   config.vm.define "logs" do |logs|
20     logs.vm.hostname = "logs.test"
21     logs.vm.network :private_network, ip: "192.168.9.90"
22
23     logs.vm.provision :ansible do |ansible|
24       ansible.playbook = "provisioning/elk/main.yml"
25       ansible.inventory_path = "provisioning/elk/inventory"
26       ansible.become = true
27     end
28   end
29
30 end
This Vagrant configuration expects an inventory file at provisioning/elk/inventory, so create one with the following contents:
1 [logs]
2 logs.test ansible_ssh_host=192.168.9.90 ansible_ssh_port=22
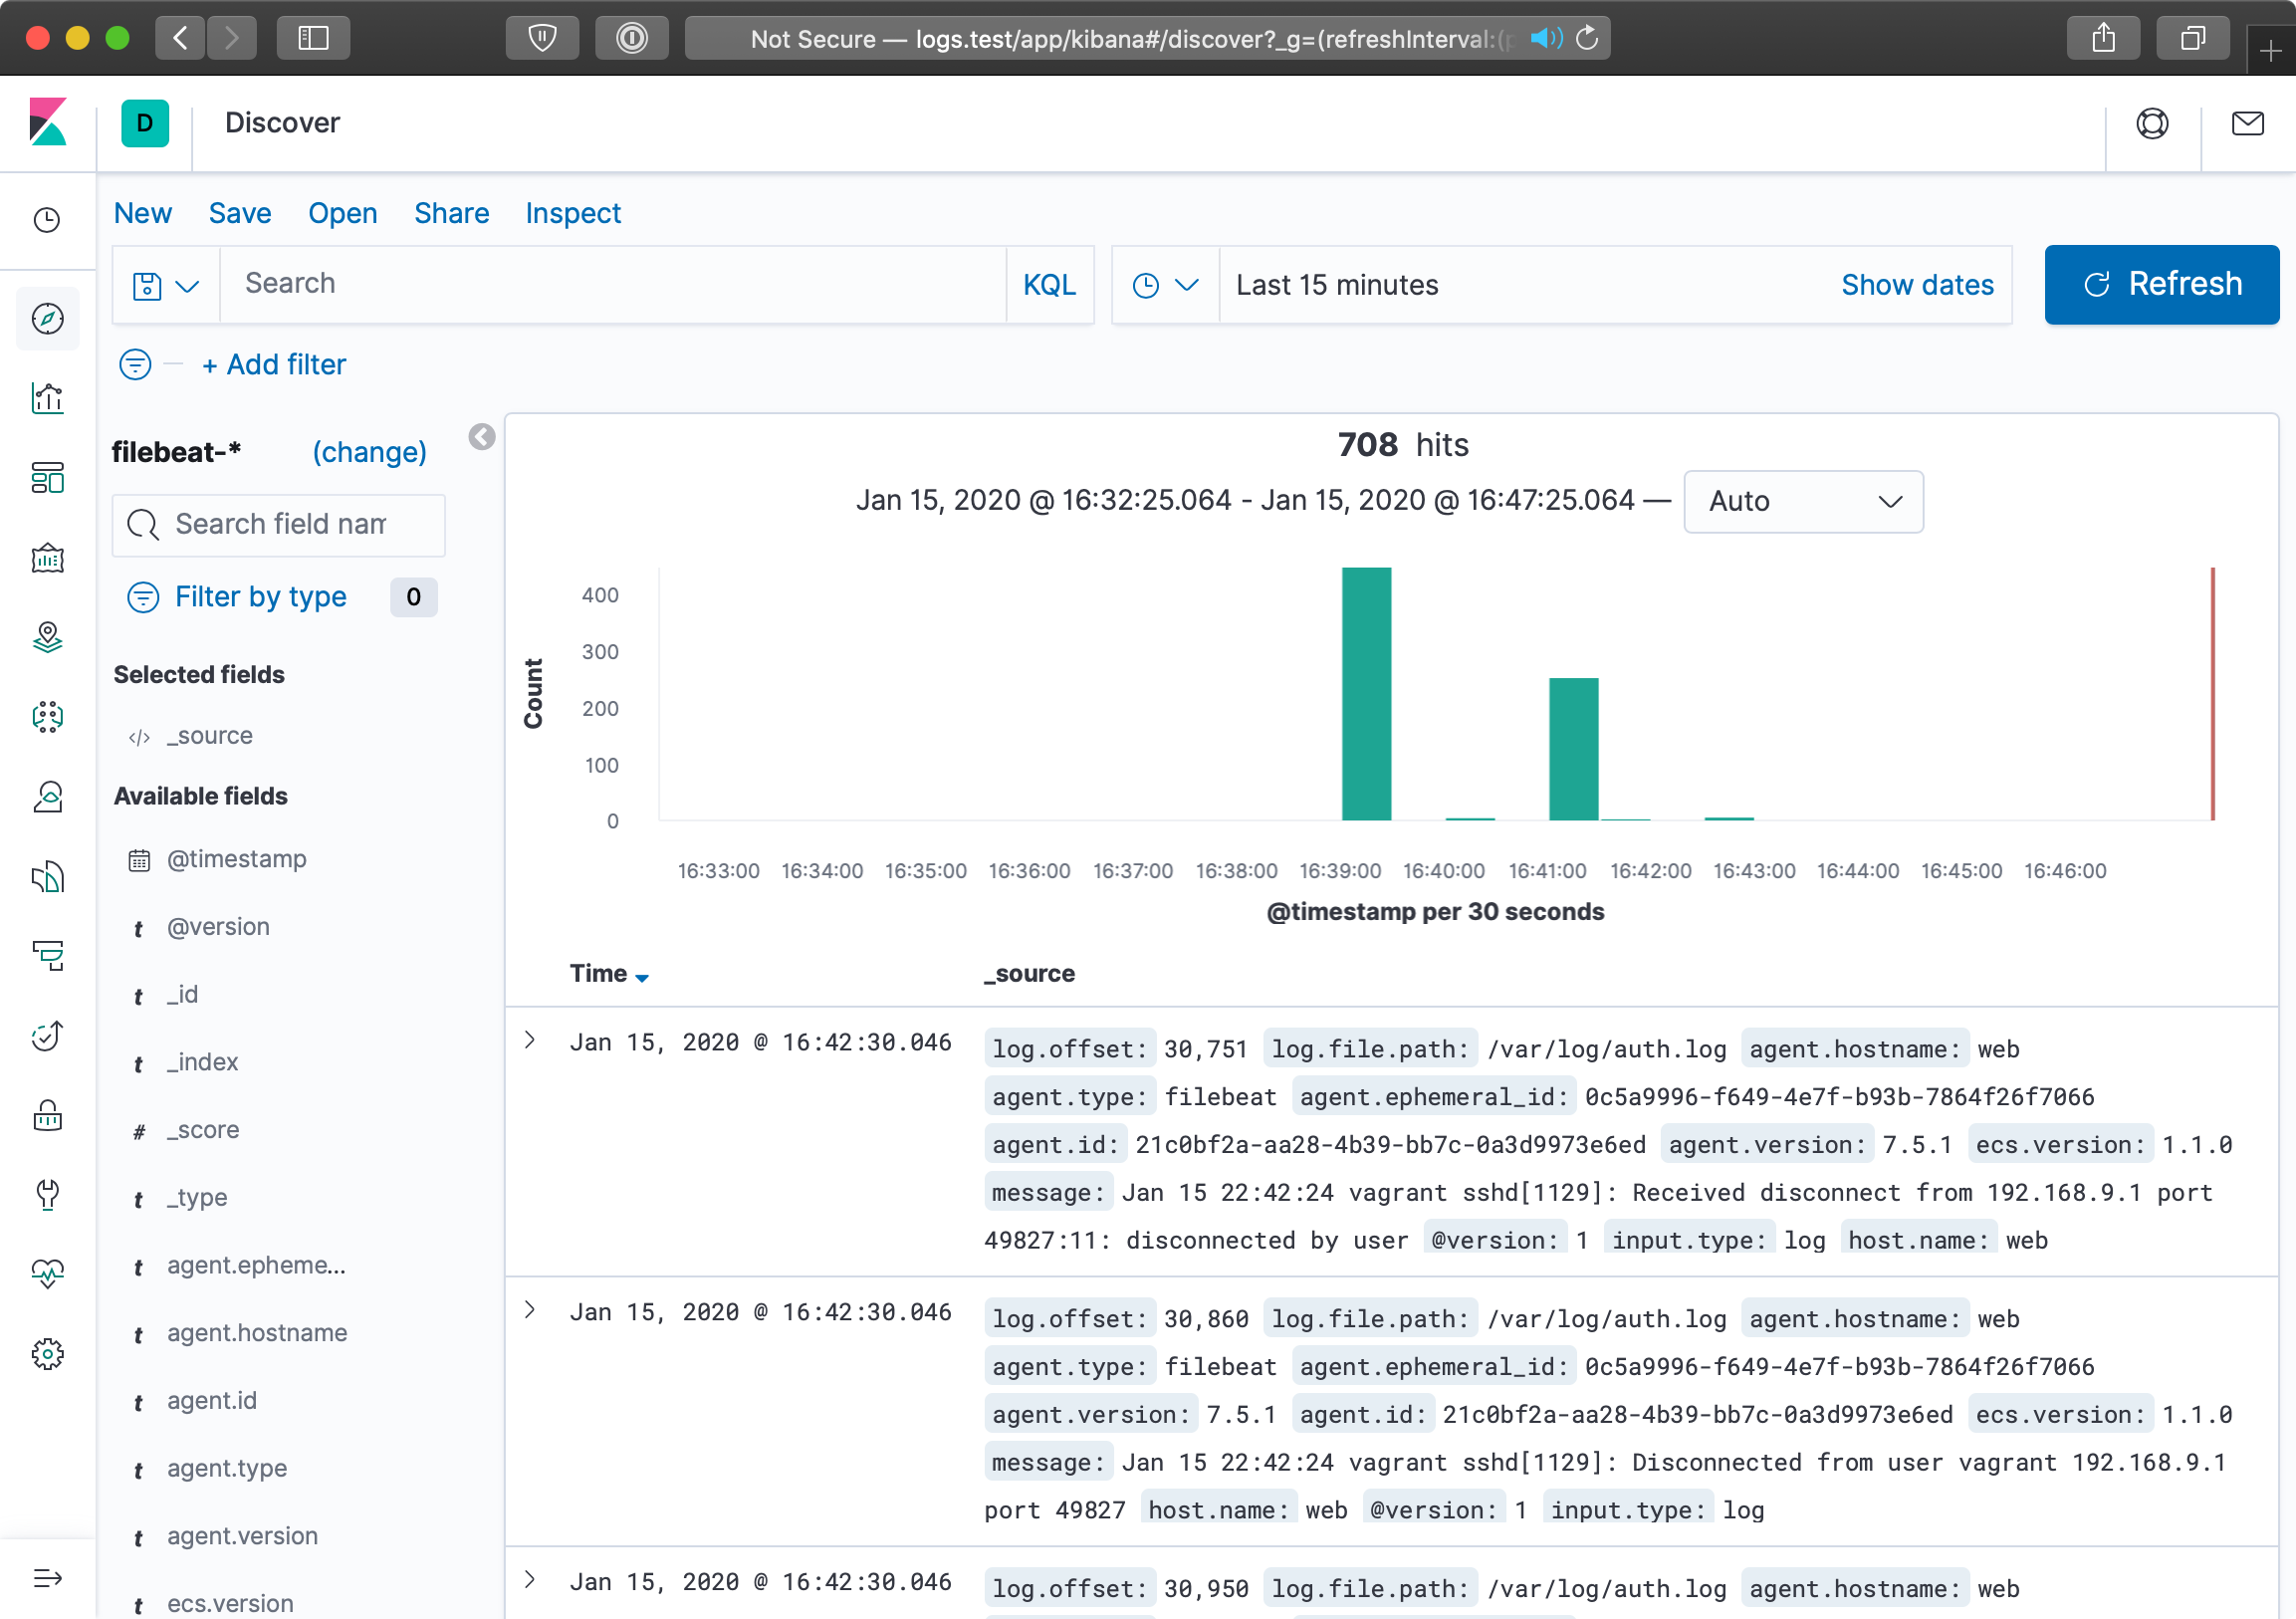
Now, run vagrant up. The build should take about five minutes, and upon completion, if you add a line like logs.test 192.168.9.90 to your /etc/hosts file, you can visit http://logs.test/ in your browser and see Kibana’s default homepage:
You can start exploring log data after configuring Kibana to search filebeat indices:
- Click on the home page link to ‘Connect to your Elasticsearch index’
- Enter an index pattern like
filebeat-*(which will match all Filebeat indices), and click ‘Next step’ - Choose
@timestampfor the Time Filter field name, and click ‘Create index pattern’
Now that Kibana knows how to read the filebeat index, you can discover and search through log data in the ‘Discover’ UI, which is the top link in the sidebar:
We won’t dive too deep into customizing Kibana’s interface with saved searches, visualizations, and dashboards, since there are many guides to using Kibana, including Kibana’s official guide.
Forwarding Logs from Other Servers
It’s great that we have the ELK stack running. Elasticsearch will store and make available log data with one search index per day, Logstash will listen for log entries, Filebeat will send entries in /var/log/auth.log to Logstash, and Kibana will organize the logged data in useful visualizations.
Configuring additional servers to direct their logs to our new Logstash server is fairly simple using Filebeat. The basic steps we’ll follow are:
- Set up another server in the Vagrantfile.
- Set up an Ansible playbook to install and configure Filebeat alongside the application running on the server.
- Boot the server and watch as the logs are forwarded to the main ELK server.
Let’s begin by creating a new Nginx web server. It’s useful to monitor web server access logs for a variety of reasons, especially to watch for traffic spikes and increases in non-200 responses for certain resources. Add the following server definition inside the Vagrantfile, just after the end of the ELK server definition:
30   # Web server.
31   config.vm.define "web" do |web|
32     web.vm.hostname = "web.test"
33     web.vm.network :private_network, ip: "192.168.9.91"
34
35     web.vm.provider :virtualbox do |v|
36       v.memory = 512
37       v.cpus = 1
38     end
39
40     web.vm.provision :ansible do |ansible|
41       ansible.playbook = "provisioning/web/main.yml"
42       ansible.inventory_path = "provisioning/web/inventory"
43       ansible.become = true
44     end
45   end
We’ll next set up the playbook to install and configure both Nginx and Filebeat, at provisioning/web/main.yml:
 1 ---
 2 - hosts: web
 3   gather_facts: yes
 4
 5   vars_files:
 6     - vars/main.yml
 7
 8   pre_tasks:
 9     - name: Update apt cache if needed.
10       apt: update_cache=yes cache_valid_time=86400
11
12   roles:
13     - geerlingguy.nginx
14     - geerlingguy.filebeat
15
16   tasks:
17     - name: Set up virtual host for testing.
18       copy:
19         src: files/example.conf
20         dest: /etc/nginx/sites-enabled/example.conf
21         owner: root
22         group: root
23         mode: 0644
24       notify: restart nginx
25
26     - name: Ensure logs server is in hosts file.
27       lineinfile:
28         dest: /etc/hosts
29         regexp: '.*logs\.test$'
30         line: "192.168.9.90 logs.test"
31         state: present
This playbook runs the geerlingguy.nginx and geerlingguy.filebeat roles, and in the tasks, there are two additional tasks: one to configure a server in Nginx’s configuration (example.conf), and one to ensure the webserver knows the correct IP address for the logs.test server.
Create the Nginx configuration file at the path provisioning/web/files/example.conf, and define one Nginx virtualhost for our testing:
1 server {
2   listen 80 default_server;
3
4   root /usr/share/nginx/www;
5   index index.html index.htm;
6
7   access_log /var/log/nginx/access.log combined;
8   error_log /var/log/nginx/error.log debug;
9 }
Since this is the only server definition, and it’s set as the default_server on port 80, all requests will be directed to it. We routed the access_log to /var/log/nginx/access.log, and told Nginx to write log entries using the combined format, which is how our Logstash server expects nginx access logs to be formatted.
Next, set up the required variables to tell the nginx and logstash-forwarder roles how to configure their respective services. Inside provisioning/web/vars/main.yml:
 1 ---
 2 nginx_user: www-data
 3 nginx_remove_default_vhost: true
 4
 5 filebeat_output_logstash_enabled: true
 6 filebeat_output_logstash_hosts:
 7   - "logs.test:5044"
 8
 9 filebeat_ssl_key_file: elk-example.p8
10 filebeat_ssl_certificate_file: elk-example.crt
11 filebeat_ssl_insecure: "true"
12
13 filebeat_inputs:
14   - type: log
15     paths:
16       - /var/log/auth.log
17   - type: log
18     paths:
19       - /var/log/nginx/access.log
The nginx variables remove the default virtualhost entry and ensure Nginx will run optimally on our Ubuntu server. The filebeat variables tell the filebeat role how to connect to the central ELK server, and which logs to deliver to Logstash:
-
filebeat_output_logstash_enabledand_hosts: Tells the role to configure Filebeat to connect to Logstash, and the host and port to use. -
logstash_ssl_*: Provide a key and certificate to use for encrypted log transport (note that these files should be in the same directory as the playbook, copied over from theelkplaybook). -
filebeat_inputs: Defines a list of inputs, which identify log files or other types of log inputs. In this case, we’re configuring the authentication log (/var/log/auth.log), which is asyslog-formatted log file, and the combined-format access log from Nginx (/var/log/nginx/access.log).
To allow Vagrant to pass the proper connection details to Ansible, create a file named provisioning/web/inventory with the web.test host details:
1 [web]
2 web.test ansible_ssh_host=192.168.9.91 ansible_ssh_port=22
Run vagrant up again. Vagrant should verify that the first server (logs) is running, then create and run the Ansible provisioner on the newly-defined web Nginx server.
You can load http://192.168.9.91/ or http://web.test/ in your browser, and you should see a Welcome to nginx! message on the page. You can refresh the page a few times, then switch back over to http://logs.test/ to view some new log entries on the ELK server:
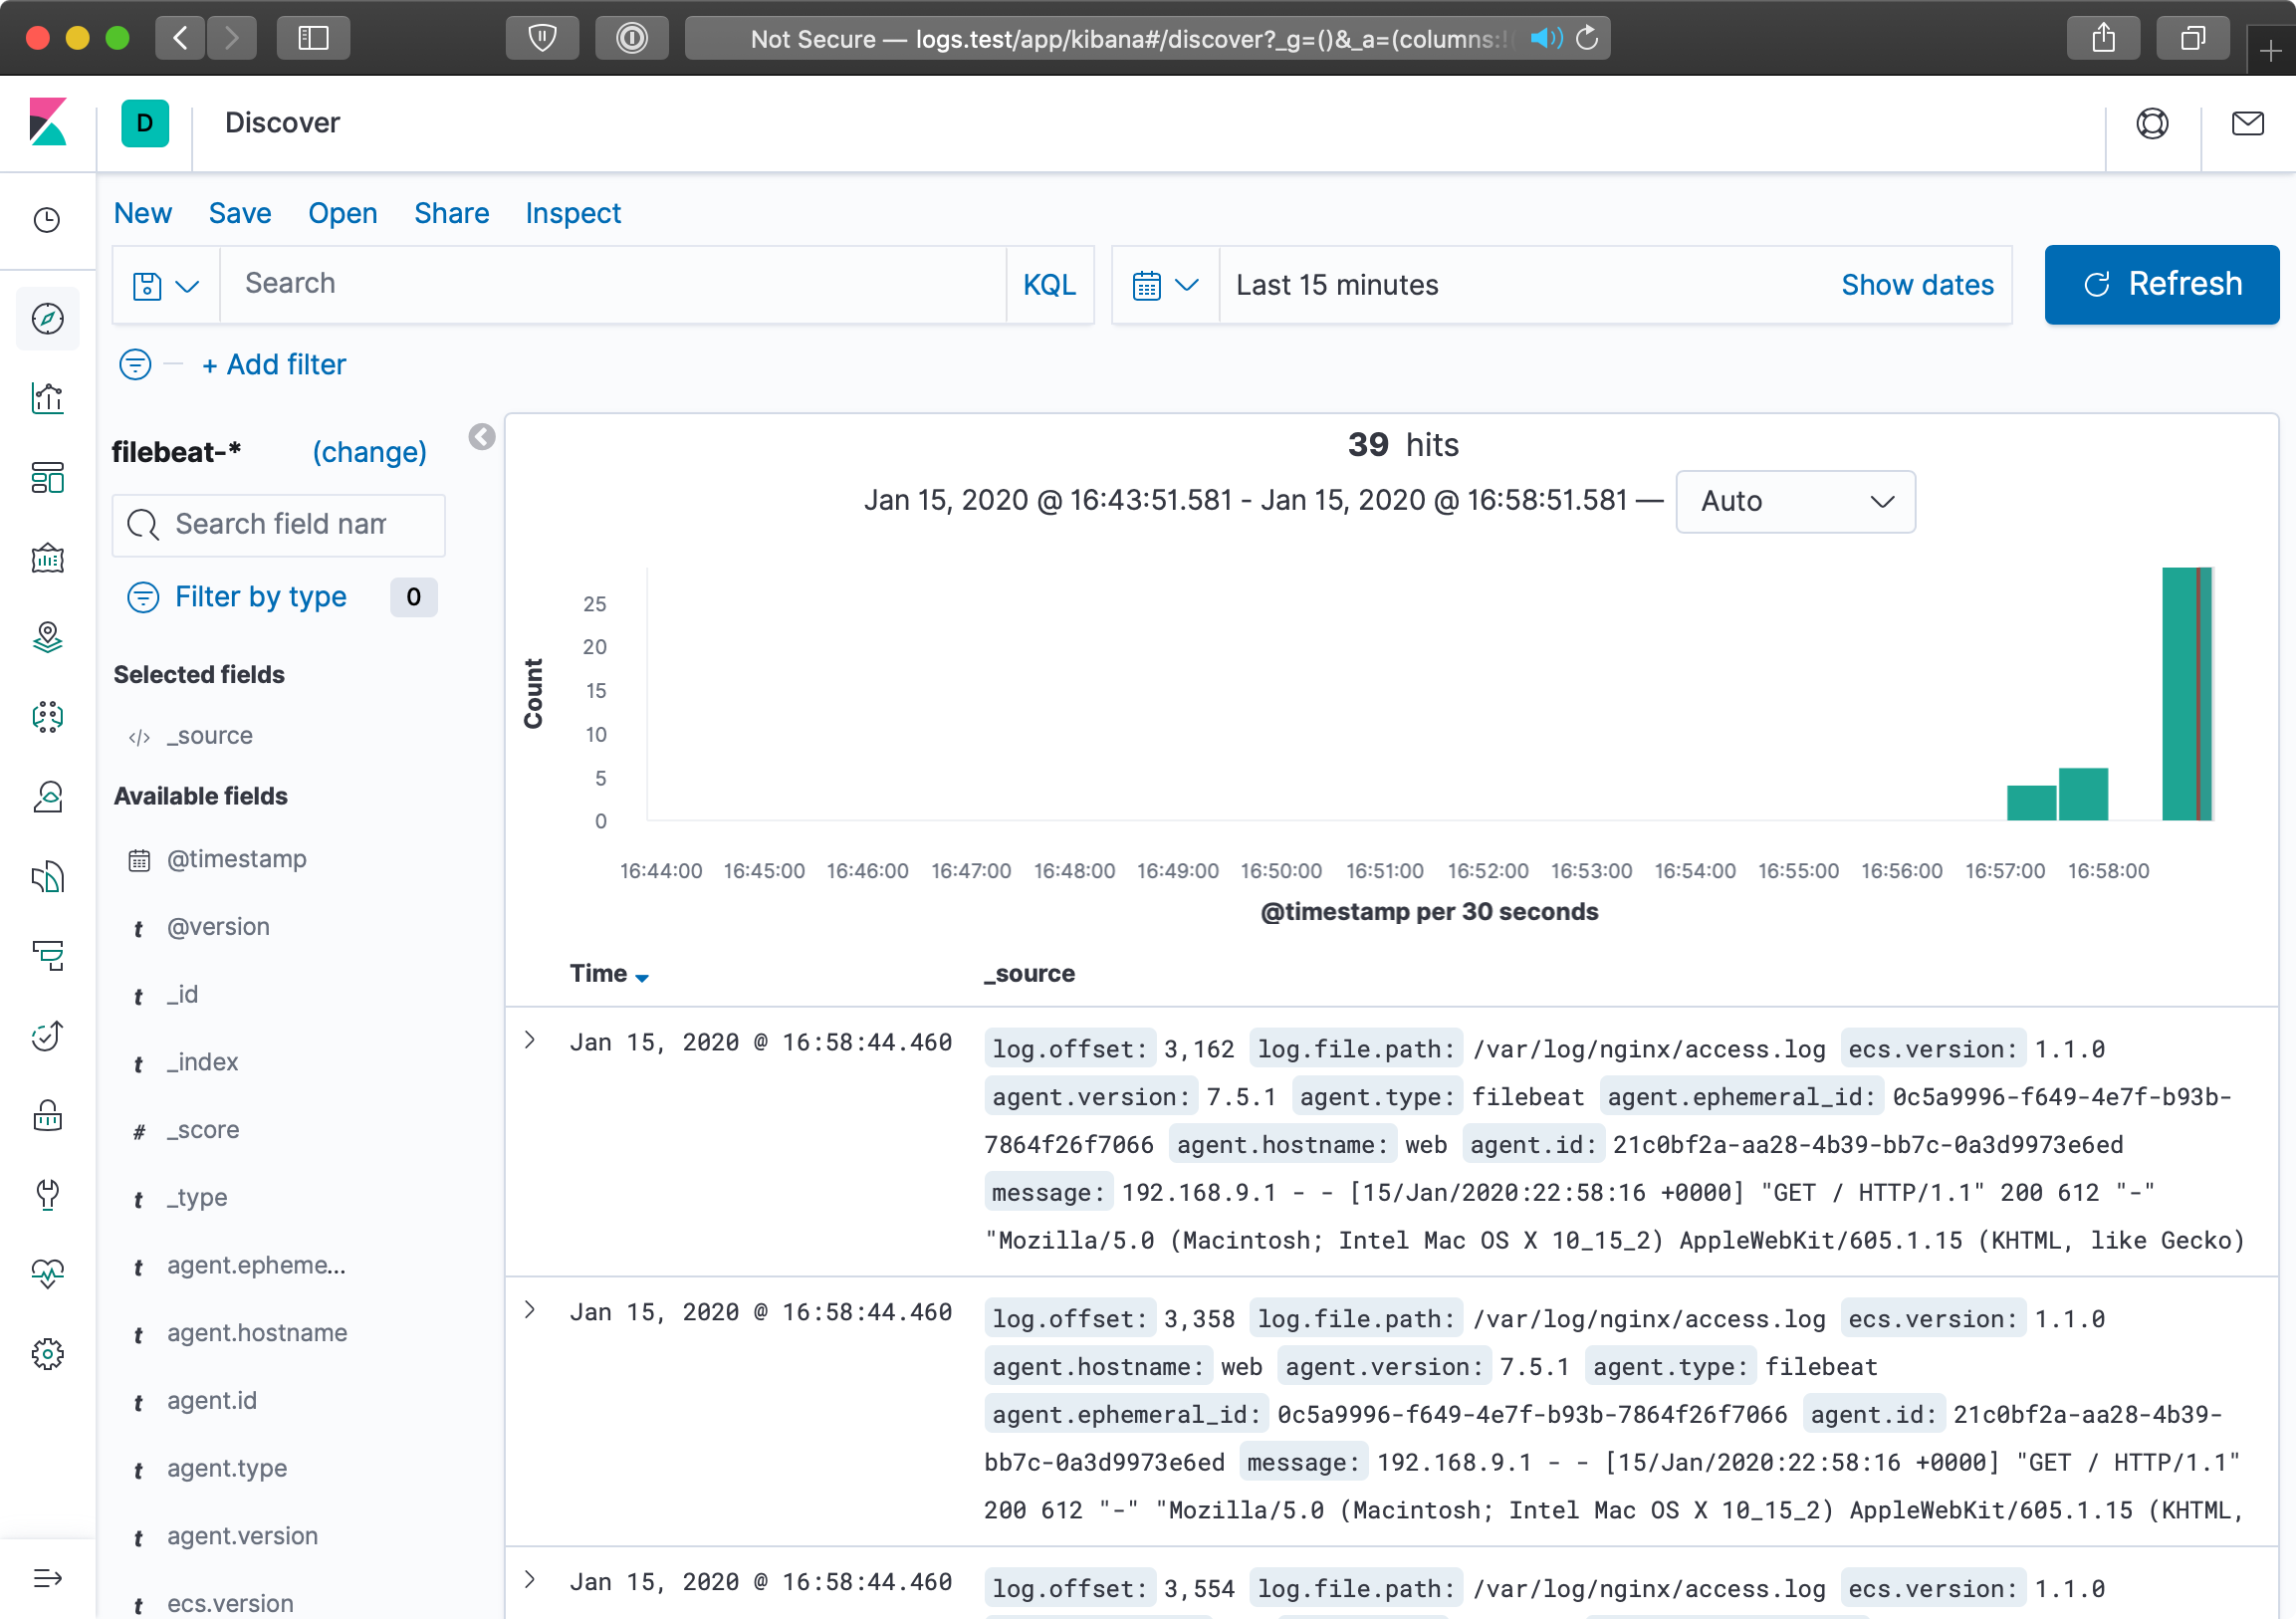
A few requests being logged through logstash forwarder isn’t all that exciting. Let’s use the popular ab tool available most anywhere to put some load on the web server. On a modest laptop, running the command below resulted in Nginx serving around 1,200 requests per second.
During the course of the load test, I set Kibana to show only the past 5 minutes of log data (automatically refreshed every 5 seconds) and I could monitor the requests on the ELK server just a few seconds after they were served by Nginx:
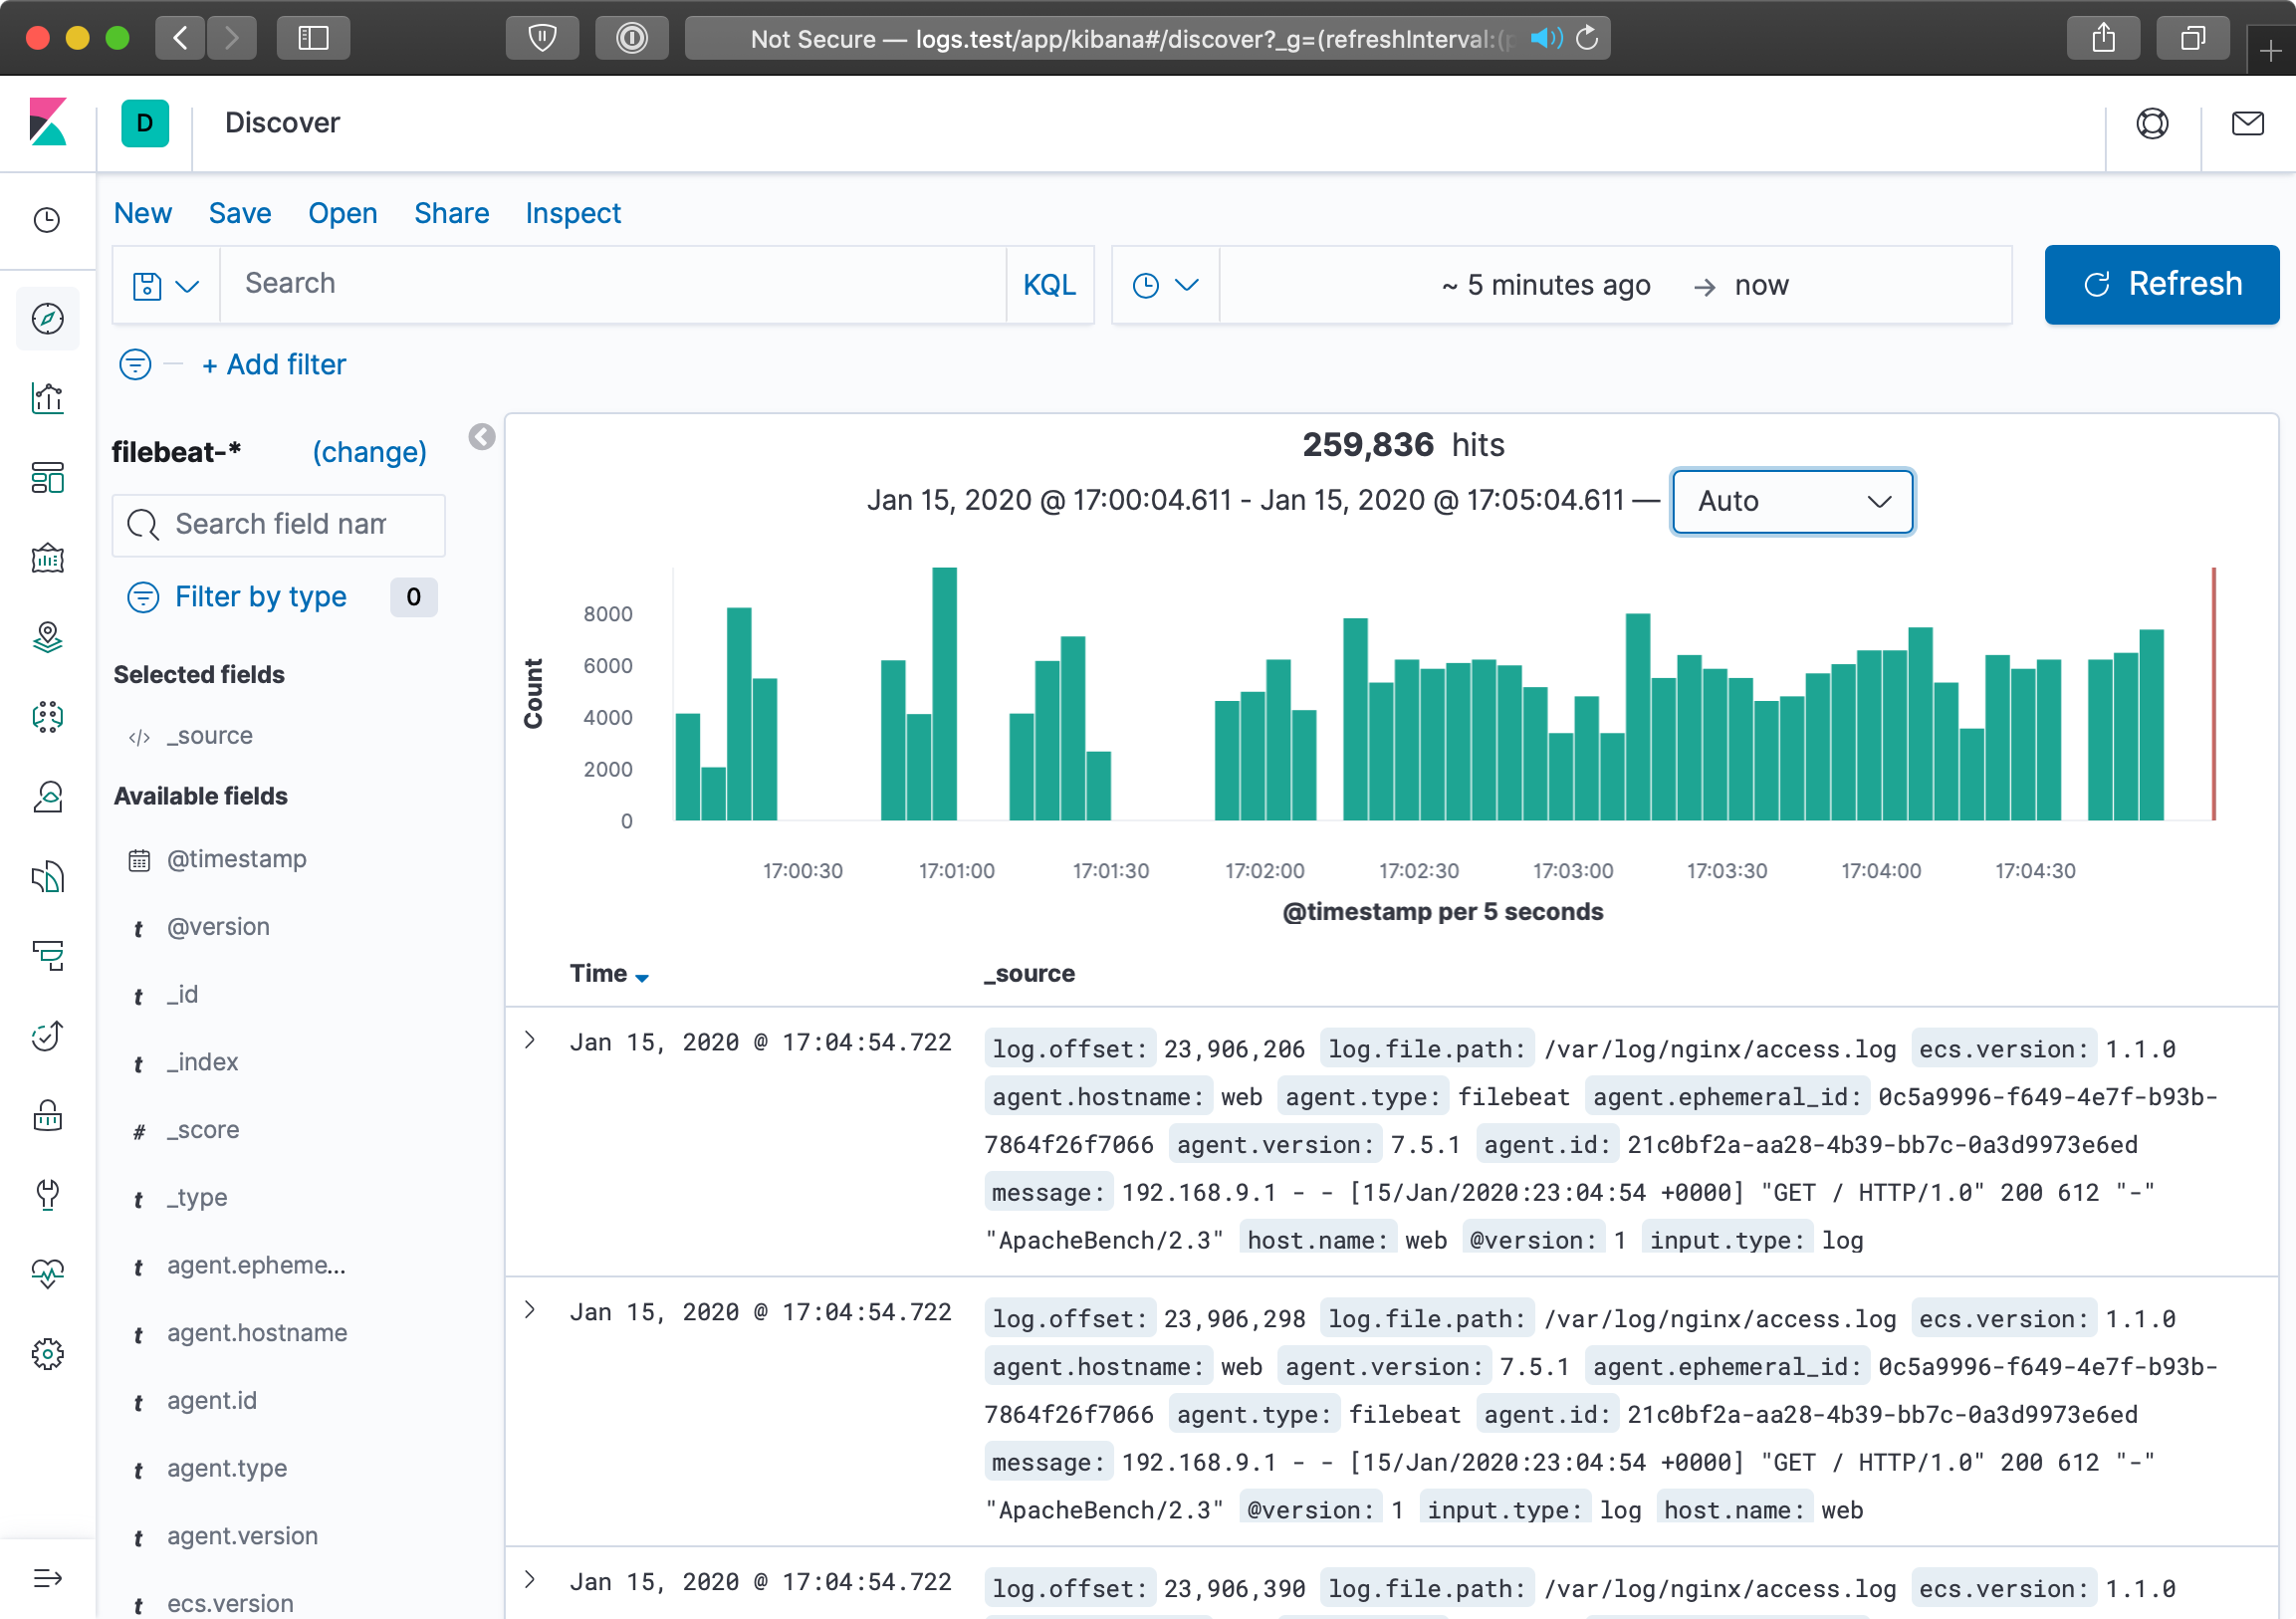
Filebeat uses a highly-efficient TCP-like protocol, Lumberjack, to transmit log entries securely between servers. With the right tuning and scaling, you can efficiently process and display thousands of requests per second across your infrastructure! For most, even the simple example demonstrated above would adequately cover an entire infrastructure’s logging and log analysis needs.
Summary
Log aggregation and analysis are two fields that see constant improvements and innovation. There are many SaaS products and proprietary solutions that can assist with logging, but few match the flexibility, security, and TCO of Elasticsearch, Logstash and Kibana.
Ansible is the simplest way to configure an ELK server and direct all your infrastructure’s pertinent log data to the server.
GlusterFS Distributed File System Configuration with Ansible
Modern infrastructure often involves some amount of horizontal scaling; instead of having one giant server with one storage volume, one database, one application instance, etc., most apps use two, four, ten, or dozens of servers.

Many applications can be scaled horizontally with ease. But what happens when you need shared resources, like files, application code, or other transient data, to be shared on all the servers? And how do you have this data scale out with your infrastructure, in a fast but reliable way? There are many different approaches to synchronizing or distributing files across servers:
- Set up rsync either on cron or via inotify to synchronize smaller sets of files on a regular basis.
- Store everything in a code repository (e.g. Git, SVN, etc.) and deploy files to each server using Ansible.
- Have one large volume on a file server and mount it via NFS or some other file sharing protocol.
- Have one master SAN that’s mounted on each of the servers.
- Use a distributed file system, like Gluster, Lustre, Fraunhofer, or Ceph.
Some options are easier to set up than others, and all have benefits—and drawbacks. Rsync, git, or NFS offer simple initial setup, and low impact on filesystem performance (in many scenarios). But if you need more flexibility and scalability, less network overhead, and greater fault tolerance, you will have to consider something that requires more configuration (e.g. a distributed file system) and/or more hardware (e.g. a SAN).
GlusterFS is licensed under the AGPL license, has good documentation, and a fairly active support community (especially in the #gluster IRC channel). But to someone new to distributed file systems, it can be daunting to get set it up the first time.
Configuring Gluster - Basic Overview
To get Gluster working on a basic two-server setup (so you can have one folder synchronized and replicated across the two servers—allowing one server to go down completely, and the other to still have access to the files), you need to do the following:
- Install Gluster server and client on each server, and start the server daemon.
- (On both servers) Create a ‘brick’ directory (where Gluster will store files for a given volume).
- (On both servers) Create a directory to be used as a mount point (a directory where you’ll have Gluster mount the shared volume).
- (On both servers) Use
gluster peer probeto have Gluster connect to the other server. - (On one server) Use
gluster volume createto create a new Gluster volume. - (On one server) Use
gluster volume startto start the new Gluster volume. - (On both servers) Mount the gluster volume (adding a record to
/etc/fstabto make the mount permanent).
Additionally, you need to make sure you have the following ports open on both servers (so Gluster can communicate): TCP ports 111, 24007-24011, 49152-49153, and UDP port 111. For each extra server in your Gluster cluster, you need to add an additional TCP port in the 49xxx range.
Configuring Gluster with Ansible
For demonstration purposes, we’ll set up a simple two-server infrastructure using Vagrant, and create a shared volume between the two, with two replicas (meaning all files will be replicated on each server). As your infrastructure grows, you can set other options for data consistency and transport according to your needs.
To build the two-server infrastructure locally, create a folder gluster containing the following Vagrantfile:
 1 # -*- mode: ruby -*-
 2 # vi: set ft=ruby :
 3
 4 Vagrant.configure("2") do |config|
 5   # Base VM OS configuration.
 6   config.vm.box = "geerlingguy/ubuntu2004"
 7   config.vm.synced_folder '.', '/vagrant', disabled: true
 8   config.ssh.insert_key = false
 9
10   config.vm.provider :virtualbox do |v|
11     v.memory = 256
12     v.cpus = 1
13   end
14
15   # Define two VMs with static private IP addresses.
16   boxes = [
17     { :name => "gluster1", :ip => "192.168.29.2" },
18     { :name => "gluster2", :ip => "192.168.29.3" }
19   ]
20
21   # Provision each of the VMs.
22   boxes.each do |opts|
23     config.vm.define opts[:name] do |config|
24       config.vm.hostname = opts[:name]
25       config.vm.network :private_network, ip: opts[:ip]
26
27       # Provision both VMs using Ansible after the last VM is booted.
28       if opts[:name] == "gluster2"
29         config.vm.provision "ansible" do |ansible|
30           ansible.playbook = "playbooks/provision.yml"
31           ansible.inventory_path = "inventory"
32           ansible.limit = "all"
33         end
34       end
35     end
36   end
37
38 end
This configuration creates two servers, gluster1 and gluster2, and will run a playbook at playbooks/provision.yml on the servers defined in an inventory file in the same directory as the Vagrantfile.
Create the inventory file to help Ansible connect to the two servers:
1 [gluster]
2 192.168.29.2
3 192.168.29.3
4
5 [gluster:vars]
6 ansible_user=vagrant
7 ansible_ssh_private_key_file=~/.vagrant.d/insecure_private_key
Now, create a playbook named provision.yml inside a playbooks directory:
 1 ---
 2 - hosts: gluster
 3   become: yes
 4
 5   vars_files:
 6     - vars.yml
 7
 8   roles:
 9     - geerlingguy.firewall
10     - geerlingguy.glusterfs
11
12   tasks:
13     - name: Ensure Gluster brick and mount directories exist.
14       file:
15         path: "{{ item }}"
16         state: directory
17         mode: 0775
18       with_items:
19         - "{{ gluster_brick_dir }}"
20         - "{{ gluster_mount_dir }}"
21
22     - name: Configure Gluster volume.
23       gluster_volume:
24         state: present
25         name: "{{ gluster_brick_name }}"
26         brick: "{{ gluster_brick_dir }}"
27         replicas: 2
28         cluster: "{{ groups.gluster | join(',') }}"
29         host: "{{ inventory_hostname }}"
30         force: yes
31       run_once: true
32
33     - name: Ensure Gluster volume is mounted.
34       mount:
35         name: "{{ gluster_mount_dir }}"
36         src: "{{ inventory_hostname }}:/{{ gluster_brick_name }}"
37         fstype: glusterfs
38         opts: "defaults,_netdev"
39         state: mounted
This playbook uses two roles to set up a firewall and install the required packages for GlusterFS to work. You can manually install both of the required roles with the command ansible-galaxy role install geerlingguy.firewall geerlingguy.glusterfs, or add them to a requirements.yml file and install with ansible-galaxy install -r requirements.yml.
Gluster requires a ‘brick’ directory to use as a virtual filesystem, and our servers also need a directory where the filesystem can be mounted, so the first file task ensures both directories exist (gluster_brick_dir and gluster_mount_dir). Since we need to use these directory paths more than once, we use variables which will be defined later, in vars.yml.
Ansible’s gluster_volume module (added in Ansible 1.9) does all the hard work of probing peer servers, setting up the brick as a Gluster filesystem, and configuring the brick for replication. Some of the most important configuration parameters for the gluster_volume module include:
-
state: Setting this topresentmakes sure the brick is present. It will also start the volume when it is first created by default, though this behavior can be overridden by thestart_on_createoption. -
nameandbrickgive the Gluster brick a name and location on the server, respectively. In this example, the brick will be located on the boot volume, so we also have to addforce: yes, or Gluster will complain about not having the brick on a separate volume. -
replicastells Gluster how many replicas should exist; this number can vary depending on how many servers you have in the brick’scluster, and how much tolerance you have for server outages. We won’t get much into tuning GlusterFS for performance and resiliency, but most situations warrant a value of2or3. -
clusterdefines all the hosts which will contain the distributed filesystem. In this case, all theglusterservers in our Ansible inventory should be included, so we use a Jinjajoinfilter to join all the addresses into a list. -
hostsets the host for peer probing explicitly. If you don’t set this, you can sometimes get errors on brick creation, depending on your network configuration.
We only need to run the gluster_volume module once for all the servers, so we add run_once: true.
The last task in the playbook uses Ansible’s mount module to ensure the Gluster volume is mounted on each of the servers, in the gluster_mount_dir.
After the playbook is created, we need to define all the variables used in the playbook. Create a vars.yml file inside the playbooks directory, with the following variables:
 1 ---
 2 # Firewall configuration.
 3 firewall_allowed_tcp_ports:
 4   - 22
 5   # For Gluster.
 6   - 111
 7   # Port-mapper for Gluster 3.4+.
 8   # - 2049
 9   # Gluster Daemon.
10   - 24007
11   # 24009+ for Gluster <= 3.3; 49152+ for Gluster 3.4+.
12   - 24009
13   - 24010
14   - 49152
15   - 49153
16   # Gluster inline NFS server.
17   - 38465
18   - 38466
19 firewall_allowed_udp_ports:
20   - 111
21
22 # Gluster configuration.
23 gluster_mount_dir: /mnt/gluster
24 gluster_brick_dir: /srv/gluster/brick
25 gluster_brick_name: gluster
This variables file should be pretty self-explanatory; all the ports required for Gluster are opened in the firewall, and the three Gluster-related variables we use in the playbook are defined.
Now that we have everything set up, the folder structure should look like this:
Change directory into the gluster directory, and run vagrant up. After a few minutes, provisioning should have completed successfully. To ensure Gluster is working properly, you can run the following two commands, which should give information about Gluster’s peer connections and the configured gluster volume:
You can also do the following to confirm that files are being replicated/distributed correctly:
- Log into the first server:
vagrant ssh gluster1 - Create a file in the mounted gluster volume:
sudo touch /mnt/gluster/test - Log out of the first server:
exit - Log into the second server:
vagrant ssh gluster2 - List the contents of the gluster directory:
ls /mnt/gluster
You should see the test file you created in step 2; this means Gluster is working correctly!
Summary
Deploying distributed file systems like Gluster can seem challenging, but Ansible simplifies the process, and more importantly, does so idempotently; each time you run the playbook again, it will ensure everything stays configured as you’ve set it.
This example Gluster configuration can be found in its entirety on GitHub, in the Gluster example directory.
Mac Provisioning with Ansible and Homebrew
The next example will be specific to the Mac, but the principle behind it applies universally. How many times have you wanted to hit the ‘reset’ button on your day-to-day workstation or personal computer? How much time to you spend automating configuration and testing of applications and infrastructure at your day job, and how little do you spend automating your own local environment?
Over the past few years, as I’ve gone through four Macs (one personal, three employer-provided), I decided to start fresh on each new Mac (rather than transfer all my cruft from my old Mac to my new Mac through Apple’s Migration Assistant). I had a problem, though; I had to spend at least 4-6 hours on each Mac, downloading, installing, and configuring everything. And I had another problem—since I actively used at least two separate Macs, I had to manually install and configure new software on both Macs whenever I wanted to try a new tool.
To restore order to this madness, I wrapped up all the configuration I could into a set of dotfiles and used git to synchronize the dotfiles to all my workstations.
However, even with the assistance of Homebrew, an excellent package manager for OS X, there was still a lot of manual labor involved in installing and configuring my favorite apps and command line tools.
Running Ansible playbooks locally
We saw examples of running playbooks with connection: local earlier while provisioning virtual machines in the cloud through our local workstation. But in fact, you can perform any Ansible task using a local connection. This is how we will configure our local workstation, using Ansible.
I usually begin building a playbook by adding the basic scaffolding first, then filling in details as I go. You can follow along by creating the playbook main.yml with:
 1 ---
 2 - hosts: localhost
 3   user: jgeerling
 4   connection: local
 5
 6   vars_files:
 7     - vars/main.yml
 8
 9   roles: []
10
11   tasks: []
We’ll store any variables we need in the included vars/main.yml file. The user is set to my local user account (in this case, jgeerling), so file permissions are set for my account, and tasks are run under my own account in order to minimize surprises.
Automating Homebrew package and app management
Since I use Homebrew (billed as “the missing package manager for OS X”) for most of my application installation and configuration, I created the role geerlingguy.homebrew, which first installs Homebrew and then installs all the applications and packages I configure in a few simple variables.
The next step, then, is to add the Homebrew role and configure the required variables. Inside main.yml, update the roles section:
 9   roles:
10     - geerlingguy.homebrew
Then add the following into vars/main.yml:
 1 ---
 2 homebrew_installed_packages:
 3   - sqlite
 4   - mysql
 5   - php
 6   - python
 7   - ssh-copy-id
 8   - cowsay
 9   - pv
10   - wget
11   - brew-cask
12
13 homebrew_taps:
14   - homebrew/core
15   - homebrew/cask
16
17 homebrew_cask_appdir: /Applications
18 homebrew_cask_apps:
19   - docker
20   - google-chrome
21   - sequel-pro
22   - slack
Homebrew has a few tricks up its sleeve, like being able to manage general packages like PHP, MySQL, Python, Pipe Viewer, etc. natively (using commands like brew install [package] and brew uninstall package), and can also install and manage general application installation for many Mac apps, like Chrome, Firefox, VLC, etc. using brew cask.
To anyone who’s set up a new Mac the old-fashioned way—download 15 .dmg files, mount them, drag the applications to the Applications folder, eject them, delete the .dmg files—Homebrew’s simplicity and speed are a true godsend. This Ansible playbook has so far automated that process completely, so you don’t even have to run the Homebrew commands manually! The geerlingguy.homebrew role uses Ansible’s built-in homebrew module to manage package installation, along with some custom tasks to manage cask applications.
Configuring Mac OS X through dotfiles
Just like there’s a homebrew role on Ansible Galaxy, made for configuring and installing packages via Homebrew, there’s a dotfiles role you can use to download and configure your local dotfiles.
In this example, we’ll use the author’s dotfiles, but you can tell the role to use whatever set of dotfiles you want.
Add another role to the roles list:
 9   roles:
10     - geerlingguy.homebrew
11     - geerlingguy.dotfiles
Then, add the following three variables to your vars/main.yml file:
2 dotfiles_repo: https://github.com/geerlingguy/dotfiles.git
3 dotfiles_repo_local_destination: ~/repositories/dotfiles
4 dotfiles_files:
5   - .bash_profile
6   - .gitignore
7   - .inputrc
8   - .osx
9   - .vimrc
The first variable gives the git repository URL for the dotfiles to be cloned. The second gives a local path for the repository to be stored, and the final variable tells the role which dotfiles it should use from the specified repository.
The dotfiles role clones the specified dotfiles repository locally, then symlinks every one of the dotfiles specified in dotfiles_files into your home folder (removing any existing dotfiles of the same name).
If you want to run the .osx dotfile, which adjusts many system and application settings, add in a new task under the tasks section in the main playbook:
13   tasks:
14     - name: Run .osx dotfiles.
15       shell: ~/.osx --no-restart
16       changed_when: false
In this case, the .osx dotfile allows a --no-restart flag to be passed to prevent the script from restarting certain apps and services including Terminal—which is good, since you’d likely be running the playbook from within Terminal.
At this point, you already have the majority of your local environment set up. Copying additional settings and tweaking things further is an exercise in adjusting your dotfiles or including another playbook that copies or links preference files into the right places.
I’m constantly tweaking my own development workstation, and for the most part, all my configuration is wrapped up in my Mac Development Ansible Playbook, available on GitHub. I’d encourage you to fork that project, as well as my dotfiles, if you’d like to get started automating the build of your own development workstation. Even if you don’t use a Mac, most of the structure is similar; just substitute a different package manager, and start automating!
Summary
Ansible is the best way to automate infrastructure provisioning and configuration. Ansible can also be used to configure your own workstation, saving you the time and frustration it takes to do so yourself. Unfortunately, you can’t yet provision yourself a new top-of-the-line workstation with Ansible!
You can find the full playbook I’m currently using to configure my Macs on GitHub: Mac Development Ansible Playbook.