Chapter 4 - Ansible Playbooks
Power plays
Like many other configuration management solutions, Ansible uses a metaphor to describe its configuration files. They are called ‘playbooks’, and they list sets of tasks (‘plays’ in Ansible parlance) that will be run against a particular server or set of servers. In American football, a team follows a set of pre-written playbooks as the basis for a bunch of plays they execute to try to win a game. In Ansible, you write playbooks (a list of instructions describing the steps to bring your server to a certain configuration state) that are then played on your servers.
Playbooks are written in YAML, a simple human-readable syntax popular for defining configuration. Playbooks may be included within other playbooks, and certain metadata and options cause different plays or playbooks to be run in different scenarios on different servers.
Ad-hoc commands alone make Ansible a powerful tool; playbooks turn Ansible into a top-notch server provisioning and configuration management tool.
What attracts most DevOps personnel to Ansible is the fact that it is easy to convert shell scripts (or one-off shell commands) directly into Ansible plays. Consider the following script, which installs Apache on a RHEL/CentOS server:
Shell Script
1 # Install Apache.
2 yum install --quiet -y httpd httpd-devel
3 # Copy configuration files.
4 cp httpd.conf /etc/httpd/conf/httpd.conf
5 cp httpd-vhosts.conf /etc/httpd/conf/httpd-vhosts.conf
6 # Start Apache and configure it to run at boot.
7 service httpd start
8 chkconfig httpd on
To run the shell script (in this case, a file named shell-script.sh with the contents as above), you would call it directly from the command line:
Ansible Playbook
 1 ---
 2 - hosts: all
 3
 4   tasks:
 5     - name: Install Apache.
 6       command: yum install --quiet -y httpd httpd-devel
 7     - name: Copy configuration files.
 8       command: >
 9         cp httpd.conf /etc/httpd/conf/httpd.conf
10     - command: >
11         cp httpd-vhosts.conf /etc/httpd/conf/httpd-vhosts.conf
12     - name: Start Apache and configure it to run at boot.
13       command: service httpd start
14     - command: chkconfig httpd on
To run the Ansible Playbook (in this case, a file named playbook.yml with the contents as above), you would call it using the ansible-playbook command:
Ansible is powerful in that you quickly transition to using playbooks if you know how to write standard shell commands—the same commands you’ve been using for years—and then as you get time, rebuild your configuration to take advantage of Ansible’s helpful features.
In the above playbook, we use Ansible’s command module to run standard shell commands. We’re also giving each task a ‘name’, so when we run the playbook, the task has human-readable output on the screen or in the logs. The command module has some other tricks up its sleeve (which we’ll see later), but for now, be assured shell scripts are translated directly into Ansible playbooks without much hassle.
The above playbook will perform exactly like the shell script, but you can improve things greatly by using some of Ansible’s built-in modules to handle the heavy lifting:
Revised Ansible Playbook - Now with idempotence!
 1 ---
 2 - hosts: all
 3   become: yes
 4
 5   tasks:
 6     - name: Install Apache.
 7       yum:
 8         name:
 9           - httpd
10           - httpd-devel
11         state: present
12
13     - name: Copy configuration files.
14       copy:
15         src: "{{ item.src }}"
16         dest: "{{ item.dest }}"
17         owner: root
18         group: root
19         mode: 0644
20       with_items:
21         - src: httpd.conf
22           dest: /etc/httpd/conf/httpd.conf
23         - src: httpd-vhosts.conf
24           dest: /etc/httpd/conf/httpd-vhosts.conf
25
26     - name: Make sure Apache is started now and at boot.
27       service:
28         name: httpd
29         state: started
30         enabled: yes
Now we’re getting somewhere. Let me walk you through this simple playbook:
- The first line,
---, is how we mark this document as using YAML syntax (like using<html>at the top of an HTML document, or<?phpat the top of a block of PHP code). - The second line,
- hosts: alldefines the first (and in this case, only) play, and tells Ansible to run the play onallhosts that it knows about. - The third line,
become: yestells Ansible to run all the commands throughsudo, so the commands will be run as the root user. - The fifth line,
tasks:, tells Ansible that what follows is a list of tasks to run as part of this play. - The first task begins with
name: Install Apache..nameis not a module that does something to your server; rather, it’s a way of giving a human-readable description to the task that follows. Seeing “Install Apache” is more relevant than seeing “yum name=httpd state=present”… but if you drop the name line completely, that won’t cause any problem.- We use the
yummodule to install Apache. Instead of the commandyum -y install httpd httpd-devel, we can describe to Ansible exactly what we want. Ansible will take the list of packages we provide. We tell yum to make sure the packages are installed withstate: present, but we could also usestate: latestto ensure the latest version is installed, orstate: absentto make sure the packages are not installed.
- We use the
- The second task again starts with a human-readable name (which could be left out if you’d like).
- We use the
copymodule to copy files from a source (on our local workstation) to a destination (the server being managed). We could also pass in more variables, like file metadata including ownership and permissions (owner,group, andmode). - Ansible allows lists of variables to be passed into tasks using
with_items: Define a list of items and each one will be passed into the play, referenced using theitemvariable (e.g.{{ item }}). - In this case, we are using a list of items containing dicts (dictionaries) used for variable substitution; to define each element in a list of dicts with each list item in the format:
-var1:valuevar2:valueThe list can have as many variables as you want, even deeply-nested dicts. When you reference the variables in the play, you use a dot to access the variable within the item, so
{{ item.var1 }}would access the first variable. In our example,item.srcaccesses thesrcin each item.
- We use the
- The third task also uses a name to describe it in a human-readable format.
- We use the
servicemodule to describe the desired state of a particular service, in this casehttpd, Apache’s http daemon. We want it to be running, so we setstate: started, and we want it to run at system startup, so we sayenabled: yes(the equivalent of runningchkconfig httpd on).
- We use the
With this playbook format, Ansible can keep track of the state of everything on all our servers. If you run the playbook the first time, it will provision the server by ensuring Apache is installed and running, and your custom configuration is in place.
Even better, the second time you run it (if the server is in the correct state), it won’t actually do anything besides tell you nothing has changed. So, with this one short playbook, you’re able to provision and ensure the proper configuration for an Apache web server. Additionally, running the playbook with the --check option (see the next section below) verifies the configuration matches what’s defined in the playbook, without actually running the tasks on the server.
If you ever want to update your configuration, or install another httpd package, either update the configuration file locally or add a package to the name list for yum and run the playbook again. Whether you have one or a thousand servers, all of their configurations will be updated to match your playbook—and Ansible will tell you if anything ever changes (you’re not making ad-hoc changes on individual production servers, are you?).
Running Playbooks with ansible-playbook
If we run the playbooks in the examples above (which are set to run on all hosts), then the playbook would be run against every host defined in your Ansible inventory file (see Chapter 1’s basic inventory file example).
Limiting playbooks to particular hosts and groups
You can limit a playbook to specific groups or individual hosts by changing the hosts: definition. The value can be set to all hosts, a group of hosts defined in your inventory, multiple groups of hosts (e.g. webservers,dbservers), individual hosts (e.g. atl.example.com), or a mixture of hosts. You can even do wild card matches, like *.example.com, to match all subdomains of a top-level domain.
You can also limit the hosts on which the playbook is run via the ansible-playbook command:
In this case (assuming your inventory file contains a webservers group), even if the playbook is set to hosts: all, or includes hosts in addition to what’s defined in the webservers group, it will only be run on the hosts defined in webservers.
You could also limit the playbook to one particular host:
If you want to see a list of hosts that would be affected by your playbook before you actually run it, use --list-hosts:
Running this should give output like:
(Where count is the count of servers defined in your inventory, and following is a list of all the hosts defined in your inventory).
Setting user and sudo options with ansible-playbook
If no remote_user is defined alongside the hosts in a playbook, Ansible assumes you’ll connect as the user defined in your inventory file for a particular host, and then will fall back to your local user account name. You can explicitly define a remote user to use for remote plays using the --user (-u) option:
In some situations, you will need to pass along your sudo password to the remote server to perform commands via sudo. In these situations, you’ll need use the --ask-become-pass (-K) option. You can also explicitly force all tasks in a playbook to use sudo with --become (-b). Finally, you can define the sudo user for tasks run via sudo (the default is root) with the --become-user option.
For example, the following command will run our example playbook with sudo, performing the tasks as the sudo user janedoe, and Ansible will prompt you for the sudo password:
If you’re not using key-based authentication to connect to your servers (read my warning about the security implications of doing so in Chapter 1), you can use --ask-pass.
Other options for ansible-playbook
The ansible-playbook command also allows for some other common options:
-
--inventory=PATH(-i PATH): Define a custom inventory file (default is the default Ansible inventory file, usually located at/etc/ansible/hosts). -
--verbose(-v): Verbose mode (show all output, including output from successful options). You can pass in-vvvvto give every minute detail. -
--extra-vars=VARS(-e VARS): Define variables to be used in the playbook, in"key=value,key=value"format. -
--forks=NUM(-f NUM): Number for forks (integer). Set this to a number higher than 5 to increase the number of servers on which Ansible will run tasks concurrently. -
--connection=TYPE(-c TYPE): The type of connection which will be used (this defaults tossh; you might sometimes want to uselocalto run a playbook on your local machine, or on a remote server via cron). -
--check: Run the playbook in Check Mode (‘Dry Run’); all tasks defined in the playbook will be checked against all hosts, but none will actually be run.
There are some other options and configuration variables that are important to get the most out of ansible-playbook, but this should be enough to get you started running the playbooks in this chapter on your own servers or virtual machines.
Real-world playbook: CentOS Node.js app server
The first example, while being helpful for someone who might want to post a simple static web page to a clunky old Apache server, is not a good representation of a real-world scenario. I’m going to run through more complex playbooks that do many different things, most of which are actually being used to manage production infrastructure today.
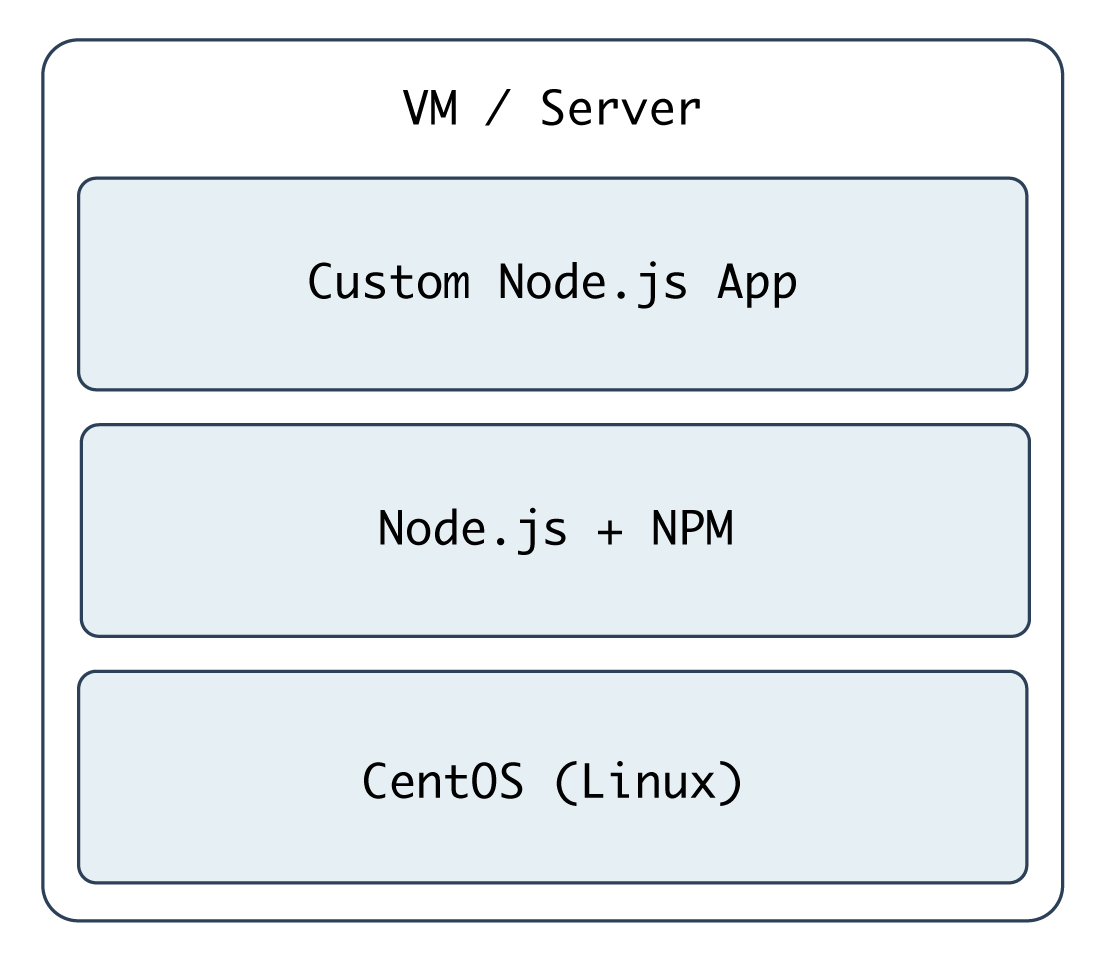
The first playbook will configure a CentOS server with Node.js, and install and start a simple Node.js application. The server will have a very simple architecture:
To start things off, we need to create a YAML file (playbook.yml in this example) to contain our playbook. Let’s keep things simple:
1 ---
2 - hosts: all
3   become: yes
4
5   vars:
6     node_apps_location: /usr/local/opt/node
7
8   tasks:
First, define a set of hosts (all) on which this playbook will be run (see the section above about limiting the playbook to particular groups and hosts), then tell Ansible to run the playbook with root privileges (since we need to install and configure system packages).
Next, we can define vars (playbook variables) directly in the playbook; in this case, we are adding the node_apps_location variable so we can use that to identify where our Node.js apps will be located.
Finally, the playbook will need to do something on the hosts, so we add a tasks section which we’ll fill in soon.
Add extra repositories
Adding extra package repositories (yum or apt) is one thing many admins will do before any other work on a server to ensure that certain packages are available, or are at a later version than the ones in the base installation.
In the shell script below, we want to add both the EPEL and Remi repositories, so we can get some packages like Node.js or later versions of other necessary software (these examples presume you’re running RHEL/CentOS 7.x as the root user):
 1 # Install EPEL repo.
 2 yum install -y epel-release
 3
 4 # Import Remi GPG key.
 5 wget https://rpms.remirepo.net/RPM-GPG-KEY-remi \
 6   -O /etc/pki/rpm-gpg/RPM-GPG-KEY-remi
 7 rpm --import /etc/pki/rpm-gpg/RPM-GPG-KEY-remi
 8
 9 # Install Remi repo.
10 rpm -Uvh --quiet \
11   https://rpms.remirepo.net/enterprise/remi-release-7.rpm
12
13 # Install Node.js (npm plus all its dependencies).
14 yum --enablerepo=epel -y install npm
This shell script uses the rpm command to install the EPEL repository, import the Remi repository GPG keys, add the Remi repository, and finally install Node.js. It works okay for a simple deployment (or by hand), but it’s silly to run all these commands (some of which could take time or stop your script entirely if your connection is flaky or bad) if the result has already been achieved (namely, two repositories and their GPG keys have been added).
Ansible makes things a little more robust. Even though the following is slightly more verbose, it performs the same actions in a more structured way, which is simpler to understand, and works with variables and other nifty Ansible features we’ll discuss later:
 9     - name: Install EPEL repo.
10       yum: name=epel-release state=present
11
12     - name: Import Remi GPG key.
13       rpm_key:
14         key: "https://rpms.remirepo.net/RPM-GPG-KEY-remi"
15         state: present
16
17     - name: Install Remi repo.
18       yum:
19         name: "https://rpms.remirepo.net/enterprise/remi-release-7.rpm"
20         state: present
21
22     - name: Ensure firewalld is stopped (since this is for testing).
23       service: name=firewalld state=stopped
24
25     - name: Install Node.js and npm.
26       yum: name=npm state=present enablerepo=epel
27
28     - name: Install Forever (to run our Node.js app).
29       npm: name=forever global=yes state=present
Let’s walk through this playbook step-by-step:
-
yuminstalls the EPEL repository (and automatically imports its GPG key). -
rpm_keyis a very simple Ansible module that takes and imports an RPM key from a URL or file, or the key id of a key that is already present, and ensures the key is either present or absent (thestateparameter). We’re importing one key, for Remi’s repository. - We can install extra yum repositories using the
yummodule. Just pass in the URL to the repo.rpmfile, and Ansible will take care of the rest. - Since this server is being used only for test purposes, we disable the system firewall so it won’t interfere with testing (using the
servicemodule). -
yuminstalls Node.js (along with all the required packages fornpm, Node’s package manager) if it’s not present, and allows the EPEL repo to be searched via theenablerepoparameter (you could also explicitly disable a repository usingdisablerepo). - Since NPM is now installed, we use Ansible’s
npmmodule to install a Node.js utility,forever, to launch our app and keep it running. Settingglobaltoyestells NPM to install theforevernode module in/usr/lib/node_modules/so it will be available to all users and Node.js apps on the system.
We’re beginning to have a nice little Node.js app server set up. Let’s set up a little Node.js app that responds to HTTP requests on port 80.
Deploy a Node.js app
The next step is to install a simple Node.js app on our server. First, we’ll create a really simple Node.js app by creating a new folder, app, in the same folder as your playbook.yml. Create a new file, app.js, in this folder, with the following contents:
 1 // Load the express module.
 2 var express = require('express');
 3 var app = express();
 4
 5 // Respond to requests for / with 'Hello World'.
 6 app.get('/', function(req, res){
 7     res.send('Hello World!');
 8 });
 9
10 // Listen on port 80 (like a true web server).
11 app.listen(80);
12 console.log('Express server started successfully.');
Don’t worry about the syntax or the fact that this is Node.js. We just need a quick example to deploy. This example could’ve been written in Python, Perl, Java, PHP, or another language, but since Node is a simple language (JavaScript) that runs in a lightweight environment, it’s an easy language to use when testing things or prodding your server.
Since this little app is dependent on Express (an http framework for Node), we also need to tell NPM about this dependency via a package.json file in the same folder as app.js:
1 {
2   "name": "examplenodeapp",
3   "description": "Example Express Node.js app.",
4   "author": "Jeff Geerling <geerlingguy@mac.com>",
5   "dependencies": {
6     "express": "4.x"
7   },
8   "engine": "node >= 0.10.6"
9 }
We need to copy the entire app to the server, and then have NPM download the required dependencies (in this case, express), so add these tasks to your playbook:
31     - name: Ensure Node.js app folder exists.
32       file: "path={{ node_apps_location }} state=directory"
33
34     - name: Copy example Node.js app to server.
35       copy: "src=app dest={{ node_apps_location }}"
36
37     - name: Install app dependencies defined in package.json.
38       npm: path={{ node_apps_location }}/app
First, we ensure the directory where our app will be installed exists, using the file module.
Second, we copy the entire app folder up to the server, using Ansible’s copy command, which intelligently distinguishes between a single file or a directory of files, and recurses through the directory, similar to recursive scp or rsync.
Third, we use npm again, this time, with no extra arguments besides the path to the app. This tells NPM to parse the package.json file and ensure all the dependencies are present.
We’re almost finished! The last step is to start the app.
Launch a Node.js app
We’ll now use forever (which we installed earlier) to start the app.
41     - name: Check list of running Node.js apps.
42       command: forever list
43       register: forever_list
44       changed_when: false
45
46     - name: Start example Node.js app.
47       command: "forever start {{ node_apps_location }}/app/app.js"
48       when: "forever_list.stdout.find(node_apps_location + \
49 '/app/app.js') == -1"
In the first play, we’re doing two new things:
-
registercreates a new variable,forever_list, to be used in the next play to determine when to run the play.registerstashes the output (stdout, stderr) of the defined command in the variable name passed to it. -
changed_whentells Ansible explicitly when this play results in a change to the server. In this case, we know theforever listcommand will never change the server, so we just sayfalse—the server will never be changed when the command is run.
The second play actually starts the app, using Forever. We could also start the app by calling node {{ node_apps_location }}/app/app.js, but we would not be able to control the process easily, and we would also need to use nohup and & to avoid Ansible hanging on this play.
Forever tracks the Node apps it manages, and we use Forever’s list option to print a list of running apps. The first time we run this playbook, the list will obviously be empty—but on future runs, if the app is running, we don’t want to start another instance of it. To avoid that situation, we tell Ansible when we want to start the app with when. Specifically, we tell Ansible to start the app only when the app’s path is not in the forever list output.
Node.js app server summary
At this point, you have a complete playbook that will install a simple Node.js app which responds to HTTP requests on port 80 with “Hello World!”.
To run the playbook on a server (in our case, we could just set up a new VirtualBox VM for testing, either via Vagrant or manually), use the following command (pass in the node_apps_location variable via the command):
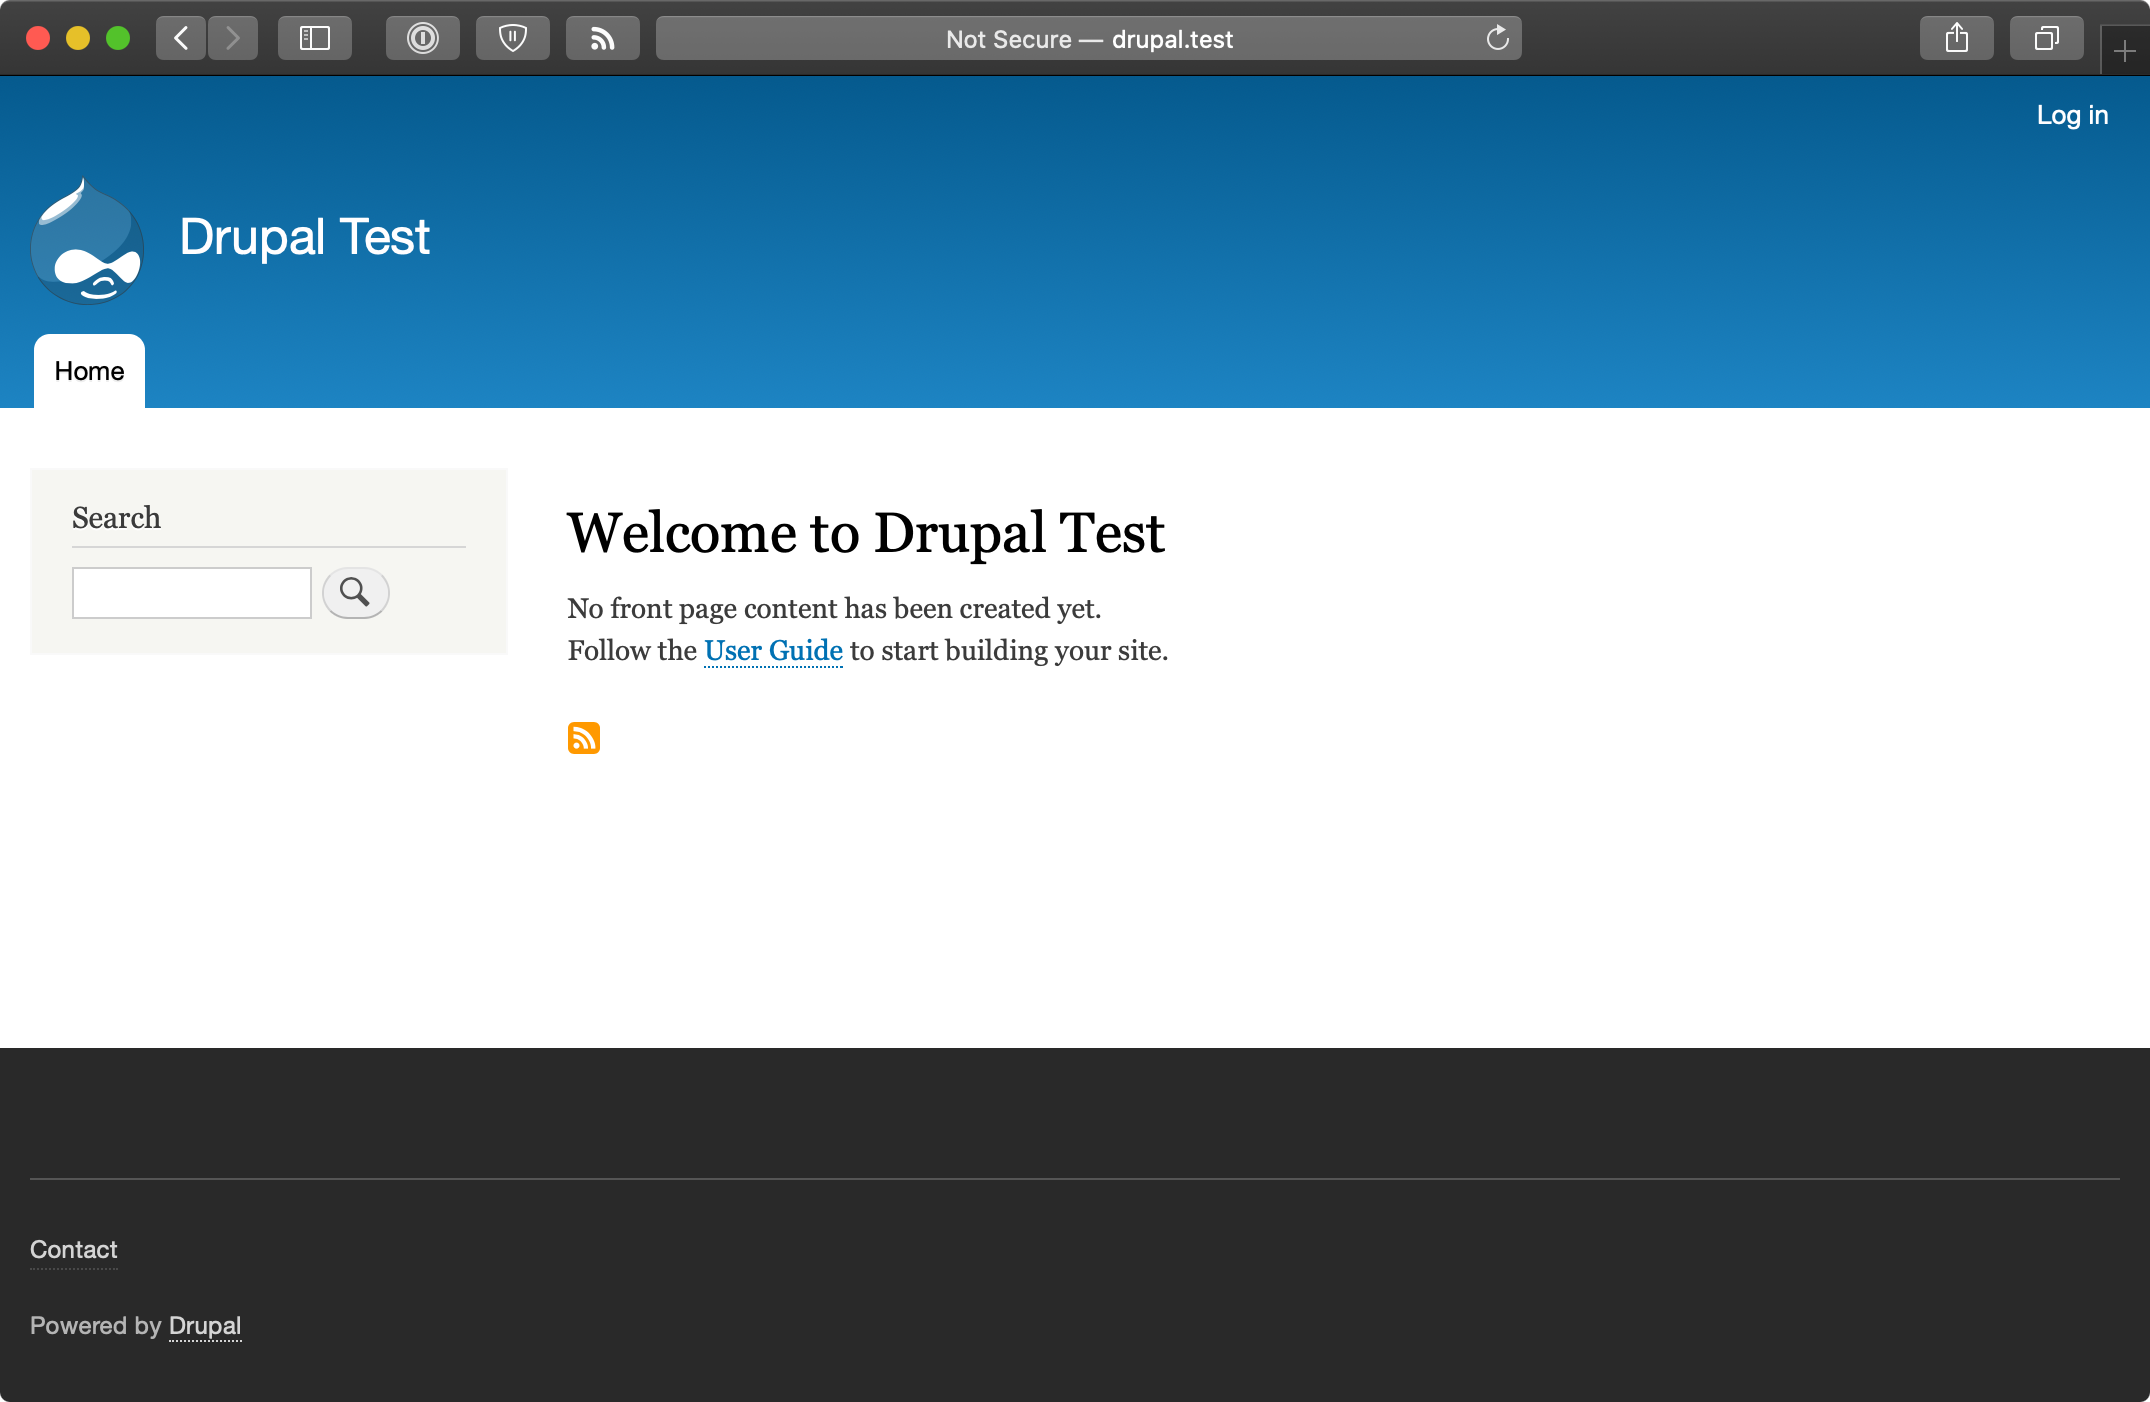
Once the playbook has finished configuring the server and deploying your app, visit http://hostname/ in a browser (or use curl or wget to request the site), and you should see the following:

Simple, but very powerful. We’ve configured an entire Node.js application server In fewer than fifty lines of YAML!
Real-world playbook: Ubuntu LAMP server with Drupal
At this point, you should be getting comfortable with Ansible playbooks and the YAML syntax used to define them. Up to this point, most examples have assumed you’re working with a CentOS, RHEL, or Fedora server. Ansible plays nicely with other flavors of Linux and BSD-like systems as well. In the following example, we’re going to set up a traditional LAMP (Linux, Apache, MySQL, and PHP) server using Ubuntu to run a Drupal website.

Include a variables file, and discover pre_tasks and handlers
To make our playbook more efficient and readable, let’s begin the playbook (named playbook.yml) by instructing Ansible to load in variables from a separate vars.yml file:
1 ---
2 - hosts: all
3   become: yes
4
5   vars_files:
6     - vars.yml
Using one or more included variable files cleans up your main playbook file, and lets you organize all your configurable variables in one place. At the moment, we don’t have any variables to add; we’ll define the contents of vars.yml later. For now, create the empty file, and continue on to the next section of the playbook, pre_tasks:
 8   pre_tasks:
 9     - name: Update apt cache if needed.
10       apt: update_cache=yes cache_valid_time=3600
Ansible lets you run tasks before or after the main tasks (defined in tasks:) or roles (defined in roles:—we’ll get to roles later) using pre_tasks and post_tasks, respectively. In this case, we need to ensure that our apt cache is updated before running the rest of the playbook, so we have the latest package versions on our server. We use Ansible’s apt module and tell it to update the cache if it’s been more than 3600 seconds (1 hour) since the last update.
With that out of the way, we’ll add another new section to our playbook, handlers:
12   handlers:
13     - name: restart apache
14       service: name=apache2 state=restarted
handlers are special kinds of tasks you run at the end of a play by adding the notify option to any of the tasks in that group. The handler will only be called if one of the tasks notifying the handler makes a change to the server (and doesn’t fail), and it will only be notified at the end of the play.
To call this handler from a task, add the option notify: restart apache to any task in the play. We’ve defined this handler so we can restart the apache2 service after a configuration change, which will be explained below.
Basic LAMP server setup
The first step towards building an application server that depends on the LAMP stack is to build the actual LAMP part of it. This is the simplest process, but still requires a little extra work for our particular server. We want to install Apache, MySQL and PHP, but we’ll also need a couple other dependencies.
16   tasks:
17     - name: Get software for apt repository management.
18       apt:
19         state: present
20         name:
21           - python3-apt
22           - python3-pycurl
23
24     - name: Add ondrej repository for later versions of PHP.
25       apt_repository: repo='ppa:ondrej/php' update_cache=yes
26
27     - name: "Install Apache, MySQL, PHP, and other dependencies."
28       apt:
29         state: present
30         name:
31           - acl
32           - git
33           - curl
34           - unzip
35           - sendmail
36           - apache2
37           - php7.4-common
38           - php7.4-cli
39           - php7.4-dev
40           - php7.4-gd
41           - php7.4-curl
42           - php7.4-json
43           - php7.4-opcache
44           - php7.4-xml
45           - php7.4-mbstring
46           - php7.4-pdo
47           - php7.4-mysql
48           - php-apcu
49           - libpcre3-dev
50           - libapache2-mod-php7.4
51           - python3-mysqldb
52           - mysql-server
53
54     - name: Disable the firewall (since this is for local dev only).
55       service: name=ufw state=stopped
56
57     - name: "Start Apache, MySQL, and PHP."
58       service: "name={{ item }} state=started enabled=yes"
59       with_items:
60         - apache2
61         - mysql
In this playbook, we begin with a common LAMP setup:
- Install a couple helper libraries which allow Python to manage apt more precisely (
python3-aptandpython3-pycurlare required for theapt_repositorymodule to do its work). - Install an extra
aptPPA that will allow installation of a later version of PHP than is available in the default system repositories. - Install all the required packages for our LAMP server (including all the PHP extensions Drupal requires).
- Disable the firewall entirely, for testing purposes. If on a production server or any server exposed to the Internet, you should instead have a restrictive firewall only allowing access on ports 22, 80, 443, and other necessary ports.
- Start up all the required services, and make sure they’re enabled to start on system boot.
Configure Apache
The next step is configuring Apache so it will work correctly with Drupal. Out of the box, Apache may not have mod_rewrite enabled. To remedy that situation, you could use the command sudo a2enmod rewrite, but Ansible has a handy apache2_module module that will do the same thing with idempotence.
We also need to add a VirtualHost entry to give Apache the site’s document root and provide other options for the site.
63     - name: Enable Apache rewrite module (required for Drupal).
64       apache2_module: name=rewrite state=present
65       notify: restart apache
66
67     - name: Add Apache virtualhost for Drupal.
68       template:
69         src: "templates/drupal.test.conf.j2"
70         dest: "/etc/apache2/sites-available/{{ domain }}.test.conf"
71         owner: root
72         group: root
73         mode: 0644
74       notify: restart apache
75
76     - name: Enable the Drupal site.
77       command: >
78         a2ensite {{ domain }}.test
79         creates=/etc/apache2/sites-enabled/{{ domain }}.test.conf
80       notify: restart apache
81
82     - name: Disable the default site.
83       command: >
84         a2dissite 000-default
85         removes=/etc/apache2/sites-enabled/000-default.conf
86       notify: restart apache
The first command enables all the required Apache modules by symlinking them from /etc/apache2/mods-available to /etc/apache2/mods-enabled.
The second command copies a Jinja template we define inside a templates folder to Apache’s sites-available folder, with the correct owner and permissions. Additionally, we notify the restart apache handler, because copying in a new VirtualHost means Apache needs to be restarted to pick up the change.
Let’s look at our Jinja template (denoted by the extra .j2 on the end of the filename), drupal.test.conf.j2:
 1 <VirtualHost *:80>
 2     ServerAdmin webmaster@localhost
 3     ServerName {{ domain }}.test
 4     ServerAlias www.{{ domain }}.test
 5     DocumentRoot {{ drupal_core_path }}/web
 6     <Directory "{{ drupal_core_path }}/web">
 7         Options FollowSymLinks Indexes
 8         AllowOverride All
 9     </Directory>
10 </VirtualHost>
This is a fairly standard Apache VirtualHost definition, but we have a few Jinja template variables mixed in. The syntax for printing a variable in a Jinja template is the same syntax we use in our Ansible playbooks—two brackets around the variable’s name (like so: {{ variable }}).
There are two variables we will need (drupal_core_path and domain), so add them to the empty vars.yml file we created earlier:
1 ---
2 # The path where Drupal will be downloaded and installed.
3 drupal_core_path: "/var/www/drupal"
4
5 # The resulting domain will be [domain].test (with .test appended).
6 domain: "drupal"
Now, when Ansible reaches the play that copies this template into place, the Jinja template will have the variable names replaced with the values /var/www/drupal and drupal (or whatever values you’d like!).
The last two tasks (lines 76-86) enable the VirtualHost we just added, and remove the default VirtualHost definition, which we no longer need.
At this point, you could start the server, but Apache will likely throw an error since the VirtualHost you’ve defined doesn’t exist (there’s no directory at {{ drupal_core_path }}/web yet!). This is why using notify is important—instead of adding a task after these three steps to restart Apache (which will fail the first time you run the playbook), notify will wait until after we’ve finished all the other steps in our main group of tasks (giving us time to finish setting up the server), then restart Apache.
Configure PHP with lineinfile
We briefly mentioned lineinfile earlier in the book, when discussing file management and ad-hoc task execution. Modifying PHP’s configuration is a perfect way to demonstrate lineinfile’s simplicity and usefulness:
88     - name: Adjust OpCache memory setting.
89       lineinfile:
90         dest: "/etc/php/7.4/apache2/conf.d/10-opcache.ini"
91         regexp: "^opcache.memory_consumption"
92         line: "opcache.memory_consumption = 96"
93         state: present
94       notify: restart apache
Ansible’s lineinfile module does a simple task: ensures that a particular line of text exists (or doesn’t exist) in a file.
In this example, we need to adjust PHP’s default opcache.memory_consumption option so the Drupal codebase can be compiled into PHP’s system memory for much faster page load times.
First, we tell lineinfile the location of the file, in the dest parameter. Then, we give a regular expression (Python-style) to define what the line looks like (in this case, the line starts with the exact phrase “opcache.memory_consumption”). Next, we tell lineinfile exactly how the resulting line should look. Finally, we explicitly state that we want this line to be present (with the state parameter).
Ansible will take the regular expression, and see if there’s a matching line. If there is, Ansible will make sure the line matches the line parameter. If not, Ansible will add the line as defined in the line parameter. Ansible will only report a change if it had to add or change the line to match line.
Configure MySQL
The next step is to create a database and user (named for the domain we specified earlier) for our Drupal installation to use.
 96     - name: Create a MySQL database for Drupal.
 97       mysql_db: "db={{ domain }} state=present"
 98
 99     - name: Create a MySQL user for Drupal.
100       mysql_user:
101         name: "{{ domain }}"
102         password: "1234"
103         priv: "{{ domain }}.*:ALL"
104         host: localhost
105         state: present
Install Composer
If we wanted, we could manually download Drupal from Drupal.org, then run the install wizard using our browser, but that’s how you’d do things before you learned to automate with Ansible!
Instead, we’re going to set up the Drupal codebase and install Drupal all via automation. Drupal uses Composer to configure its codebase and manage PHP dependencies, so the first step is installing Composer on the server.
107     - name: Download Composer installer.
108       get_url:
109         url: https://getcomposer.org/installer
110         dest: /tmp/composer-installer.php
111         mode: 0755
112
113     - name: Run Composer installer.
114       command: >
115         php composer-installer.php
116         chdir=/tmp
117         creates=/usr/local/bin/composer
118
119     - name: Move Composer into globally-accessible location.
120       command: >
121         mv /tmp/composer.phar /usr/local/bin/composer
122         creates=/usr/local/bin/composer
The first two commands download and run Composer’s php-based installer, which generates a ‘composer.phar’ PHP application archive in /tmp. This archive is then copied (using the mv shell command) to the location /usr/local/bin/composer so we can use the composer command to install all of Drush’s dependencies. The latter two commands are set to run only if the /usr/local/bin/composer file doesn’t already exist (using the creates parameter).
Create a Drupal project with Composer
Now that we have composer available, we can create a Drupal project using Composer’s create-project command. This command downloads Drupal core and all of it’s recommended dependencies to a folder on the server:
124     - name: Ensure Drupal directory exists.
125       file:
126         path: "{{ drupal_core_path }}"
127         state: directory
128         owner: www-data
129         group: www-data
130
131     - name: Check if Drupal project already exists.
132       stat:
133         path: "{{ drupal_core_path }}/composer.json"
134       register: drupal_composer_json
135
136     - name: Create Drupal project.
137       composer:
138         command: create-project
139         arguments: drupal/recommended-project "{{ drupal_core_path }}"
140         working_dir: "{{ drupal_core_path }}"
141         no_dev: true
142       become_user: www-data
143       when: not drupal_composer_json.stat.exists
First, we have to make sure the directory where Drupal will be stored exists, and is owned by the Apache user, www-data.
Next, for idempotence, we’ll check if the project already exists, by seeing if a composer.json file (which Composer creates for any new PHP project) exists in the directory.
Finally, if that file doesn’t already exist, we use Ansible’s composer module to create the Drupal project. The no_dev option tells Composer to not install any Drupal development dependencies, like testing tools that may not be helpful on a production server.
The composer task would be equivalent to running the following Composer command directly:
We used Ansible’s become_user feature in this task so it runs as the Apache user, www-data. Drupal will be accessed through Apache, and if we created the project as the default root user, some files would be inaccessible to the Apache web server, causing errors.
Install Drupal with Drush
Drupal has a command-line companion in the form of Drush. Drush is developed independently of Drupal, and provides a full suite of CLI commands to manage Drupal. Drush, like most modern PHP tools, is able to be installed via Composer, so we can add Drush to our Drupal project via Ansible’s composer module with the require command.
And once Drush is installed, we can use it to install Drupal:
145     - name: Add drush to the Drupal site with Composer.
146       composer:
147         command: require
148         arguments: drush/drush:10.*
149         working_dir: "{{ drupal_core_path }}"
150       become_user: www-data
151       when: not drupal_composer_json.stat.exists
152
153     - name: Install Drupal.
154       command: >
155         vendor/bin/drush si -y --site-name="{{ drupal_site_name }}"
156         --account-name=admin
157         --account-pass=admin
158         --db-url=mysql://{{ domain }}:1234@localhost/{{ domain }}
159         --root={{ drupal_core_path }}/web
160         chdir={{ drupal_core_path }}
161         creates={{ drupal_core_path }}/web/sites/default/settings.php
162       notify: restart apache
163       become_user: www-data
Adding the when condition to this task also means Drush is only added to the project when the project is initialized. You could remove the when and run the task every time, but composer require (unlike composer install) can take a while to complete, so it’s better to not run it after the project is initialized.
To install Drupal, we use Drush’s si command (short for site-install) to run Drupal’s installation (which configures the database (and creates a sites/default/settings.php file we can use for idempotence), runs some maintenance, and configures default settings for the site). We passed in the domain variable, and added a drupal_site_name, so add that variable to your vars.yml file:
10 # Your Drupal site name.
11 drupal_site_name: "Drupal Test"
Once the site is installed, we also restart Apache for good measure (using notify again, like we did when updating Apache’s configuration). Finally, we ran both tasks using become_user so all created files work correctly with Apache.
Drupal LAMP server summary
To run the playbook on a server (either via a local VM for testing or on another server), use the following command:
After the playbook completes, if you access the server at http://drupal.test/ (assuming you’ve pointed drupal.test to your server or VM’s IP address), you’ll see Drupal’s default home page, and you could login with ‘admin’/’admin’. (Obviously, you’d set a secure password on a production server!).
A similar server configuration, running Apache, MySQL, and PHP, can be used to run many popular web frameworks and CMSes besides Drupal, including Symfony, Wordpress, Joomla, Laravel, etc.
Real-world playbook: Ubuntu server with Solr
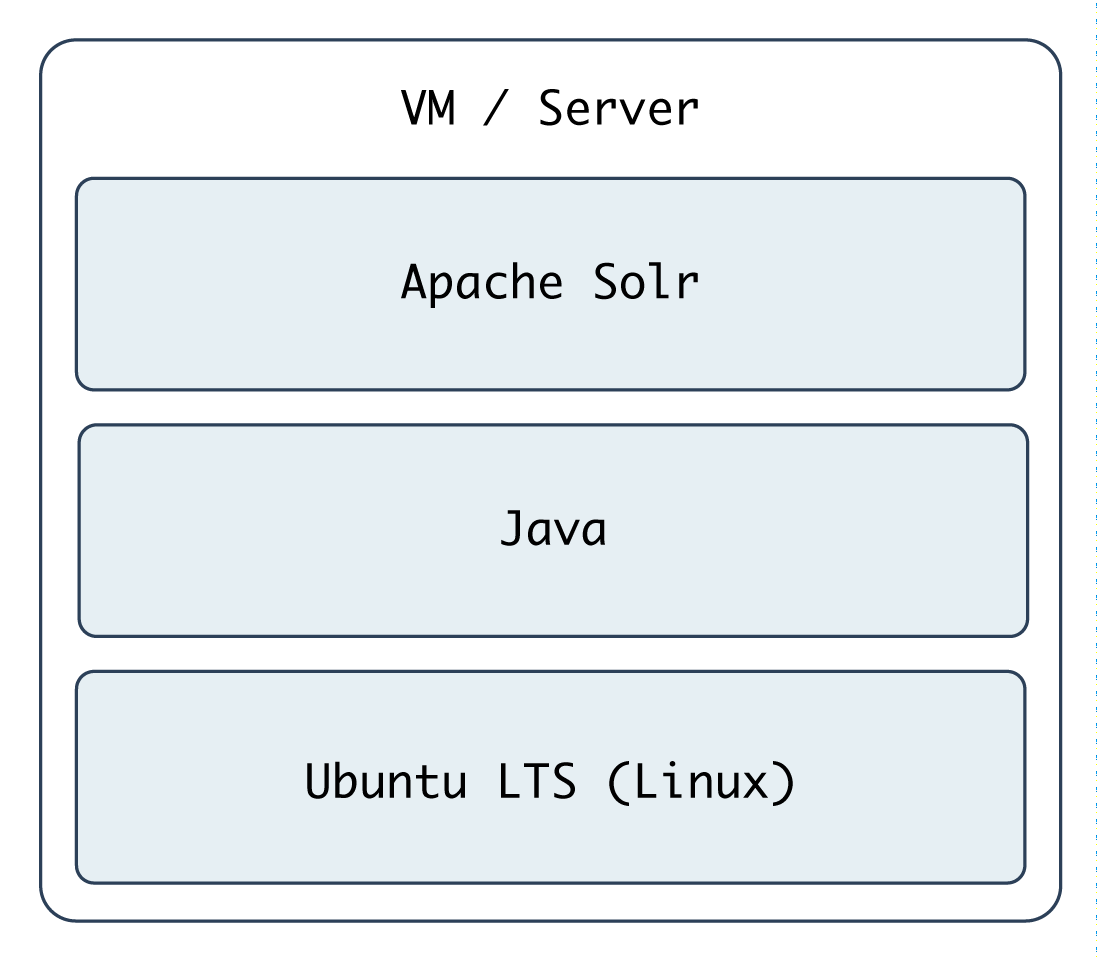
Apache Solr is a fast and scalable search server optimized for full-text search, word highlighting, faceted search, fast indexing, and more. It’s a very popular search server, and it’s pretty easy to install and configure using Ansible. In the following example, we’re going to set up Apache Solr using Ubuntu 20.04 and Java, on a server or VM with at least 512 MB of RAM.
Include a variables file, and more pre_tasks
Just like the previous LAMP server example, we’ll begin this playbook (again named playbook.yml) by telling Ansible our variables will be in a separate vars.yml file:
1 ---
2 - hosts: all
3   become: true
4
5   vars_files:
6   - vars.yml
Let’s quickly create the vars.yml file, while we’re thinking about it. Create the file in the same folder as your Solr playbook, and add the following contents:
1 ---
2 download_dir: /tmp
3 solr_dir: /opt/solr
4 solr_version: 8.6.0
5 solr_checksum: sha512:6b0d618069e37215f305d9a61a3e65be2b9cfc32a3689ea6a\
6 25be2f220b1ecc96a644ecc31c81e335a2dfa0bc8b7d0f2881ca192c36fd435cdd832fd\
7 309a9ddb
These variables define two paths we’ll use while downloading and installing Apache Solr, and the version and file download checksum for downloading Apache Solr’s source.
Back in our playbook, after the vars_files, we also need to make sure the apt cache is up to date, using pre_tasks like the previous example:
 8   pre_tasks:
 9     - name: Update apt cache if needed.
10       apt: update_cache=true cache_valid_time=3600
Install Java
It’s easy enough to install Java on Ubuntu, as it’s in the default apt repositories. We just need to make sure the right package is installed:
16   tasks:
17     - name: Install Java.
18       apt: name=openjdk-11-jdk state=present
That was easy enough! We used the apt module to install openjdk-11-jdk.
Install Apache Solr
Ubuntu’s LTS release includes a package for Apache Solr, but it installs an older version, so we’ll install the latest version of Solr from source. The first step is downloading the source:
20     - name: Download Solr.
21       get_url:
22         url: "https://archive.apache.org/dist/lucene/solr/\
23 {{ solr_version }}/solr-{{ solr_version }}.tgz"
24         dest: "{{ download_dir }}/solr-{{ solr_version }}.tgz"
25         checksum: "{{ solr_checksum }}"
When downloading files from remote servers, the get_url module provides more flexibility and convenience than raw wget or curl commands.
You have to pass get_url a url (the source of the file to be downloaded), and a dest (the location where the file will be downloaded). If you pass a directory to the dest parameter, Ansible will place the file inside, but will always re-download the file on subsequent runs of the playbook (and overwrite the existing download if it has changed). To avoid this extra overhead, we give the full path to the downloaded file.
We also use checksum, an optional parameter, for peace of mind; if you are downloading a file or archive that’s critical to the functionality and security of your application, it’s a good idea to check the file to make sure it is exactly what you’re expecting. checksum compares a hash of the data in the downloaded file to a hash that you specify (and which is provided alongside the downloads on the Apache Solr website). If the checksum doesn’t match the supplied hash, Ansible will fail and discard the freshly-downloaded (and invalid) file.
We need to expand the Solr archive so we can run the installer inside, and we can use the creates option to make this operation idempotent:
26     - name: Expand Solr.
27       unarchive:
28         src: "{{ download_dir }}/solr-{{ solr_version }}.tgz"
29         dest: "{{ download_dir }}"
30         remote_src: true
31         creates: "{{ download_dir }}/solr-{{ solr_version }}/\
32 README.txt"
Now that the source is present, run the Apache Solr installation script (provided inside the Solr archive’s bin directory) to complete Solr installation:
33     - name: Run Solr installation script.
34       command: >
35         {{ download_dir }}/solr-{{ solr_version }}/bin/install_solr_ser\
36 vice.sh
37         {{ download_dir }}/solr-{{ solr_version }}.tgz
38         -i /opt
39         -d /var/solr
40         -u solr
41         -s solr
42         -p 8983
43         creates={{ solr_dir }}/bin/solr
In this example, the options passed to the installer are hard-coded (e.g. the -p 8983 tells Apache Solr to run on port 8983), and this works fine, but if you’re going to reuse this playbook for many different types of Solr servers, you should probably configure many of these options with variables defined in vars.yml. This exercise is left to the reader.
Finally, we need a task that runs at the end of the playbook to make sure Apache Solr is started, and will start at system boot:
44     - name: Ensure solr is started and enabled on boot.
45       service: name=solr state=started enabled=yes
Run the playbook with $ ansible-playbook playbook.yml, and after a few minutes (depending on your server’s Internet connection speed), you should be able to access the Solr admin interface at http://solr.test:8983/solr (where ‘solr.test’ is your server’s hostname or IP address):

Apache Solr server summary
The configuration we used when deploying Apache Solr allows for a multi core setup, so you could add more ‘search cores’ via the admin interface (as long as the directories and core schema configuration is in place in the filesystem), and have multiple indexes for multiple websites and applications.
A playbook similar to the one above is used as part of the infrastructure for Hosted Apache Solr, a service I run which hosts Apache Solr search cores for Drupal websites.
Summary
At this point, you should be getting comfortable with Ansible’s modus operandi, the playbook. Playbooks are the heart of Ansible’s configuration management and provisioning functionality, and the same modules and similar syntax can be used with ad-hoc commands for deployments and general server management.
Now that you’re familiar with playbooks, we’ll explore more advanced concepts in building playbooks, like organization of tasks, conditionals, variables, and more. Later, we’ll explore the use of playbooks with roles to make them infinitely more flexible and to save time setting up and configuring your infrastructure.